Getting started
Quick Jobs are used in unique circumstances and some examples might include Spec Homes, Model Homes, Franchisee’s Own Home.
A standard Job is created automatically when you successfully complete a sale for a Lead. The system creates a Job automatically and retrieves all the necessary information from the Sales Folder.
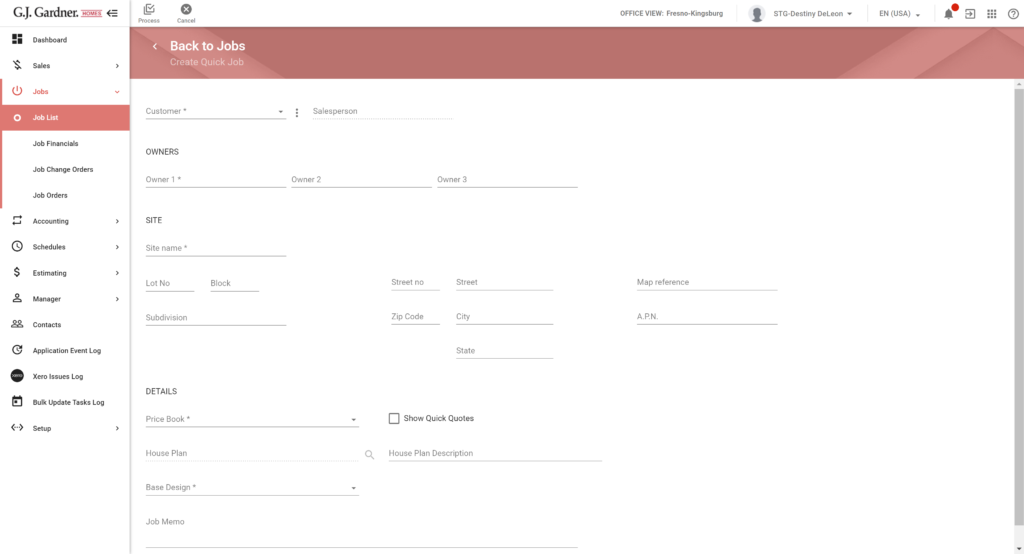
Create a Quick Job
- On the Jobs page, click Create Quick Job.
- On the Create Quick Job page, select the existing Customer. Alternatively, you can create a new contact on the fly, by clicking the
 button (next to the Customer box) and selecting Create New Contact. See the details on creating a new contact in the dedicated section.
 - Specify the owners. By default, the system uses the name of the Lead. Add the other owners if there are multiple owners.
Add site information
Specify information about the Site, as follows:
- Site name: Enter a Name for the Site which the Customer owns.
- Lot no: Enter the lot number of the Site.
- Block: Enter the block number (if applicable).
- Suburb: Enter the site subdivision (if applicable).
- Street No: Enter the street number.
- Street: Enter the name of the street where the Site is located.
- Postcode: Enter the Zip code of the Site.
- Suburb/City: Enter the city where the Site is located.
- State: Enter the state where the Site is located (US region only).
- Map reference: Optional – Add Map Number and Grid Number (for example, Map 54, G7).
- A.P.N: Enter the Assessor’s Parcel Number.
Enter job details
Specify details of the Job, as follows:
- Price book: Select the Price Book to use for the Job calculation.
- House Plan: Click the Find
 icon. In the RFQ House Plans form, select the house plan to use. Once selected, click Add Selected.
 - Base Design: Select the Base Design for the Job.
- Show Quick Quotes: If necessary, check the box to show Quick Quotes.
- House Plan Description: By default, the system generated the house plan description by combining the House Plan number and Customer name.
- Job Memo: Enter an optional memo for the Job.
When complete, click Process.
Once you have created the Job, you can proceed to its further managements, as follows:

