
- On the navigational sidebar, select Accounting.
- In the expanded section, select Make a Claim. The Make a Draw page opens, as follows:
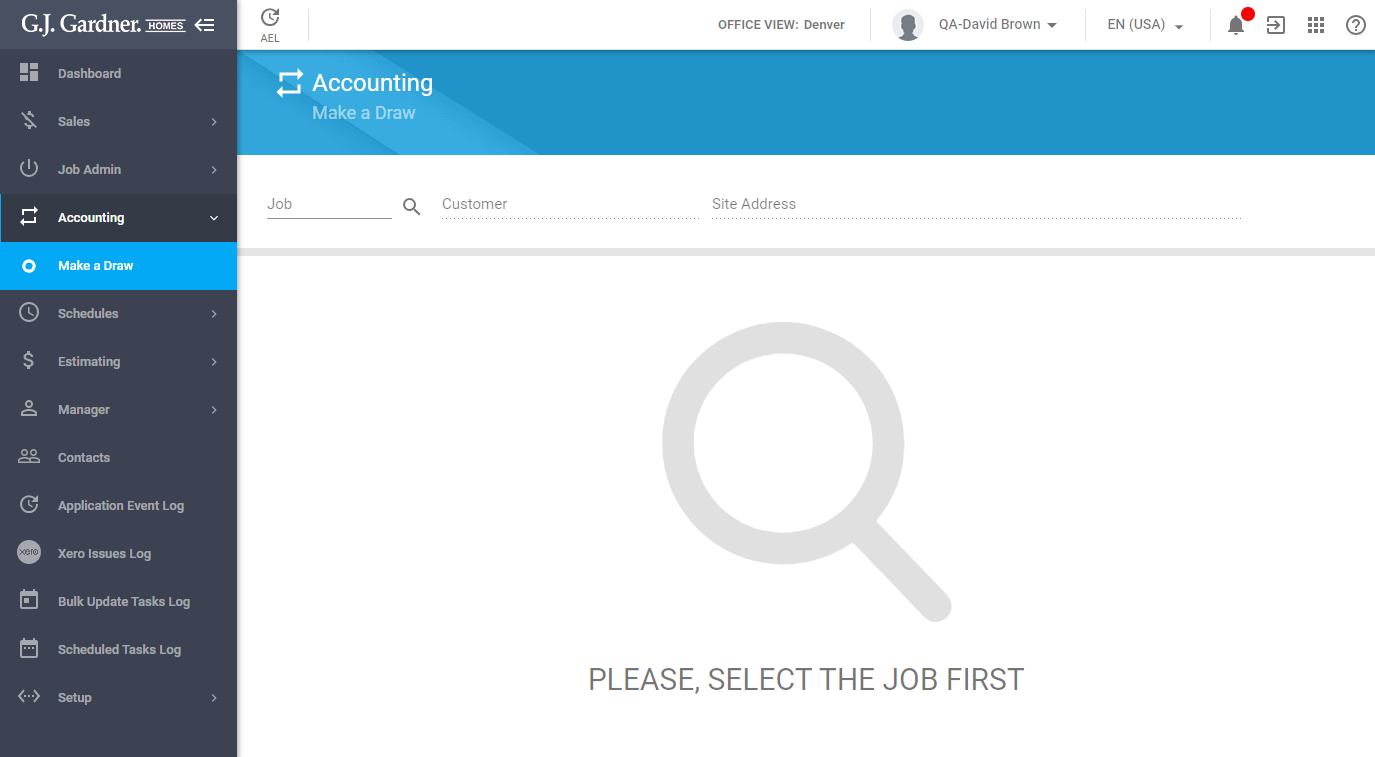
- Click the Find icon.
- In the Find Job form, select the Job that uses the Lender’s Schedule approach.
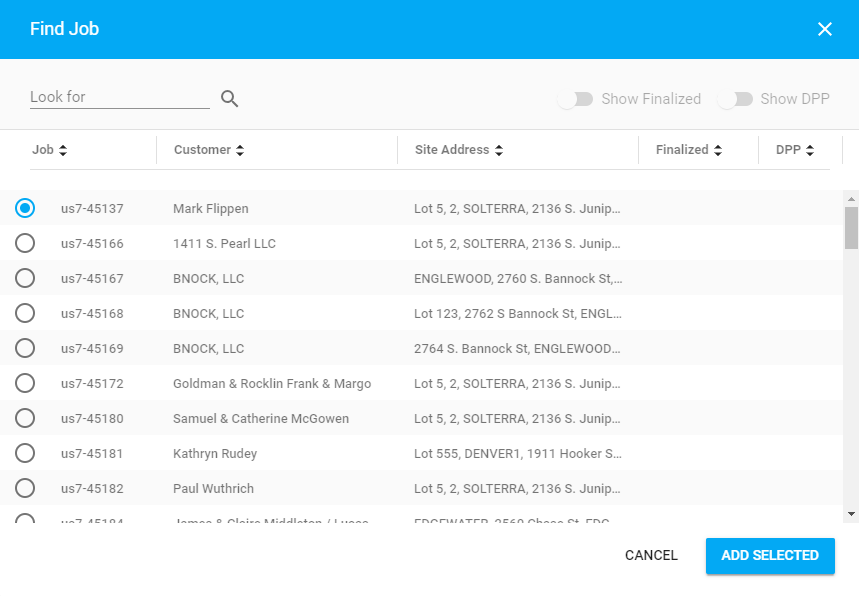
- Click Add Selected. The system will load the financial information about the selected Job, as follows:
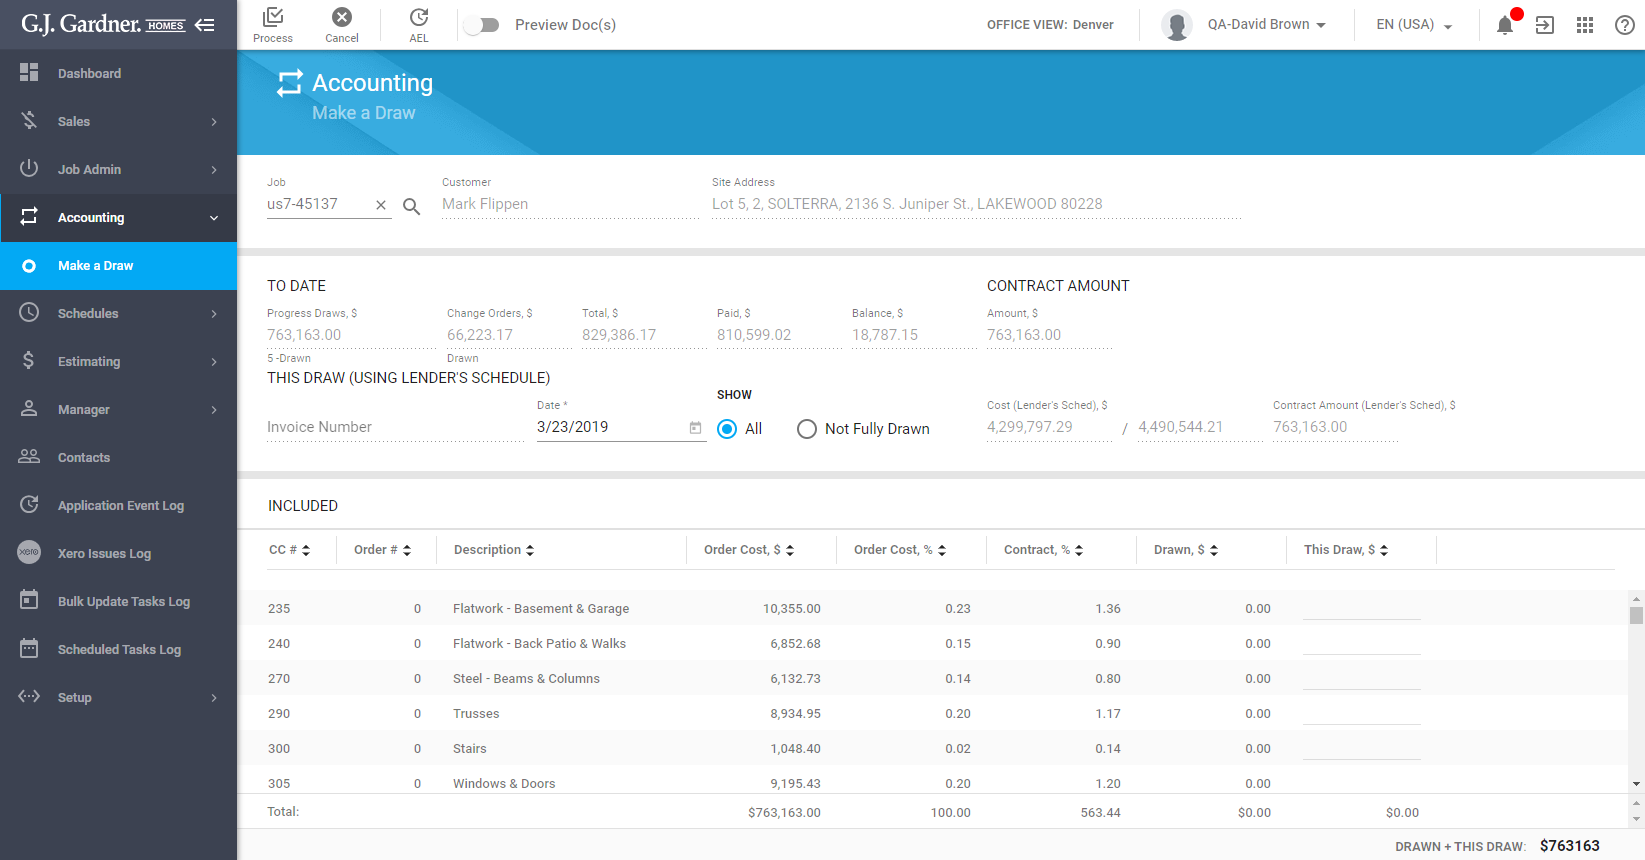
The opened page is comprised of the three blocks, as follows:
| To Date | This block shows the current draw progress as of the current date. |
| This Draw (Using Lender’s Schedule) | This block shows the total cost of the Job and the relevant information. |
| Included | This block shows the list of Cost Centers that should be drawn. |
The To Date block shows the following information:
| Progress Draws, $ | The amount of money that was already drawn as of the current date. |
| Change Orders, $ | Amount of Change Orders that was drawn as of the current date. |
| Total, $ | Total amount (contract amount and Change Orders) that was drawn as of the current date. |
| Paid, $ | Paid amount as of the current date. |
| Balance, $ | Draw balance as of the current date. The amount of money to be paid for the produced Draws. |
| Amount, $ | Contract amount that should be drawn. |
The To Date block shows the following information:
| Invoice Number | Invoice number. By default, it will be blank until you produce the invoice. The number is assigned automatically by the system. |
| Date | Pick the date for the Claim |
| Show | Use the radio buttons to show all Cost Centers or only those thwere not drawn fully. |
| Cost (Lender’s Sched.), $ | Cost of the Job according to the Lender’s Schedule (including the cost with GST tax applied). |
| Contract Amount (Lender’s Sched.), $ | Contract amount according to the Lender’s Schedule. |
The Included block shows the following information:
| CC# | The Cost Center number for the Draw. |
| Order # | The Job Order number from the Cost Center. |
| Description | Description of the Cost Center. |
| Order Cost, $ | The order cost of the Job Order from the Cost Center. |
| Order Cost, % | The ratio of the Cost Center to the cost amount. |
| Contract, % | The ratio of the Cost Center to the contract amount. |
| Drawn, $ | Amount that was already drawn for this Cost Center (if only a part of the Cost Center was drawn). |
| This Claim, $ | Amount that you want to draw this time. |
Setting the Draw Amount for Cost Centers
- Load the Job which you want to make a Draw.
- Pick the date for making a draw.
- In the Included List locate one or multiple Cost Centers which you want to make a Draw for.
- Enter the draw amount for each Cost Center in the This Draw, $ column.
- To set the exact cost of the order, click the Copy Order Cost icon.
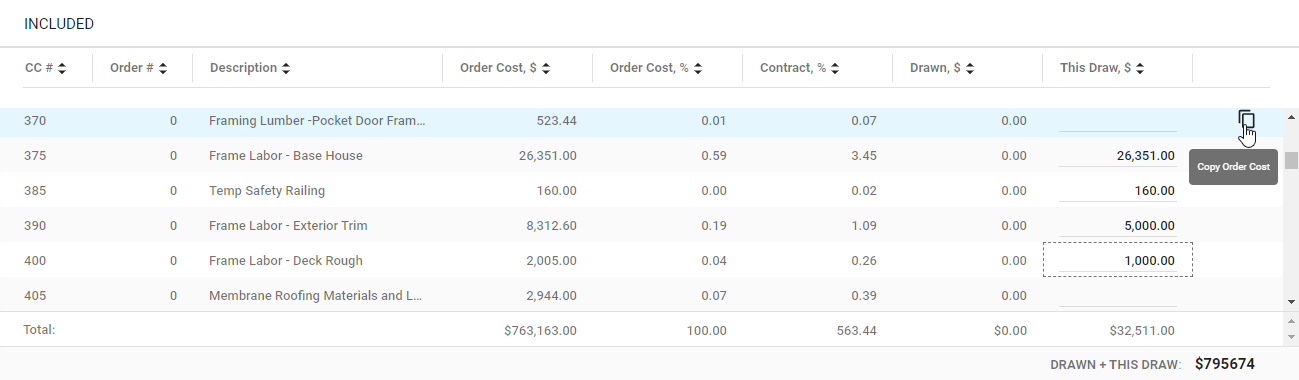
The amount (Drawn + This Draw) will be updated automatically.
Making a Draw (Lender’s Schedule)
Once you have specified the draw amount for each of the required Cost Centers, you can proceed to making a Draw for the selected Cost Centers.
- In the top part of the screen, locate the Preview Doc(s) toggle. Move it right to enable the preview of documents before their generation.
- Click Process.
The system will make a Draw and will proceed to generating documents.
After processing the Draw, the system validates the following:
- The system checks that all the required fields are populated.
- The system validated the format of specified values.
- The system checks that the Job is finalized.
- The system checks that the Job is not in the Not proceeding state.
- The system verifies that the amount in the This Draw, $ or Draw Balance fields are not zero. Otherwise, a confirmation dialog form is shown.
- If a Draw is created not for the Draw Balance (that unites excluded Cost Centers), the system checks that the sum of Draw Progress and This Draw amounts does not exceed the cost of the Lender’s Schedule. Otherwise, the system shows the corresponding message.
- If a Draw is created for the Draw Balance (that unites excluded Cost Centers) the system checks that the sum of the Draw Progress and This Draw Total amounts does not exceed the Contract Mount. Otherwise, the system shows the corresponding message.
- The system checks that the user has a permission to produce Draws.
During the processing of a Draw for the Lender’s Schedule, the system performs the following:
- The system specifies Draw amounts for selected Cost Centers and track Invoice numbers for Cost Centers.
- For the Draw Balance, the system adds a new record in the Job Lender’s Schedule.
- If the Slab date is empty, the system checks that the This Draw amount is equal or greater than 15 percent of the Contract amount. If these criteria are met, the system sets the current date as a Slab Date and fires an event for the Job which will further appear in the Contract Manager Update report.
- The system creates an Invoice in Xero and fetches its ID.
- The system initiates the Lender’s Draw documents Producing bulk task. Depending on the state of the Preview Doc(s) toggle, the system prints them at once or shows the dialog form with links to preview.
- If documents are selected for printing on the Cloud Printer, the system will prompt the user to select the Cloud Printer for printing documents.
- The system clears the Make a Draw page after the successful Draw processing.
If the Draw amount is specified for a Change Order, the system creates a separate invoice for each Change Order.