
Replaces help doc…..
How to Apply Take Off Parameters (ToPs)
What is a Take Off Parameter (ToP)
Take Off Parameters (ToPs) are a method of quantifying measurements, or quantities, of the elements of a house plan (wall length, number of doors, floor area etc.), which assist in the preparation of house estimates, quotations and job estimates.
ToPs consist of a;
- Code (used as a key in dropdown or selection lists and in quantifying formulas),
- Description (used to describe what element the ToP measures),
- Graphic Take Off (GTO) Unit of Measure (UoM) – GTO UoM – (used to determine the element’s measurement – mm, m, m2, count, $, other and n/a),
- GTO Style (used to display different line styles in a GTO),
- GTO Colour (used to display different coloured lines in a GTO).
Manage Take Off Parameters (ToPs)
- Log in to the Builder Portal.
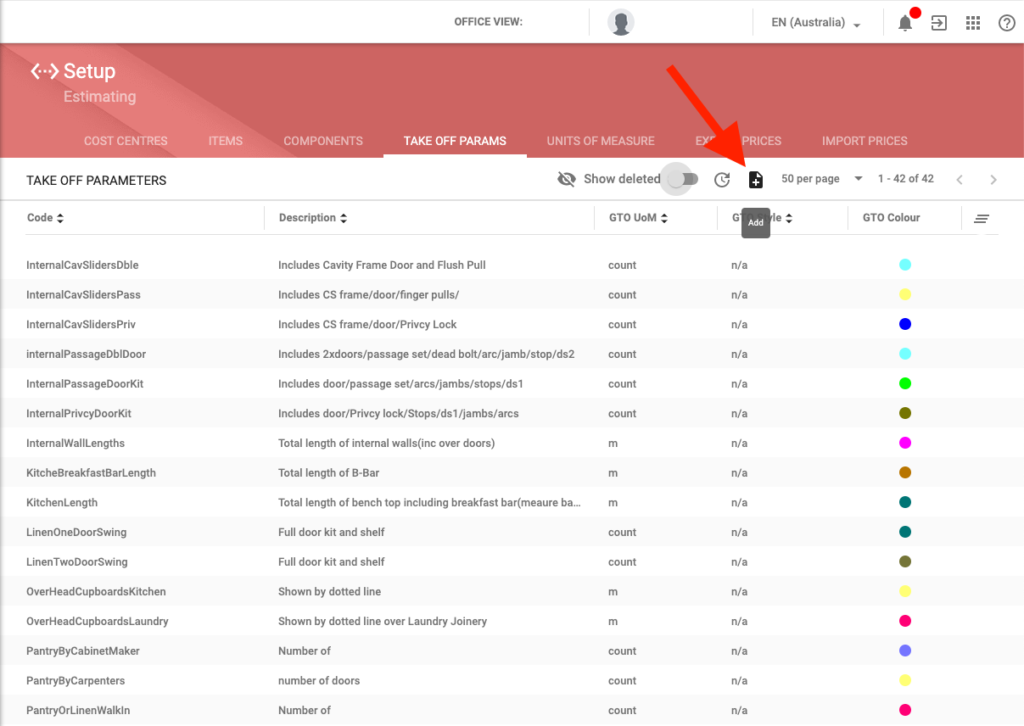
- Choose Setup > Estimating > Take Off Params.
- The following options are available;
- Add a new ToP;
- Click the Add button,
- Add a new ToP;
- Complete all the details in the Create Take Off Param screen,
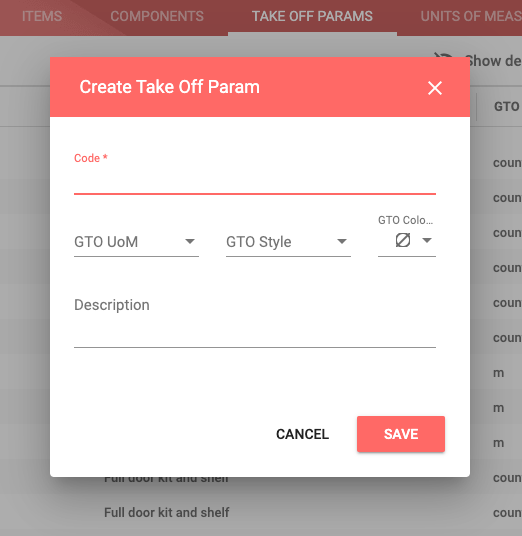
- Click Save.
- Edit an existing ToP;
- Click on the required ToP Row,
- Edit the required text or change selections from the dropdown lists in the Edit Take Off Param screen,


- Click Save.
- Delete a no longer required ToP;
- Hover over the required ToP until the right-hand side icons display,
- Click Delete
icon,

- A confirmation screen will display with either of the following message depending on the use of the ToP;
- ToP [ToP Code] will be flagged as deleted. Do you wish to proceed? (which means it is in use in an estimate somewhere in the database, and therefore cannot be deleted, it will only be removed from being added into new house estimates, quotations and job estimates),

– OR –
- Top [ToP Code] will really be deleted. Do you wish to proceed? (which means it will be deleted from the database, and cannot be recovered after deletion),

- Click Save.
- Undelete an already deleted ToP;
- Click to slide the Show deleted toggle to on,

- Hover over the required Deleted ToP until the right-hand side icons display,
- Click Undelete
icon,

- A confirmation screen will display,

- Click Yes.
Manage ToPs in a House Estimate
- Choose Estimating > House Plans & Estimates.
- Search the required House Plan & Estimate.
- Click
icon or Press Return/Enter.
- Click on the Row of the required House Plan Estimate to open.
- The list of ToPs used in a House Estimate is displayed on the lower left-side of the House Plans & Estimates screen, the columns displayed are;
- Code (an alphanumeric list of the ToP Codes used in the House Estimate),
- Value (the value attributed to each ToP),
- UoM (the Unit of Measure attributed to each ToP),
- Count (the number of times each ToP is used in Formulas attributed to Items and/or Components contained in the House Estimate;
The individual columns may be adjusted for size, and the height of the ToPs used can be adjusted by dragging up or down the thick grey line with the three dots in the centre.
- A green highlight means the ToP value has been measured via the GTO function,
- No highlight means the ToP value has been manually calculated and entered,
- The Display Usage icon, when selected, will display which Cost Centres contain Formulas where the ToP has been used, and when displayed, the Go To link will access the selected Item and/or Component in the applicable Cost Centre.


- Click the GTO icon
to open House Plans via Graphic Take Off, where a User will be presented with three possibilities;

- If the correct House Plan has been imported, check and amend ToPs as required;
- Unselect the Overlay checkbox to declutter the screen,
- To add to a ToP, select the required ToP from the dropdown list and start measuring the addition to the ToP,


- To delete a ToP, or part thereof, select the required ToP from the dropdown list and select the Databox associated with the required ToP, or part thereof, and click Delete from the left-hand side menu and re-measure the new required ToP, or part thereof.


- If the incorrect House Plan has been or is imported, click Delete Current View and import the correct House Plan, and measure ToPs as required,

- If there is no House Plan, import plans via the Graphic Takeoff Import Plan Image function, and measure ToPs as required.
Additional ToPs may be added via the Add ToP function in Graphic Take Off. One-off house plan specific ToPs may be useful to quantify those unusual items such as driveways / paths, floorcoverings, wallpaper, stacked stone etc.


- Alternatively, the value of individual ToPs may be adjusted by a single click of the Value column item, this will display the dotted-line box around the selected data box, which can be amended by typing to over type (a double click of the Value column item will highlight text, which can be amended by typing to over type or once text is highlighted, the cursor can be placed to amend text).
If the value of a ToP that was measured in the GTO (highlighted green) is amended manually, all the related measurements of the ToP will be removed from the GTO automatically.

The data box will be underlined while remaining in the data box, then when another selection is clicked, the entire row will be highlighted and an ‘*’ displayed to the left of the row to signify that data has been changed and requires processing or recalculating.


- To add a ToP into a House Estimate and have it display in the list of Used ToPs, first it must be added to the Formula box of an Item or a Component in the House Estimate;
- Select the required Cost Centre,
- Select the required Item or Component,
- Select Formula,
- Select the required formula principle (Take Off Parameters are the most commonly used principle by far);
- Math functions (mathematical functions – log(x), Pi() etc.),
- Operators (mathematical operators – *, /, +, – etc.),
- Take off Params (full list of available ToPs – ContractPrice, FloorArea etc.),
- Trig functions (trigonometric functions – cos(x), sin(x), tan(x) etc.).
- Using the Take off Params principle, Scroll down the list of ToPs in the lower right-hand corner of the House Estimate page,
- Select the appropriate ToP from the list and choose either of the following methods to add the selected ToP to the Formula box;
- Drag and Drop (click and hold the left mouse button and drag the ToP over to the Formula box and release the left mouse button),
– OR –
- Double click (double click the left mouse button),
– OR –
- Select <Add To Formula.
- Click Process.


- The newly added ToP can now be measured either by GTO or manually entered.
If a ToP is no longer used in any Items and/or Components in the House Estimate, the ToP will be automatically removed from the list of used ToPs.
A modified Formula may be Propagated to other House Estimates, either All House Plans or Selected House Plans by selecting the
icon under the Formula box.


Manage ToPs in a Quotation (Quick Quote)
- Choose Sales > Leads
- Search for the required Lead.
- Click
icon or Press Return/Enter.
- Click on the Row of the required Lead to open.
- Click Sales Folders > RFQ Management > Quotations.
- Click on the Row of the required Quotation to open or Create a new Quotation.
- The list of ToPs used in the Quotation (Quick Quote) is displayed by clicking either of the two icons
or
located to the right of the Quick Quote number (QQ……);

- Edit ToP(s) in GTO icon
- If the correct House Plan has been imported, check and amend ToPs as required;
- Unselect the Overlay checkbox to declutter the screen,
- To add to a ToP, select the required ToP from the dropdown list and start measuring the addition to the ToP,
- If the correct House Plan has been imported, check and amend ToPs as required;
- To delete a ToP, or part thereof, select the required ToP from the dropdown list and select the Databox associated with the required ToP, or part thereof, and click Delete from the left-hand side menu and re-measure the new required ToP, or part thereof.

- If the incorrect House Plan has been imported, click Delete Current View and import the correct House Plan, and measure ToPs as required,

- If there is no House Plan, import plans via the Graphic Takeoff Import Plan Image function, and measure ToPs as required.
Additional ToPs may be added via the Add ToP function in Graphic Take Off. One-off plan specific ToPs may be useful to quantify those unusual items such as driveways / paths, floorcoverings, wallpaper, stacked stone etc., where the measured quantity can be manually transferred/entered to an Item or a Component in the Quote Changes list .


- Alternatively, the value of individual ToPs may be adjusted by a single click of the
- Edit ToP(s) icon
opens the List of ToPs, where the value of individual ToPs may be manually adjusted by a single click of the Value column item, this will display the dotted-line box around the selected data box, which can be amended by typing to over type (a double click of the Value column item will highlight text, which can be amended by typing to over type or once text is highlighted, the cursor can be placed to amend text).
- Edit ToP(s) icon


The individual columns may be adjusted for size.
If the value of a ToP that was measured in the GTO (highlighted green) is amended manually, all the related measurements of the ToP will be removed from the GTO views.
The data box will be underlined while remaining in the data box, then when another selection is clicked, the entire row will be highlighted and an ‘*’ displayed to the left of the row to signify that data has been changed and requires processing or recalculating.

Manage ToPs in a Job Estimate
- Choose Jobs > Job List, search for the Job and click the ‘$’ icon to the right on the row of the searched Job to open the Job Estimate.
- The list of ToPs used in a Job Estimate is displayed on the lower left-side of the Job Estimate screen, the columns displayed are;
- Code (an alphanumeric list of the ToP Codes used in the House Estimate),
- Value (the value attributed to each ToP),
- UoM (the Unit of Measure attributed to each ToP),
- Count (the number of times each ToP is used in Formulas attributed to Items and/or Components contained in the House Estimate;
The individual columns may be adjusted for size, and the height of the ToPs used can be adjusted by dragging up or down the thick grey line with the three dots in the centre.
- A green highlight means the ToP value has been measured via the GTO function,
- No highlight means the ToP value has been manually calculated and entered,
- The Display Usage icon, when selected, will display which Cost Centres contain Formulas where the ToP has been used, and when displayed, the Go To link will access the selected Item and/or Component in the applicable Cost Centre.


- Click the GTO icon to open Plans via Graphic Take Off, where a User will be presented with three possibilities;
- If the correct Plan has been imported, check and amend ToPs as required,
- Unselect the Overlay checkbox to declutter the screen,
- To add to a ToP, select the required ToP from the dropdown list and start measuring the addition to the ToP,
- To delete a ToP, or part thereof, select the required ToP from the dropdown list and select the Databox associated with the required ToP, or part thereof, and click Delete from the left-hand side menu and re-measure the new required ToP, or part thereof.
- If the incorrect Plan has been or is imported, click Delete Current View and import the correct Plan, and measure ToPs as required,

- If there is no Plan, import plans via the Graphic Takeoff Import Plan Image function, and measure ToPs as required.
Additional ToPs may be added via the Add ToP function in Graphic Take Off. One-off job specific ToPs may be useful to quantify those unusual items such as driveways / paths, floorcoverings, wallpaper, stacked stone etc.


- Alternatively, the value of individual ToPs may be adjusted by a single click of the Value column item, this will display the dotted-line box around the selected data box, which can be amended by typing to over type (a double click of the Value column item will highlight text, which can be amended by typing to over type or once text is highlighted, the cursor can be placed to amend text).
If the value of a ToP that was measured in the GTO (highlighted green) is amended manually, all the related measurements of the ToP will be removed from the GTO automatically.
The data box will be underlined while remaining in the data box, then when another selection is clicked, the entire row will be highlighted and an ‘*’ displayed to the left of the row to signify that data has been changed and requires processing or recalculating.
- To add a ToP into a Job Estimate and have it display in the list of Used ToPs, first it must be added to the Formula box of an Item or a Component in the Job Estimate;
- Select the required Cost Centre,
- Select the required Item or Component,
- Select Formula,
- Select the required formula principle (Take Off Parameters are the most commonly used principle by far);
- Math functions (mathematical functions – log(x), Pi() etc.),
- Operators (mathematical operators – *, /, +, – etc.),
- Take off Params (full list of available ToPs – ContractPrice, FloorArea etc.),
- Trig functions (trigonometric functions – cos(x), sin(x), tan(x) etc.).
- Using the Take off Params principle, Scroll down the list of ToPs in the lower right-hand corner of the Job Estimate page,
- Select the appropriate ToP from the list and choose either of the following methods to add the selected ToP to the Formula box;
- Drag and Drop (click and hold the left mouse button and drag the ToP over to the Formula box and release the left mouse button),
– OR –
- Double click (double click the left mouse button),
– OR –
- Select <Add To Formula.
- Click Process.


- The newly added ToP can now be measured either by GTO or manually entered.
If a ToP is no longer used in any Items and/or Components in the Job Estimate, the ToP will be automatically removed from the list of used ToPs.