
You can manage quotations in the system. The number of quotations per one Sales Folder is not limited. The system generates a Quotation Number based on the continuous numbering of quotations generated in the system for a specific office. You cannot edit the Quotation Number which was automatically allocated by the system.
To view the Quotations produced in this Sales Folder:
- Initiate the RFQ Management for the Lead.
- Switch to the Quotations tab.
On the Quotations tab, you can see the list of quotations, as follows:
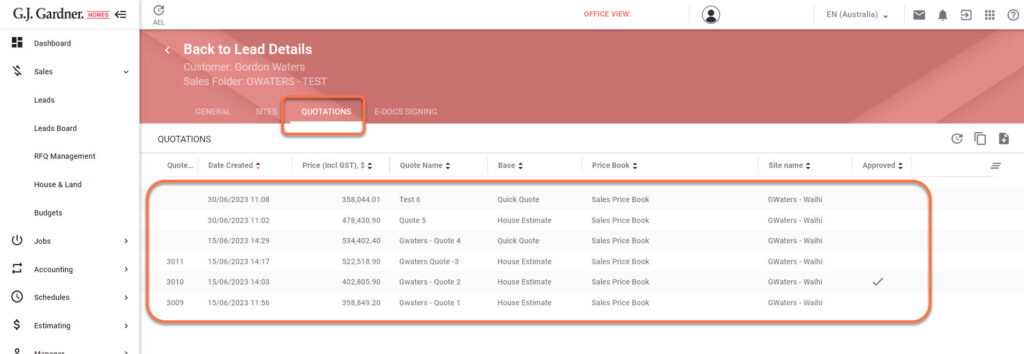
For each quotation, the following information is available:
| Date created | Date when the quotation was created. |
| Quote Number | Identification number generated when the quote is printed. |
| Quote name | Name of the quote. |
| Price book | Price book which was used for creating the quotation. |
| Base | Base which was used for creating a Quotation, as follows:
|
| Site name | Name of the site which the quotation is created for. |
| Approved | Approval status of the quotation. |
| Price, $ | The price in the quotation. |
You can perform the following operations on quotations:
- create new quotations
- edit the existing quotations
- delete the no longer needed quotations
- clone the existing quotations
- print the completed quotations
Creating Quotations
You can create quotations on the basis of the following:
- House Estimate
- Quick QuoteCreation of quotations on the basis of the Quick Quote and Sales Estimate depends on the Quick quote allowed and Use sales estimates options that can be enabled or disabled in the System variables.
- Sales Estimate
You can select a specific Site which the quote is created for.
Generally, the process of creating quotations is relatively the same but with some variances.
Creating a Quotation as House Estimate
- Above the list with quotations on the right side, locate the Add
 icon and click it.
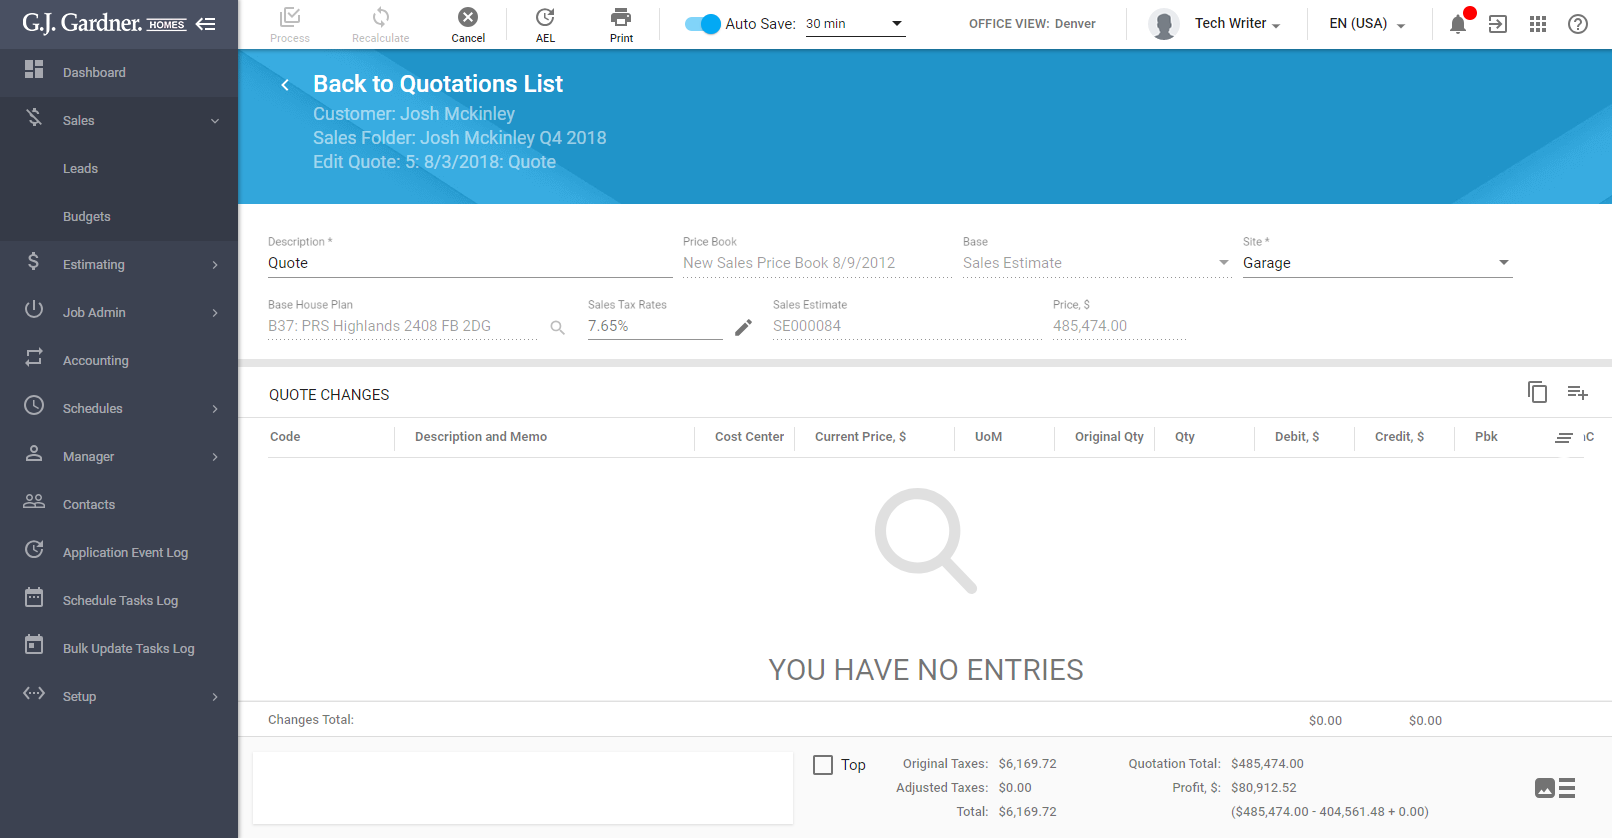
 - On the Create quote page, specify information for the quotation, as follows:
3. Manage quote changes if needed. See the following chapters for the details on this.
4. When complete, click Process.
To select the Base House Plan:
- Click the Select
 icon.
icon. - In the RFQ House Plans form, select the House Plan you want use. Alternatively, you can search for the House Plan by its code or description.
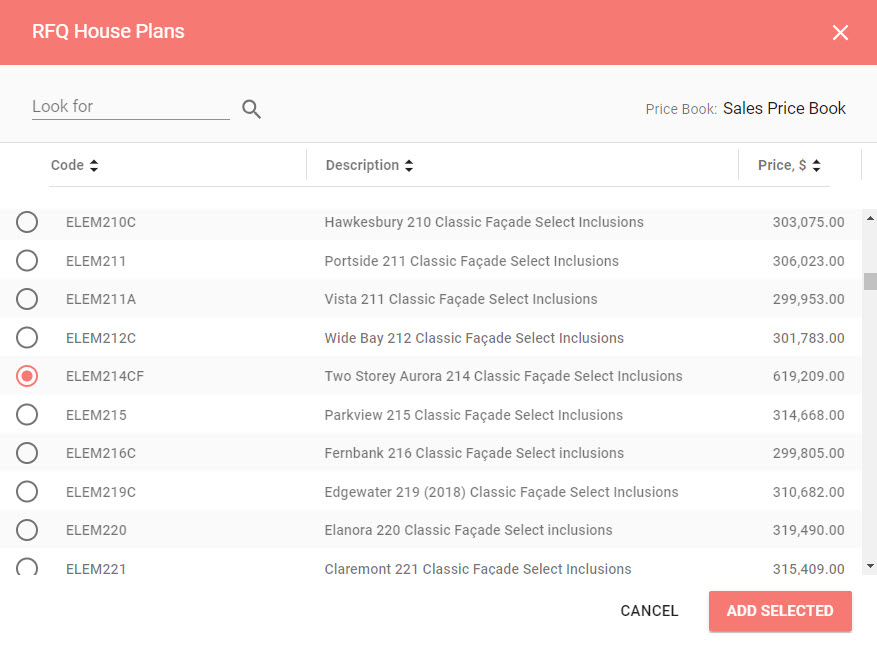
3. When complete, click Add Selected.
Creating a Quotation as Quick Quote
- Above the list with quotations on the right side, locate the Add icon and click it.
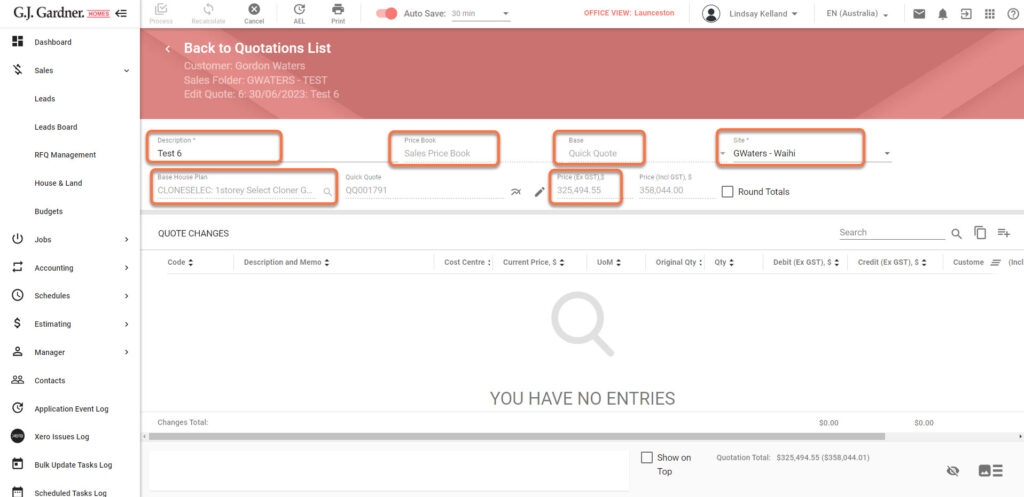
- On the Create quote page, specify information for the quotation, as follows:
Description Enter the description of the quote (name). Price Book Select the price book you want to use. Until you save the quotation you can switch to another price book by clearing the selected price book and selecting a new one. Base Select ‘Quick Quote’ for building the quotation. Site Select the site which the quotation is for. Base House Plan Click the icon and select the RFQ House Plan you want to use. When complete, click Add selected. Sales Tax Rate (US Specific Parameter)
The system applies the default sales tax rate. To override the applied sales tax rate, click the Edit icon. The system will request the processing changes. To save changes, click Process. In the Select Sales Tax Rates to Add form, select additional tax rates to apply to the quotation in addition to the default one. When complete, click Add selected. The system may require recalculation of the price. Quick Quote After clicking the Process button, the system creates the House Plan and the House Estimate of the Quick Quote type by using the Base House plan. The system also automatically assigns the code to the House Plan Estimate of the following pattern ‘QQdddddd’ where ‘dddddd’ is used as an index number of the House Plan Estimate of the Quick Quote type in the system. Price The system calculates the price automatically based on the Quick Quote House Estimate and the selected Price Book. - You can manage quote changes. For the details on this, please see the following chapter.
- When complete, click Process.
Creating a Quotation as Sales Estimate
- Above the list with quotations on the right side, locate the Add icon and click it.
- On the Create quote page, specify information for the quotation, as follows:
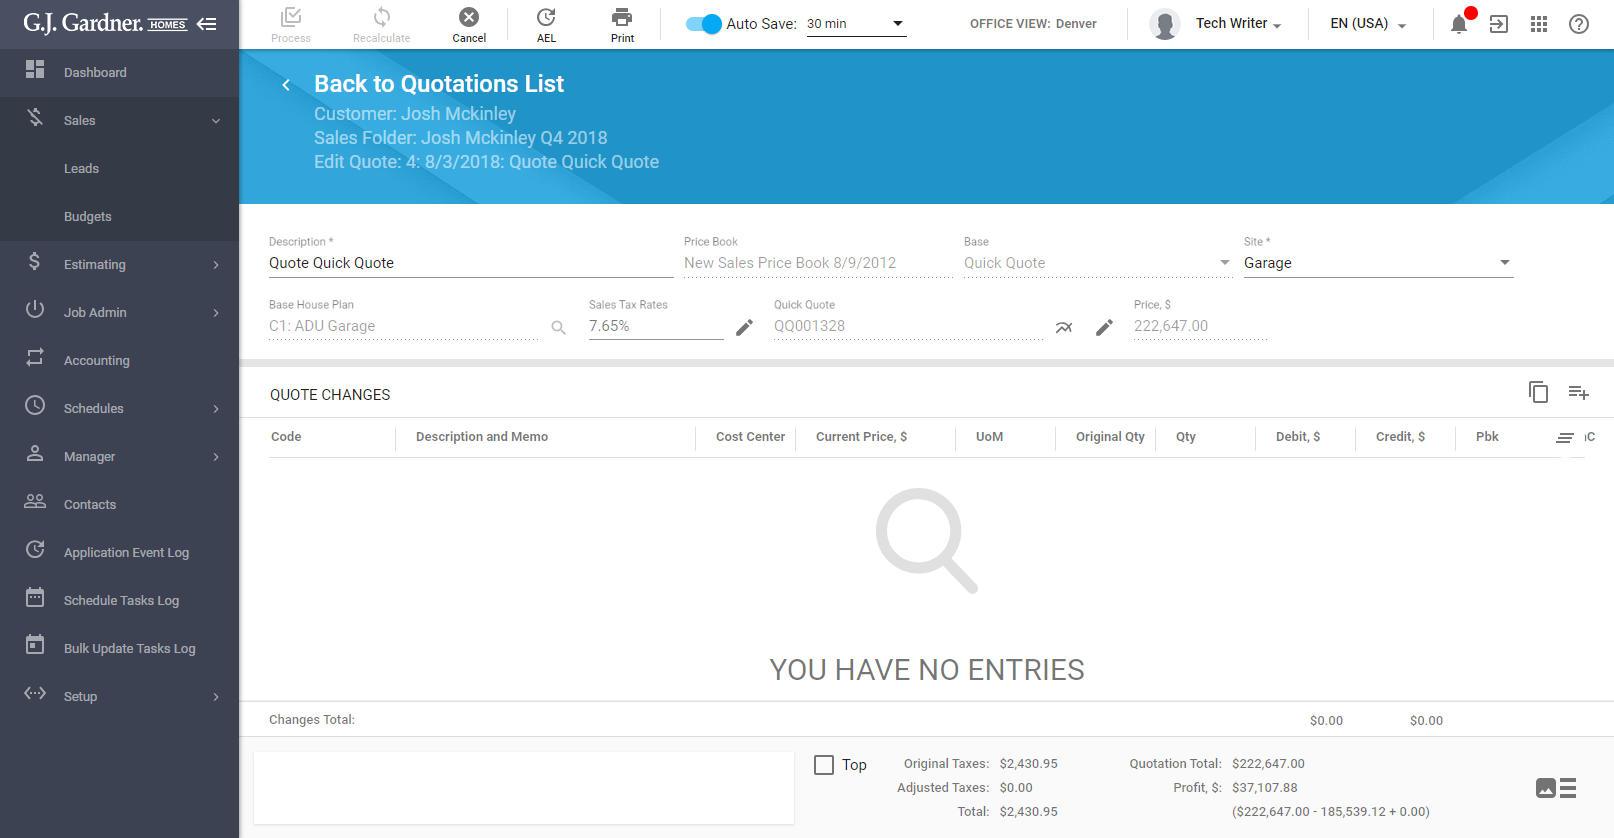
Description Enter the description of the quote (name). Price Book Select the price book you want to use. Until you save the quotation you can switch to another price book by clearing the selected price book and selecting a new one. Base Select ‘Sales Estimate’ for building the quotation. Site Select the site which the quotation is for. Base House Plan Click the icon and select the RFQ House Plan you want to use. When complete, click Add selected. Sales Tax Rate (US Specific parameter)
The system applies the default sales tax rate. To override the applied sales tax rate, click the Edit icon. The system will request the processing changes. To save changes, click Process. In the Select Sales Tax Rates to Add form, select additional tax rates to apply to the quotation in addition to the default one. When complete, click Add selected. The system may require recalculation of the price. Sales Estimate After clicking the Process button, the system will assign the sales estimate number. Its pattern looks like this ‘SEdddddd’ where ‘dddddd’ is used as an index number of the sales estimate quote in the system. After clicking the Process button, the system updates the House Plan in the selected Price Book and recalculates its price in the price book. The system also assigns the Sales Estimate number of the following pattern SEdddddd’ where ‘dddddd’ is used as an index number of the sales estimate quote in the system.
Price The system calculates the price automatically based on the selected House Plan and Price Book. - Manage quote changes if needed. See the following chapters for the details on this.
- When complete, click Process.
Editing the Quotation
You can edit the saved Quotations and manage changes within them until it is produced (printed). While editing the quotation, you will not be able to update the following:
- Price Book
- Base
- Base House Plan
- Sales Estimate
- Quick Quote
- Price (calculated automatically)
- On the list with quotations, locate the one you want to edit.
- Hover over the quotation until the action icons appear.
- Click the Edit
 icon.
icon. - Make the appropriate changes.
- Click Process.
Managing Quote Changes
You can add changes into the selected base house plans.
- Create a new quote or Edit an existing quote.
- Below the block with the quote information, locate the list with quote changes.
For each quote change the following information is available:
| Code | Code of an Item or Component included into the quote change. |
| Description and Memo | Description of an Item or Component and memo. |
| Cost Center | Cost Center which an Item or Component is mapped to. |
| Current Price, $ | Current price of an Item or Component. |
| UoM | Unit of measure of an Item or Component. |
| Original Qty | Original quantity of Items or Components from the Base Estimate. |
| Qty | Quantity of Items or Components the user is adding/crediting in the Quote Change. |
| Debit, $ | Debited amount of money for Items or Components. |
| Credit, $ | Credited amount of money for Items or Components. |
| Pbk | An icon will show if the item has been removed from the Price Book |
| IaC | Shows the icon indicating the memo is available. |
| Profit, $ | Profit from the Item or Component. (only available for Franchisee users) |
The profit for each quote change is calculated, as follows:
- If the amount is in the Debit column, the profit is calculated as (Price – (Cost * (1 + RFQ Cost Percent Adjustment / 100)). Refer System Variables for a description of RFQ Cost Percent Adjustment.
- If the Debit or Credit amount is -ve because the Price or Qty is -ve then the full amount is a loss. This will usually be used to simply give a discount to the client so it is straight off the bottom line.
You can perform the following operations on quote changes:
- add new Items and Components
- edit the details (Description, Quantity, and Debit/Credit) of existing quote changes
- remove the added Items and Components
- clone quote changes from the existing Quote
To add new Items or Components:
- Above the list with quote changes, locate the Add
 icon and click it. The RFQ Items and Components form opens. It includes the list of Components and Items that attribute to the selected Price Book. You can view the full list of Items or Components or browse them broken down by Cost Center.
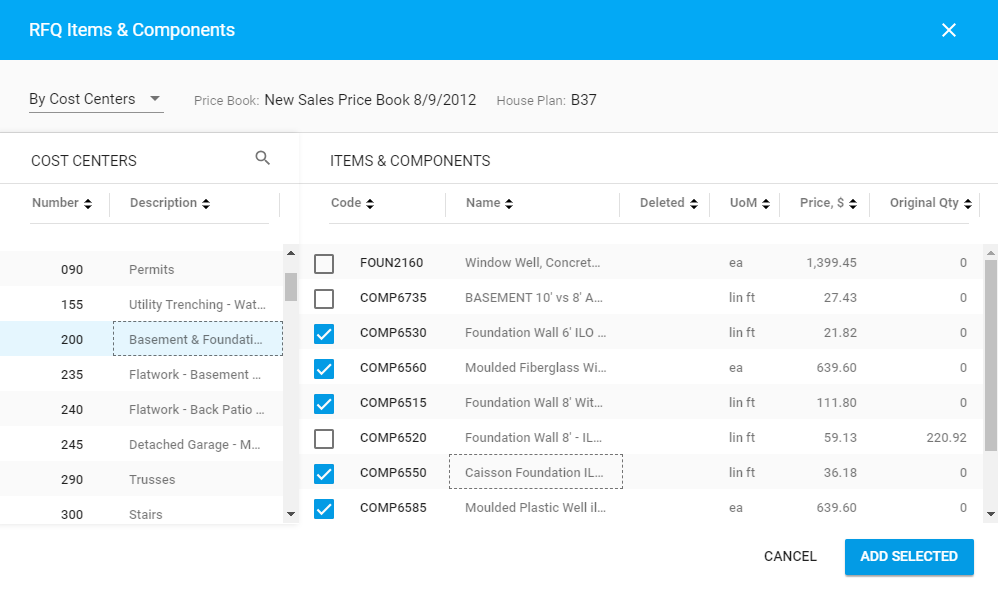
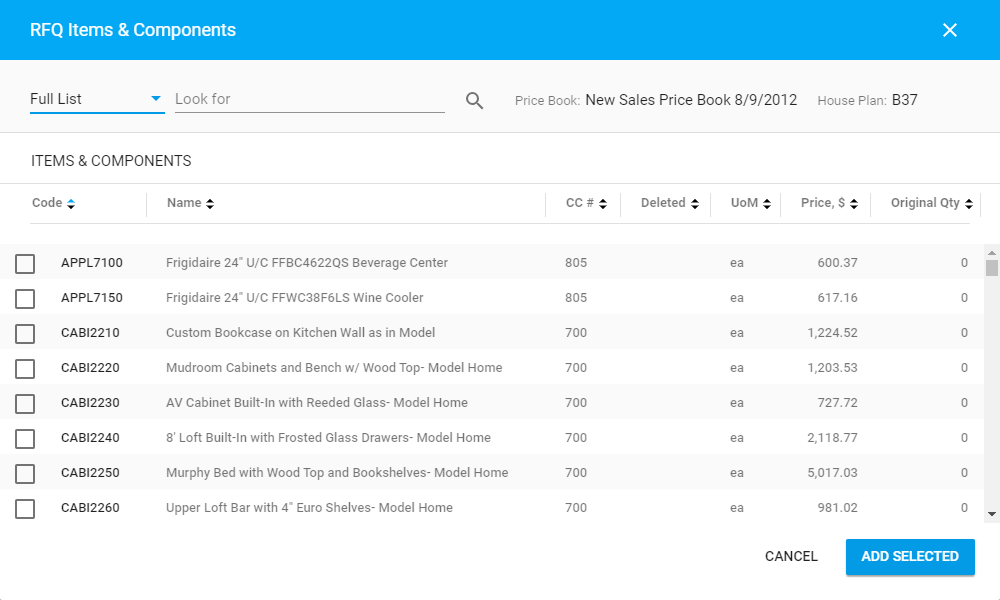
- In the opened form, select the way of viewing Items and Components:
- By Cost Centers
- Full List
- Select Items or Components that you want to add to the quote.
- When complete, click Add Selected.
- All the nAfter adding multiple Items or Components you can change the quantity of each individually by using the down arrow to select the next Item or Component in the Quote Changes list.ewly added Items and Components will appear on the Quote Changes list. They will be highlighted with pale orange color.
- To recalculate the quote, click Recalculate.
To adjust the quantity of Items or Components:
- On the Quote Changes list, locate the Item or Component which quantity you want to change.
- Hover over it and position the mouse pointer into the corresponding text field in the Qty column.
- Enter a new number.
- Click Process.
To adjust the Description of Items or Components:
- On the Quote Changes list, locate the Item or Component which description you want to update.
- Double-click the Item or Component. The text area appears.

- Update the description of the Item or Component.
- Click in some area of the screen to close the text area with description.
- Click Process.
To credit a quantity of Items or Components:
You can credit a particular quantity of Items or Components in the Quote Changes. You can credit these Items or Components by specifying their quantity less than the original quantity. In this case, the system will re-calculate the debit and credit amounts of quote changes.
- On the Quote Changes list, locate the Item or Component with the original quantity different from zero (‘0’).
- Set the quantity of the Item or Component less than the original quantity.
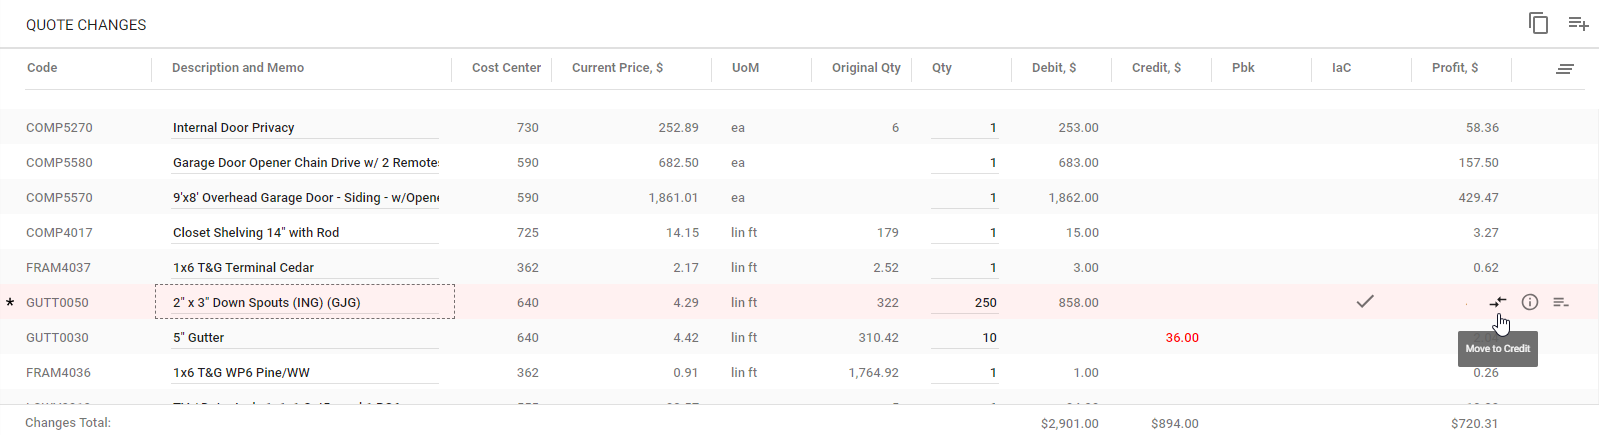
- Click the Move to Credit
 icon. The price of the Item or Component will appear in the Debit, $ column and will be colored red. The adjustment coefficient will be applied to the
 - Click Recalculate.
- Click Process.
To return the Item or Component back to Debit, click the Move to Debit ![]() icon.
icon.
To hide profit:
- Below the Quote Changes list, locate the Hide Profit
 icon.
icon. - Click this icon.
The Profit, $ column and the Profit, $ area below the Quote Changes list will be hidden.
To restore display of the profit, click the Show Profit ![]() icon.
icon.
To add optional text:
By default, the system displays the text snippet in the bottom part of the quote. If needed, you can show it at the top of the quote.
- Below the Quote Changes list, locate the text area.
- Enter additional descriptive text for the quote.
- To show the text snippet at the top of the the generated quote, check the Top box. Otherwise, it will be shown in the bottom part of the quote.
- When complete, click Process.
To remove Items or Components from the quote changes:
- On the Quote Changes list, locate the Item or Component you want to remove.
- Hover over it until the action icons appear.
- Click the Remove
 icon.
icon. - Confirm the removal of Item or Component from the quote.
- Click Recalculate.
- When complete, click Process.
To clone quote changes from another Quote:
- Above the Quote Changes list, locate the Clone
 icon and click it.
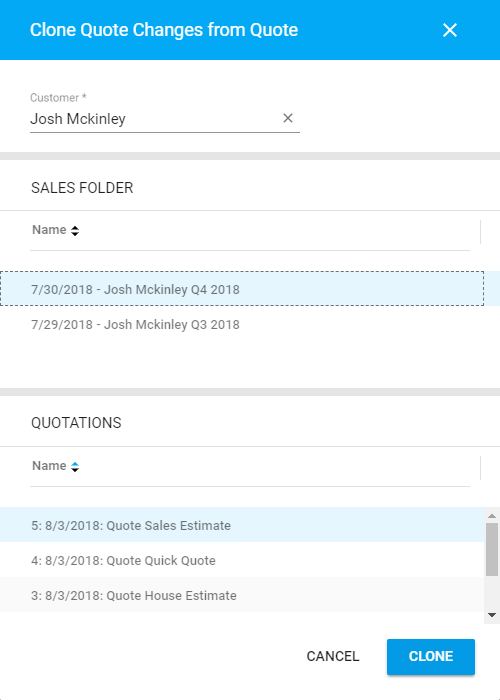
- In the Clone Quote Changes from Quote form, define the following quote which you want to clone quote changes from, as follows:
Customer Enter the Customer whose quotes you want to re-use. By default, the system shows quotes of the current Customer. Sales Folder Select the Sales Folder which Quotes you want to view. Quotations Select the quotation which Items and Components you want to clone into the current quotation. - Click Clone. The quote changes from the source Quote will appear on the list with quote changes.
- When complete, click Process.
To view memo for Item or Component:
- On the Quote Changes list, locate the Item or Component which memo you want to view.
- Hover over it until the action icons appear.
- Click the Memo
 icon. The Memo form opens.
 - View the memo.
- When complete, click OK.
Cloning the Quotation
- Above the list with Quotations, locate the Clone icon and click it.
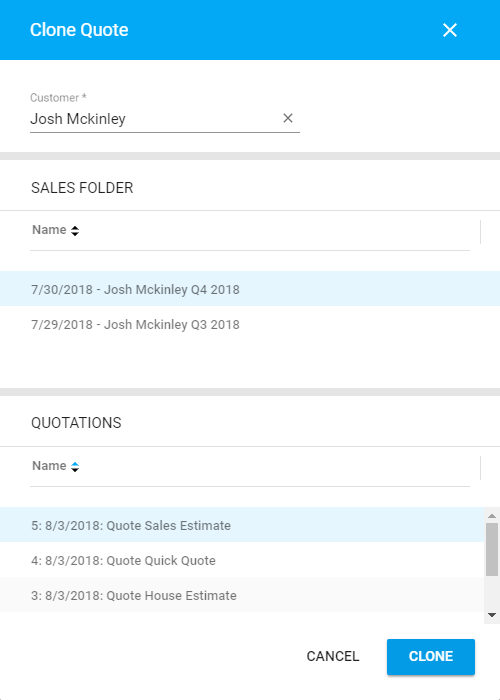
- In the Clone Quote form, select the quote which you want to clone, as follows:
Customer Enter the Customer whose quote you want to clone. By default, the system shows quotes of the current Customer. Sales Folder Select the Sales Folder which Quotes you want to view. Quotations Select the Quote from the currently selected Sales Folder which quote you want to clone. - Click Clone. The quote will be cloned and opened for editing.
- Specify information about the quote as described in the Creating Quotations section.
- When complete, click Process.
When you attempt to clone a Quote from the withdrawn Price Book, you may not be able to do this. The other situation you may encounter is the display of a warning that warns about a withdrawn Price Book. This behavior is determined by the selected option for the RFQ Clone Using Withdrawn Price Book Basis parameter in the System Variables.
Managing RFQ Quote Document Structure
You can manage the RFQ Quote Document structure and group Items and Components in the quote changes against a specific criterion.
- Open the quotation.
- Below the Quote Changes list, locate the RFQ Document Structure icon.
- Click this icon. The Set Up Quote Document Structure form opens, as follows:

This form is comprised of two parts, as follows:
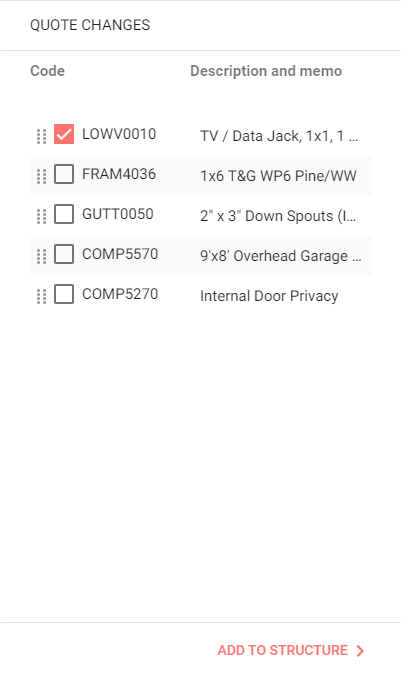
| Quote Changes | Shows the list of Items and Components added as Quote Changes. |
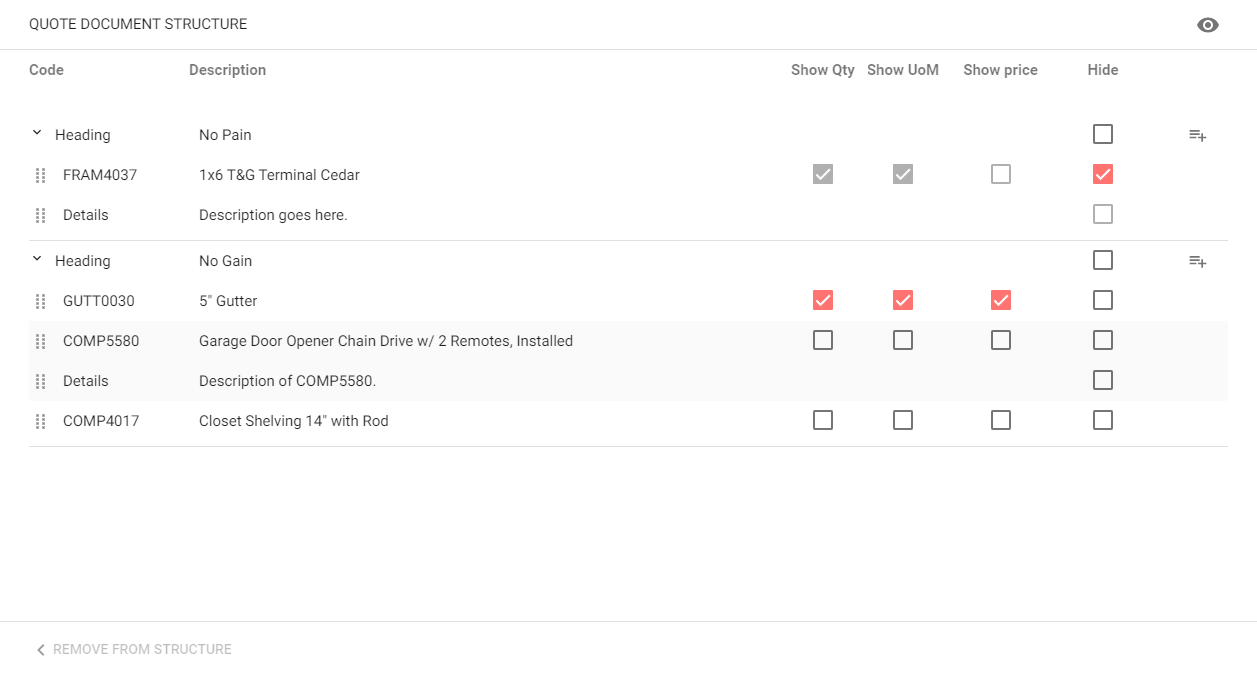
| Quote Document Structure | Shows the headings with Items and Components, including optional details for them. This table of quote changes will be included into the generated PDF file with quote changes. |
The Quote Changes list shows the following information:
| Code | Code of the Item or Component. |
| Description and memo | Description of the Item or Component with optional memo if specified. |
The Quote Document Structure list shows the following information:
| Code | Code of the Item or Component. |
| Description | Description of the Item or Component. |
| Show Qty | Check the box to show the quantity of the Item or Component from the quote changes. |
| Show UoM | Check the box to the show the Unit of Measure of the Item or Component. |
| Show price | Check the box to show the price of the Item or Component. |
| Hide | Check the box to hide a specific heading, Item or Component, and its details. |
You can perform the following operations on the structure of the Quote Document:
- add Items and Components
- add details for specific Items or Components
- regulate visibility of values of Items or Components
- regulate order of Items or Components
- remove Items or Components from the quote document structure
- preview the Quote Document
To add Items and Components into the Quote Document:
- In the Quote Changes block, select Items or Components you want to add into the Quote Document.
- Click Add to Structure.
The selected Items and Components will be added under the first heading in the Quote Document.
Alternatively, you can drag Items or Components from the Quote Changes block to the Quote Document Structure block under the appropriate heading.
To add details for an Item or Component:
- On the Quote Document Structure list, locate the Item or Component which you want to add additional details for.
- Hover over this Item or Component until the action icon appears.
- Click the icon.
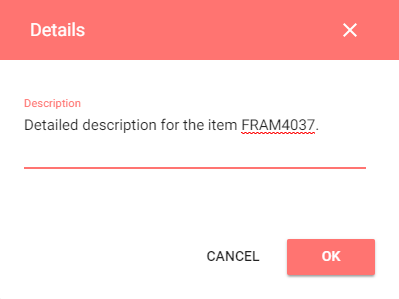
- In the Details form, enter details for the Item or Component.
- Click OK.
The same way you can add details for headings in the document.
To edit details for the Item, Component, or heading, hover over it and click the ![]() icon. In the Details form update description and click OK.
icon. In the Details form update description and click OK.
To delete details for the Item, Component, or heading, hover over it and click the ![]() icon.
icon.
To regulate visibility of parameters of Items or Components:
Use the checkboxes for specific Items and Components to check their parameters, as follows:
| Show Qty | Check box to show the quantity of the Item or Component from the quote changes. |
| Show UoM | Check box to the show the Unit of Measure of the Item or Component. |
| Show price | Check box to show price of the Item or Component. |
If the Item or Component is hidden in the Quote Document, these checkboxes become disabled.
To hide Item, Component or heading:
- Locate the Item, Component, or heading you want to hide.
- Check the box in the Hide column.
To show the hidden Item, Component, or heading, clear the box for this record in the Hide column.
To regulate order of Items or Components:
- On the Quote Document Structure list, locate the Item or Component which position you want to change.
- Hover over the draggable part of the Item or Component, until the mouse pointer changes, as follows:

- Drag the Item or Component to the appropriate place on the list.
To remove Items or Components from the quote document structure:
- On the Quote Document Structure list, locate the Item or Component you want to remove from the Quote Document.
- Select the Item or Component. Once selected, it will be highlighted light-red.
- Click Remove from Structure.
To preview the Quote Document:
- In the Set Up Quote Document Structure form, click the Preview icon,
- Wait for a bit while the system generates a preview file.
- In the Link to Preview Quote Document form, click the link to open the preview of the Quote Document.
- Review the quote document.
- When complete, close the form.
Printing the Quotation
- Open the quotation you want to print.
- In the top part of the part of the page, click the Print
 button.
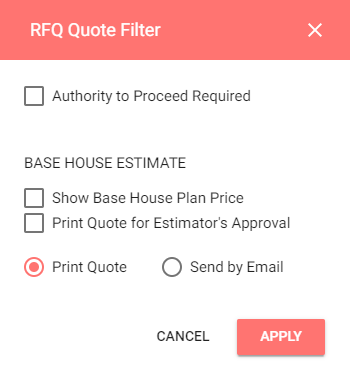
 - In the RFQ Quote Filter form, adjust the following parameters:
| Authority to Proceed Required | Check the box to require the authorization number to proceed with the quotation. |
| Show Base House Plan Price | Check the box to show the base House Plan prices in the quotation. |
| Print Quote for Estimator’s Approval | Check the box to print the quote for estimation. |
| Print Quote | Select this option if you want to print a quote. |
| Send by Email | Select this option if you want to send a Quote by email. |
To print the quote:
- In the RFQ Quote Filter form, select Print Quote.
- Click Apply. Wait for a bit until the system generates a quote.
- In the Link to Print Quote Document form, click the link to open the generated quote.
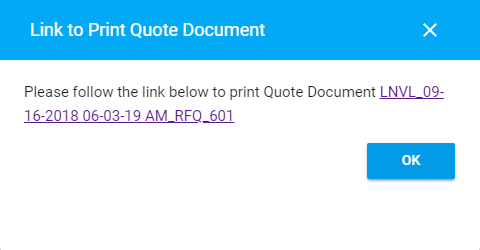
- Click OK to close the form.
To send the quote by email:
- In the RFQ Quote Filter form, select Send by Email.
- Click Apply.
- In the Email form, enter address of the customer, by default it will include the email address from the Customer, the Email Subject, and the message. The quote will be automatically attached to the email.
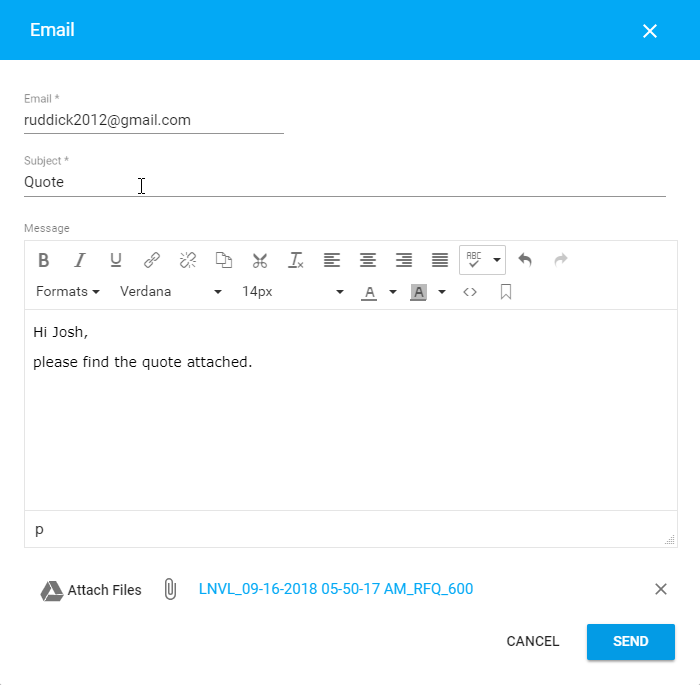
- Click Send.
Once you have printed the quote, you can no longer edit it. To add modifications, you need to create a new quote and add modifications into it.
Sending the Quote to Sign
You can send the quote to be signed by the Customer.
- On the list with quotations, locate the one you want to send for signing.
- Hover over the quotation until the action icons appear.
- Click the Send to Sign
 icon.
icon.
Approving/Unapproving the Quote
Before you can Complete a Sale, you must Approve the Quote you would like to turn into the Job, Open the list of quotations for a specific Lead.
To approve the quote:
- Hover over the quotation you want to mark as approved and click the Edit icon.
- In the bottom right part of the page, locate the Approve button and click it.
- When complete, click Process.
When you get back to the list of quotations, you will see that the mark appears in the Approved column for this quote.
To unapprove the quote:
- On the list with quotations, locate the one with the mark in the Approved column.
- Hover over the quotation and click the Edit icon.
- In the bottom right part of the page, locate the Unapprove button and click it.
- When complete, click Process.
When you get back to the list of quotations, you will see that the mark disappears in the Approved column for this quote.