
Color Selection Masters are templates that are used for producing Job Color Selections.
Color Selections are made up of four levels, as follows:
- Headings – are top level categories for grouping color details
- Sub-Headings – are more detailed categories
- Items – are all details for colors that relate to the subheading and heading they are grouped under. The text contains description of what is being chosen, e.g. Color/Model/Style. The text can also have default values supplied. This allows you to construct a Masters which can relate to individual finish levels.
- Cost Centers – Cost Centers are used to connect the Detail Line back to an Order These links are used in Job Estimating so that the Estimator can easily compare the items in the Cost Center to the detail lines from the Color Selection
- To manage Color Selection Masters, on the navigational sidebar, select Setup.
- Once the Setup section expands, select Job Admin.
- On the tabbed menu, select Colour Selection. The Color Selection page loads, as follows:

Here you can see the list of Color Selection Masters and their names.
You can perform the following operations on Color Selection Masters:
- add new Color Selection Masters
- edit the existing Color Selection Masters
- clone the existing Color Selection Masters
- delete the no longer needed Color Selection Masters
- view usage of Color Selection Masters
- undelete the deleted Color Selection Masters
Creating a New Color Selection Master
- Above the list with Color Selection Masters, locate the Add
 icon and click it.
 - On the Create Color Selection Master page, enter the name of the Color Selection Master.
- When complete, click Process.
Populating Color Selection Master with Data
Once you have created a new Color Selection Master, you need to populate it with data that will fall into the four levels, as follows:
- Headings
- Sub-Headings
- Items
- Cost Centers
All these entities are managed in the relatively similar way as follows:
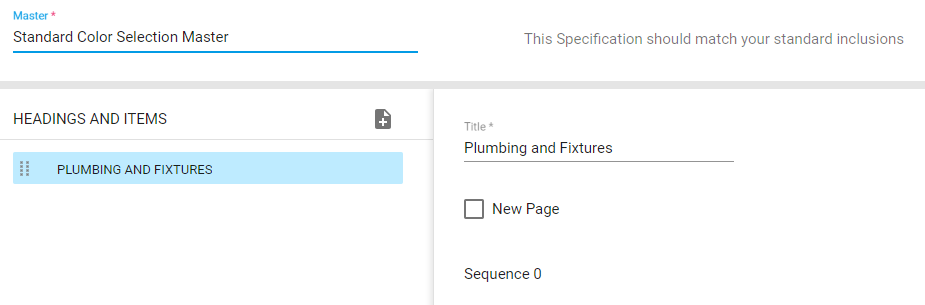
To add a new heading:
- Above the Headings and Items list, locate the Create New Heading icon and click it.
- Enter the title of a new heading.
- To show this heading on a new page, check the New Page box.
- When complete, click Process.
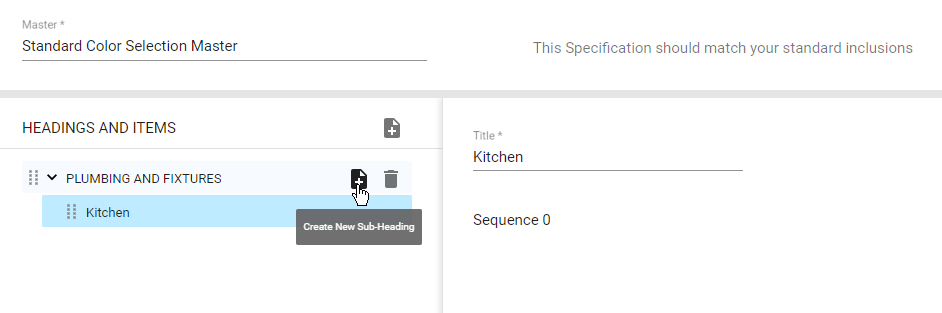
To create a new sub-heading:
- On the Headings and Items list, locate the heading within which you want to add a sub-heading.
- Hover over the heading until the action icons appear.
- Click the Create New Sub-Heading icon.
- Enter the title of a new sub-heading.
- When complete, click Process.
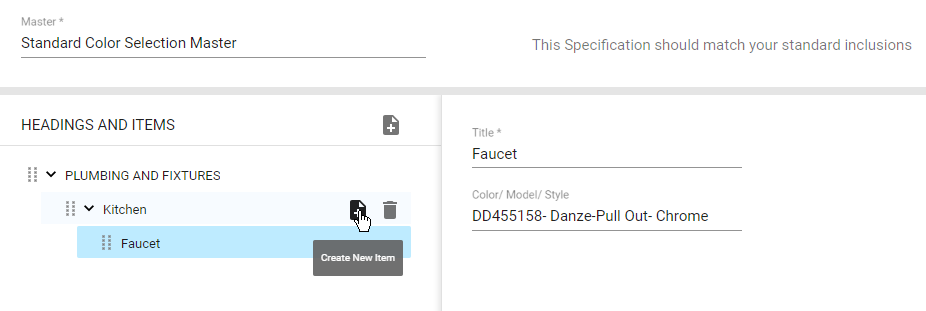
To create a new Item:
- On the Headings and Items list, locate the sub-heading within which you want to add an item.
- Hover over the heading until the action icons appear.
- Click the Create New Item icon.
- Enter the title of a new item.
- Specify the color, style of model of the item.
- When complete, click Process.
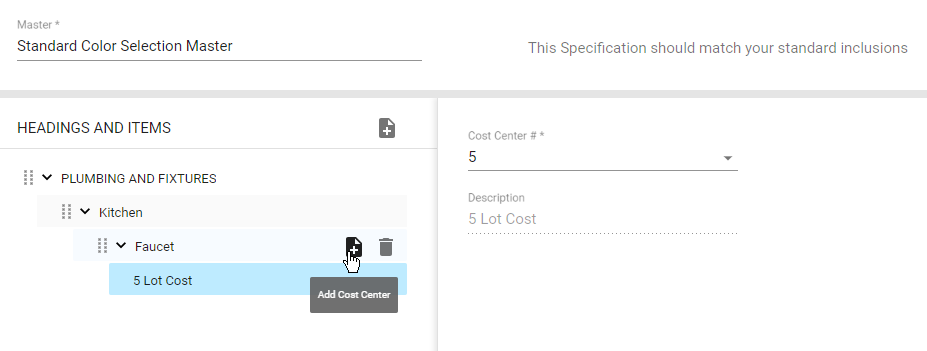
To add Cost Center:
- On the Headings and Items list, locate the item which you want to map the Cost Center.
- Hover over the item until the action icons appear.
- Click the Add Cost Center icon.
- In the Find Cost Centers form, select one or multiple Cost Centers which the Item will attribute to.
- When complete, click Process.
To delete any element from the Color Selection Master:
- Hover over the element you want to delete.
- Once the action icons appear, click the Delete
 icon.
icon. - When complete, click Process.
Please consider that when you remove heading, sub-heading or item, all its child elements will be removed too.
To change order of elements in the Color Selection Master:
To change order of elements, click and hold the ![]() part of the element row and drag it to the appropriate place.
part of the element row and drag it to the appropriate place.
To move the element from one parent element to another, click and hold the ![]() part of the element row and drag it to a new element under which you want to place it.
part of the element row and drag it to a new element under which you want to place it.
While changing the order of elements, please consider the following:
- When you move the element having some other child elements, these child elements will be moved.
- You cannot violate the hierarchy of elements. This way you cannot place the Cost Center or item under another heading or put the sub-heading under the Cost Center.
Editing the Color Selection Master
- On the list with Color Selection Masters, locate the one you want to edit.
- Hover over the Color Selection Master until the action icons appear.
- Click the Edit
 icon.
icon. - On the Edit Color Selection Master page, make the appropriate modifications.
- When complete, click Process.
Deleting the Color Selection Master
- On the list with Color Selection Masters, locate the one you want to delete.
- Hover over the Color Selection Master until the action icons appear.
- Click the Delete
 icon.
icon. - Confirm the removal of the Color Selection Master.
Undeleting the Color Selection Master
- Above the list with Color Selection Masters, locate the Show deleted toggle.
- To show deleted Color Selection Masters, move the toggle right.
- On the list locate the deleted Color Selection Master you want to undelete. It will be highlighted with the red Deleted label.
- Hover over the Color Selection Master until the action icons appear.
- Click the Undelete
 icon.
icon. - When complete, click Process.
Viewing Usage of the Color Selection Master
- On the list with Color Selection Masters, locate the one which usage you want to view.
- Hover over the Color Selection Master until the action icons appear.
- Click the Display Usage
 icon.
icon. - In the Color Selection Master Use form, view jobs that use this Color Selection Master.
- When complete, close the form.
Cloning the Color Selection Master
You can close the Color Selection Master in two ways:
- clone the existing Color Selection Master
- clone the Color Selection Master from the Job Color Selection
- Above the list with Color Selection Masters, locate the Clone
 icon and click it.
 - In the Clone Color Selection Master form, select the option for cloning:
- Colour Selection Master
- Job Colour Selection
- Select the Color Selection Master or Job Color Selection to clone.
- Click Clone. The Create Color Selection Master opens. It will include all elements from the source Color Selection Master or Job Color Selection.