
- Assign the Customer type to the contact. The Customer tab appears, as follows:

- For the customer contact type, specify the billing information, as follows:
Delivery Select the delivery type for invoices from the following options: Mail Email Billing address is the same as a common tab Select this option to use the address specified in the contact profile. If you want to use another address, clear the box and specify another billing address for the debtor contact type.
- To enable entry of the marketing information, check the Marketing Opt-In box.
- Specify the marketing information, as follows:
Ident Select the source how the customer contact appeared. Details Enter details about the customer contact. Community Select the community which the contact attributes to. This parameter can be further used for sending email campaigns. This is a region-specific parameter which may vary depending on the region where the system operates.
- When complete, click Process.
Setting Payment Details for Customer
- On the tabbed menu, select Payment.
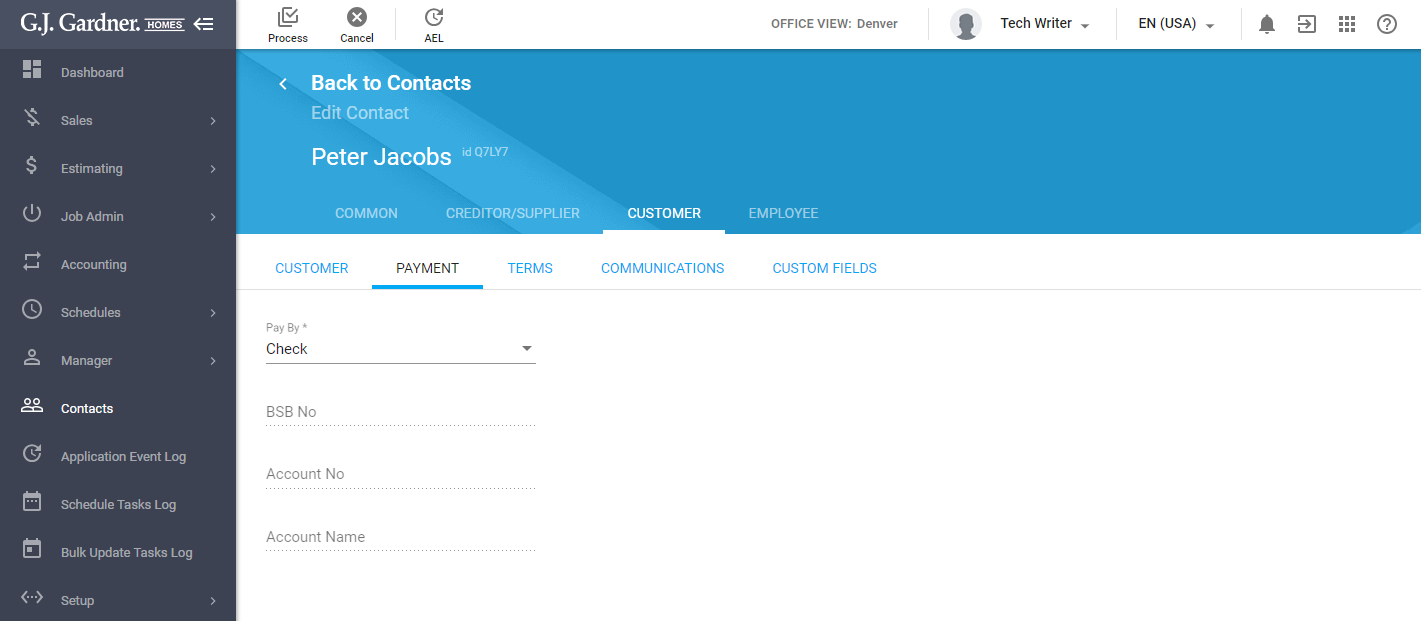
- Configure the payment parameters, as follows:
Paid By Select the payment type from the following options: - Check
- Bank Credit
- Direct Credit
- BPay (Internet)
- If you select the Check or BPay (Internet) option, you do not need to specify anything else.
- If you select the Bank Credit or Direct Credit option, you need to specify additional parameters:
BSB No Enter the Bank-State-Batch number (six / nine digits). This is a region-specific parameter which may vary depending on the region where the system operates.
Account No Enter the bank account number of the customer. Account Name Enter the account name of the customer. - When complete, click Process.
Depending on the operational region, the region-specific validation may be applied to the payment information, as follows:
| Field | USA | Australia / New Zealand |
| BSB No | The value in the field cannot exceed 9 characters.
The field can tolerate only the following characters:
| The value in the field cannot exceed 6 characters.
The field can tolerate only the following characters:
|
| Account No | Cannot exceed 20 alphanumeric characters. Only the following special characters will be tolerated: + ( ) ? : – / . and spaces. | Cannot exceed 20 alphanumeric characters. Only the following special characters will be tolerated: + ( ) ? : – / . and spaces. |
Setting Payment Terms for Customer
You can configure the payment terms for the contact of the Customer type. The system calculates the due date of an Invoice (either Payables or Receivables) on the basis of the values specified in the Payment is Due, Invoice Data and Balance Due Days fields.
- On the tabbed menu, select Terms.
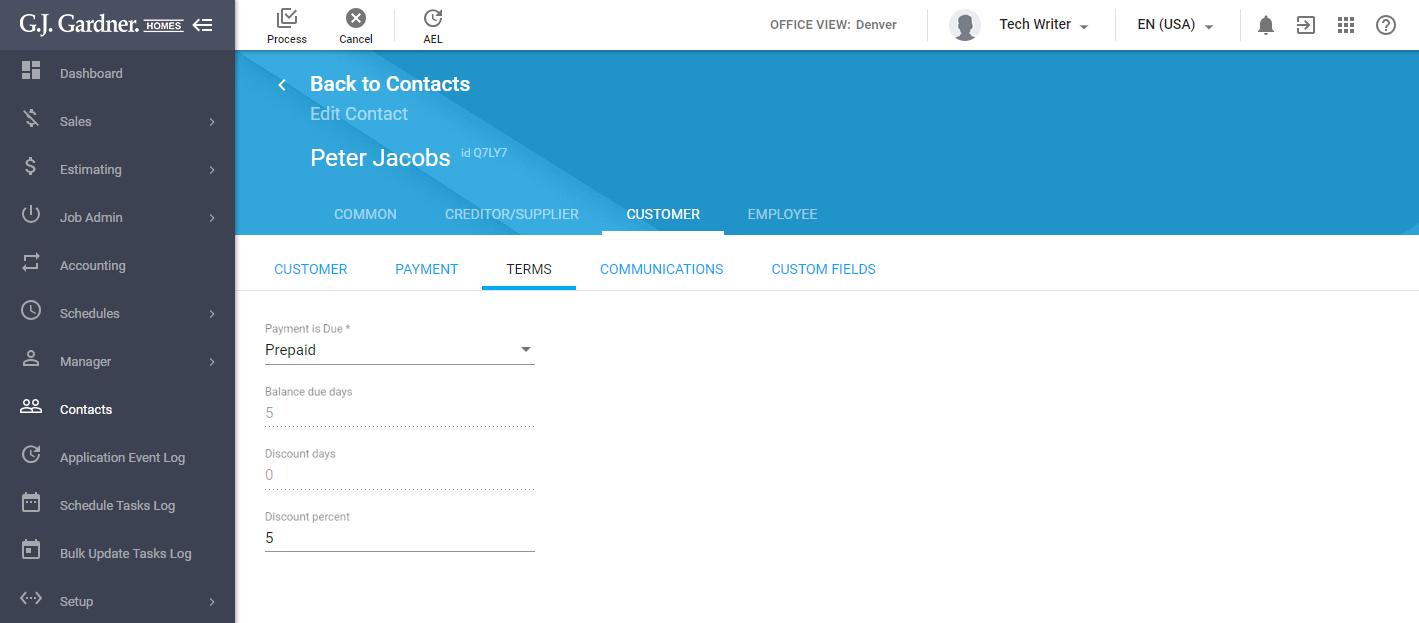
- Configure the payment terms, as follows:
Payment is Due Select the option for calculating the payment due date from the following ones: - None Advised – no specific date is required.
- COD (Cash on Delivery) – no specific due date is required. The payment is made upon delivery of the mail order.
- Prepaid – no specific due date is required. The order is considered to be prepaid.
- In a given number of days – the payment is due within the given number of days.
- On a day of the month – the payment is due on a specific day of every month.
- # of days after EOM – the payment is due within a specific number of days following the end of the month.
- Day of month after EOM – the payment is due by the specific day of the following month.
- If you select any of the last four options, you will have to specify additional information, as follows:
Due day of month Enter the due day of month. Discount days Enter the number of days before the due date when the discount can be applied if the invoice is paid in full. Discount percent Enter the discount percent which applied when the invoice is paid in full within the discount period. - When complete, click Process.
Managing Communication with Customer
You can directly communicate with the contact of the Customer type by email or by SMS, and view MailChimp newsletters that were sent.
- On the tabbed menu, select Communications. On the opened page you can view the list of communication items between you and the contact.
- For each communication item, you can view the following information:
Type Type of the communication item (SMS or email). Created Date when the communication item was created. Subject Subject of the email. It is not applicable to SMS. Sender User who initiated the communication. Message Text of the communication item. Attachments List of files attached to the email. It is not applicable to SMS.
To sort communication items:
- Click the header of the column which you want to sort by.
- You can also click the down or up arrow icons, to sort items in the descending or ascending order.
To send a new SMS:
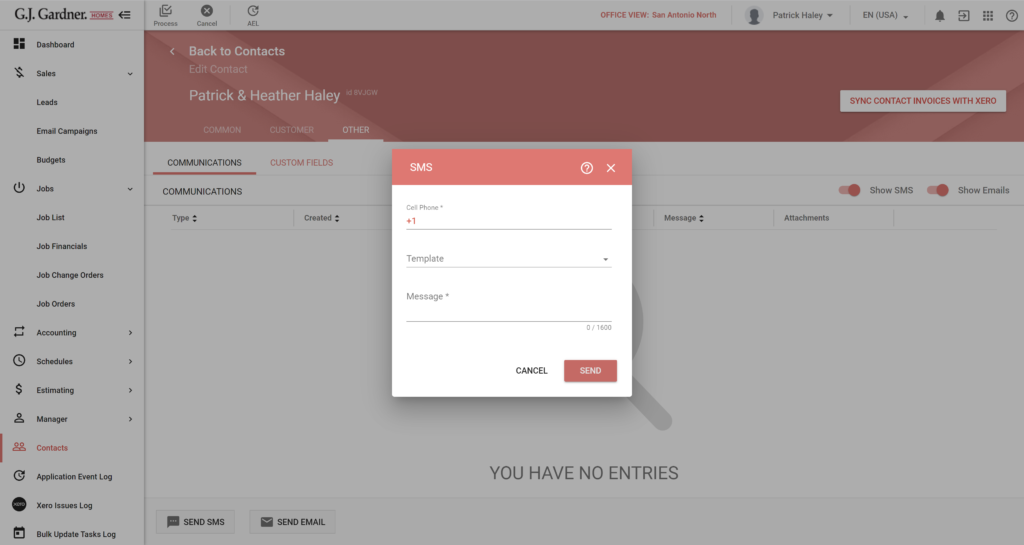
- Click Send SMS.
- In the SMS form, specify the following information:
Cell Phone Enter the cell phone number of the contact. By default, the system populates it automatically with the phone number specified in the contact profile. Template Select a template to repopulate the message field with a template from Setup > Manage SMS Templates. Message Specify the message for SMS. One SMS message can include up to 160 characters. If you exceed this limit, your message will be separated into two SMS. - Click Send.
Note
The system may automatically adjust the format of the phone number when you send an SMS to the addressee. This is required for the correct processing of the phone number by the external service. The following adjustments may occur:

- US region: +1 is added to the phone number.
- AU region: +61 is added to the phone number.
- NZ region: +64 is added to the phone number.

The system may automatically drop the zero ‘0’ in the phone numbers of AU and NZ regions, as follows: 0418989661 becomes +61418989661.
To send a new Email:
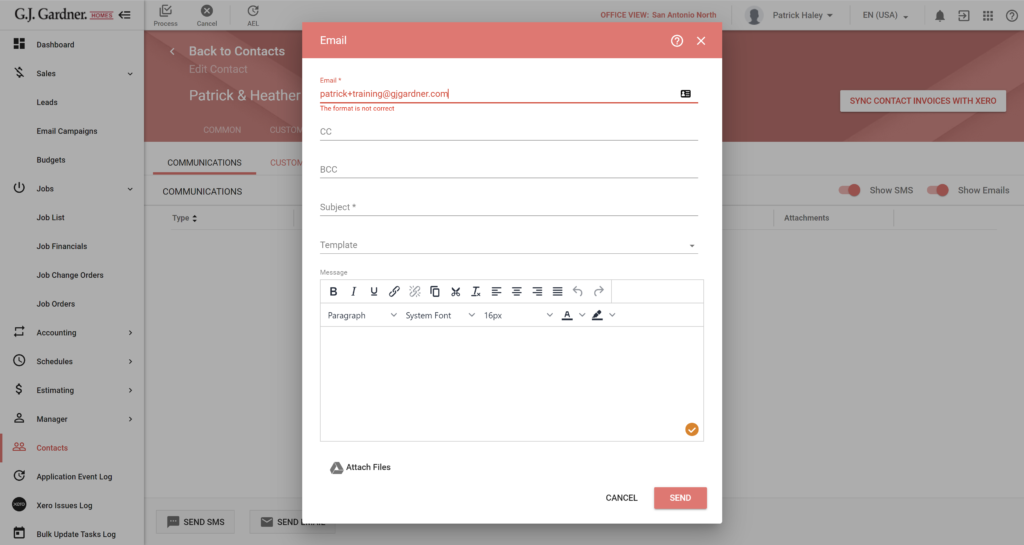
- Click Send Email.
- In the Email form, specify the following information:
To attach files to the email message, click Attach Files and select the appropriate files on your Google Drive.Email, CC, BCC Enter the email address of the Lead. By default, the system populates it automatically with the email address specified in the Lead profile. You can specify multiple email addresses of recipients by separating them with a semicolon (;). Subject Enter the email subject. Template Select a template to repopulate the message field with a template from Setup > Manage Email Templates. Subject Enter the email subject. Message Enter the email message. Use the visual editor to apply the required formatting to your message and align the text. - Click Send.
Filling Out Custom Fields
- On the tabbed menu, select Custom Fields.
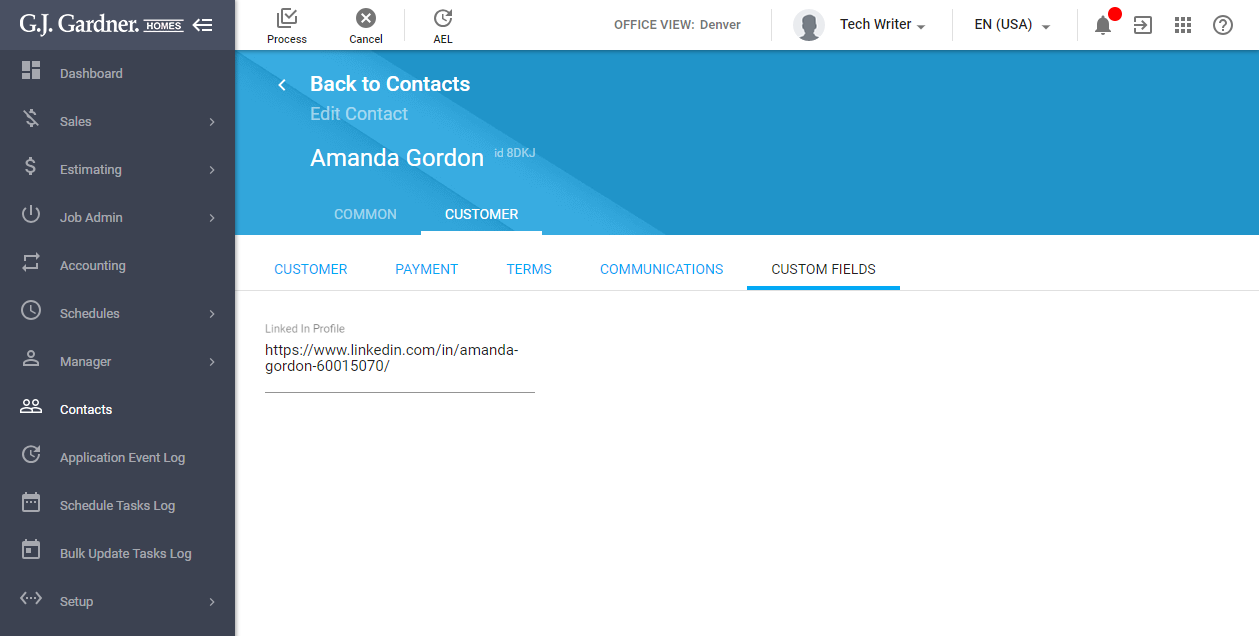
- On the opened tab, fill out the custom fields for the contact.
- When complete, click Process.
Filling Out Additional Details
- On the tabbed menu, select Additional Information.
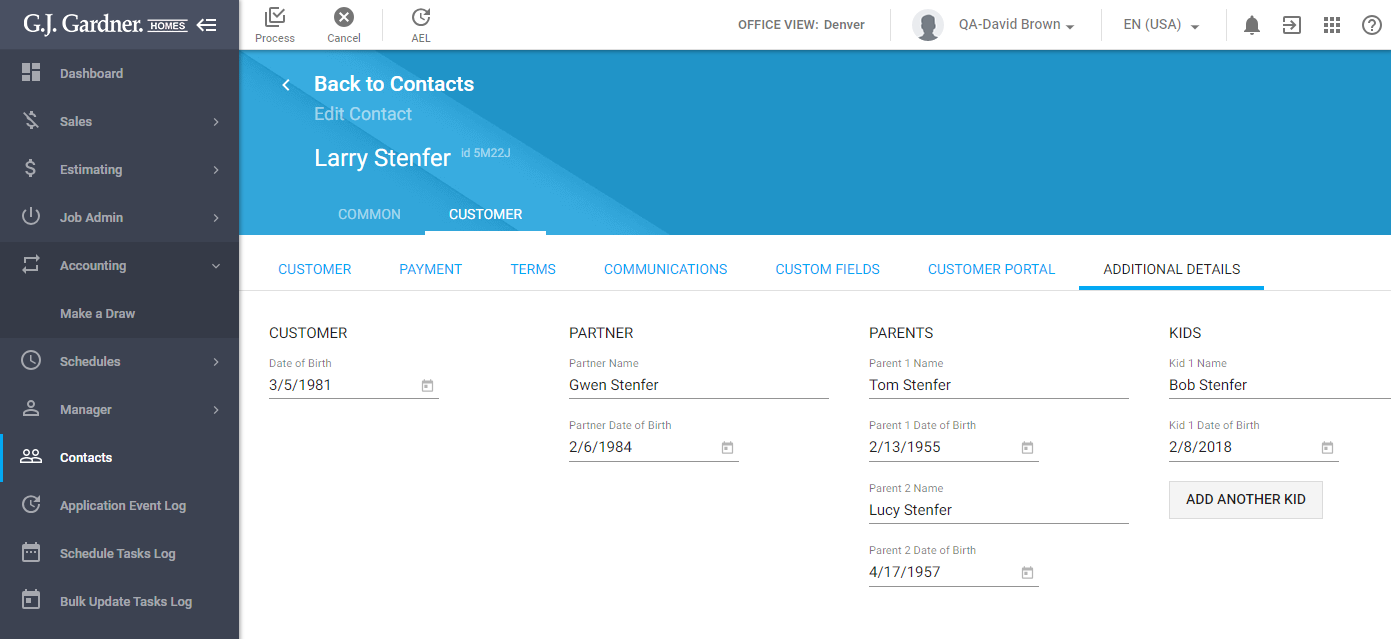
- Select the Customer’s date of birth through the date picker.
- Enter the name of the Customer’s partner.
- Select the Partner’s date of birth through the date picker.
- Enter names of the Customer’s parents.
- Select the Parents’ dates of birth through the date picker.
- Enter the name of the Customer’s kid.
- Select the Kid’s date of birth through the date picker.
- To add another kid, click Add another kid.
- When complete, click Process.