Job Color Selection is a collection of colors, models, and styles of Items and Components used in the Job. You need to go through headings and sub-headings, and supply the appropriate color, model and style options within the Job Color Selection.
A Job Color Selection is based on a Color Selection Master that you select before filling out.
Producing the Job Color Selection
- On the list with Jobs, locate the one you want to populate the Job Color Selection for.
- Hover over the Job until the action icons appear.
- Click the Job Color Selection
 icon.
icon. - In the Select Color Selection Master form, select the Color Selection Master you want to use for the Job.
- Click Apply. The Job Color Selection Page loads, as follows:

This page is comprised of the set of columns:
- Headings – shows the list of headings in the Color Selection Master.
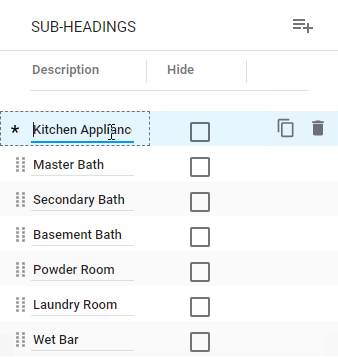
- Sub-Headings – shows the list of sub-headings within the selected heading.
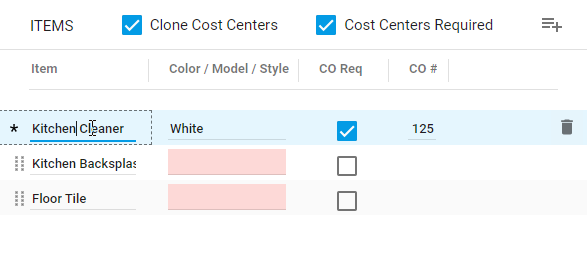
- Items – shows the list of Items within the selected sub-heading.
- Cost Centers – shows the list of Cost Centers that attribute to Items.
- Other Quote Changes – shows the list of other quote changes.
Additionally, there is a block for entering a memo.
The system loads the Color Selection Master template, but sometimes you may need to modify it, add some new positions or remove the unnecessary elements.
Managing Headings in Job Color Selection
Note
When you create a Job Color Selection, the system will automatically link Items and Components to specific paragraphs and sections based on the mappings from the Specification Template.
1. If an Item or Component is linked with a specific Heading or Subheading, such Item or Component (from Quote Changes) will appear in the Color Selection Master as an Item under the selected Subheading.
2. If an Item or Component is linked with a specific Heading, Subheading, and Item,, such Item or Component (from Quote Changes) will appear in the Color Selection as Color/Model/Style of the selected Item. Its Quote Description will be used.
Note
All the Items and Components that were not specified in the Price Book, will appear on the Other Quote Changes list. You can move them to other Subheadings of the Job Color Selection as Items.
You can manage headings in the Job Color Selection as follows:
- add new headings
- edit names of headings
- delete the no longer needed headings
- clone the headings
To add a new heading:
- Above the Headings list, locate the Create New Heading
 icon and click it.
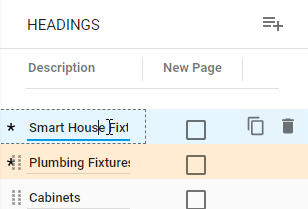
- Double-click the newly appeared row on the list and enter the heading name.
- When complete, click Process.
To edit the heading name:
- On the Headings list, locate the heading you want to edit.
- Double-click the row on the list and update the heading name.
- When complete, click Process.
To clone the heading:
You can clone the heading with all its child elements (sub-headings and items).
- On the Headings list, locate the heading you want to clone.
- Hover over the heading until the action icons appear and click the Clone
 icon. A new row appears on the Headings list.
 - Double-click the newly appeared row on the list and enter the heading name.
- Continue managing child elements within the cloned heading.
- When complete, click Process.
To delete the heading:
You can delete the heading with all its child elements.
- On the Headings list, locate the heading you want to delete.
- Hover over the heading until the action icons appear and click the Delete
 icon.
icon. - Confirm the removal of the heading with all its child elements.
- When complete, click Process.
To place the heading on a new page:
- On the Headings list, locate the heading you want to place on a new page.
- Check the corresponding box in the New Page column.
- When complete, click Process.
Managing Sub-Headings in Job Color Selection
You can manage sub-headings in the Job Color Selection, as follows:
- add new sub-headings
- edit names of sub-headings
- delete the no longer needed sub-headings
- clone the sub-headings
To add a new sub-heading:
- Select the heading which you want to add a new sub-heading into.
- Above the Sub-Headings list, locate the Create New Sub-Heading icon and click it.
- Double-click the newly appeared row on the list and enter the sub-heading name.
- When complete, click Process.
To edit the sub-heading name:
- On the Sub-Headings list, locate the sub-heading you want to edit.
- Double-click the row on the list and update the sub-heading name.
- When complete, click Process.
To clone the sub-heading:
You can clone the sub-heading with all its items.
- Select the heading which includes the sub-heading you want to clone.
- On the Sub-Headings list, locate the sub-heading you want to clone.
- Hover over the sub-heading until the action icons appear and click the Clone icon. A new row appears on the Sub-Headings list.
- Double-click the newly appeared row on the list and enter the sub-heading name.
- Continue managing child elements within the cloned sub-heading.
- When complete, click Process.
To delete the sub-heading:
You can delete the sub-heading with all its child elements.
- Select the heading which includes the sub-heading you want to delete.
- On the Sub-Headings list, locate the sub-heading you want to delete.
- Hover over the sub-heading until the action icons appear and click the Delete icon.
- Confirm the removal of the sub-heading with all its child elements.
- When complete, click Process.
To hide the sub-heading in the Job Color Selection:
- On the Sub-Headings list, locate the sub-heading you want to hide in the Job Color Selection.
- Check the corresponding box in the Hide column.
- When complete, click Process.
Managing Items in the Job Color Selection
You can manage Items in the Job Color Selection, as follows:
- add new Items
- edit names of Items
- specify Color/Model/Style in Item attributes
- delete the no longer needed Items
To add a new Item:
- Select the heading and then sub-heading which you want to add a new Item into.
- Above the Items list, locate the Create New Item icon and click it.
- Double-click the newly appeared row on the list and enter the Item name.
- When complete, click Process.
To edit the Item name:
- On the Items list, locate the Item you want to edit.
- Double-click the row on the list and update the Item name.
- When complete, click Process.
To delete the Item:
You can delete the Item with all its Cost Centers.
- Select the heading and then sub-heading which includes the Item you want to delete.
- On the Items list, locate the Item you want to delete.
- Hover over the Item until the action icons appear and click the Delete icon.
- Confirm the removal of the Item with its Cost Centers.
- When complete, click Process.
Specifying attributes of Items:
- On the Items list, locate the Item which attributes you want to specify.
- Enter the Color/Model/Style for the Item.
- If there is a Change Order required,check the corresponding box in the CO Req column. Once you enable CO Req, the CO # box becomes available. After the Change Order is created use this field to enter the Change Order Number.
- When complete, click Process.
Managing Cost Centers in the Job Color Selection
You can manage Cost Centers in the Job Color Selection, as follows:
- add new Cost Centers
- update the Cost Centers
- delete the no longer used Cost Centers
To add a new Cost Center:
- Select the heading, sub-heading and then Item which you want to add a Cost Center into.
- Above the Cost Centers list, locate the Add Cost Center icon and click it.
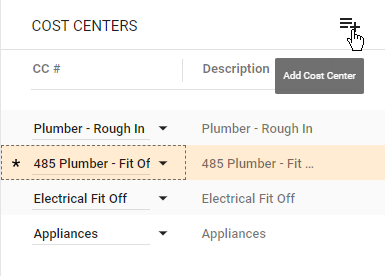 In the Find Cost Centers form, select one or multiple Cost Centers you want to add.
 - Click Add Selected.
- When complete, click Process.
To modify the Cost Center:
- On the Cost Centers list, locate the Cost Center you want to modify.
- Position the mouse pointer within the box and click the icon to clear the Cost Center.
- Select the Cost Center from the list of Cost Centers used in the current Job Color Selection.
- When complete, click Process.
To delete the Cost Center:
You can delete the Cost Centers from the Job Color Selection.
- Select the heading, sub-heading and then Item which includes the Cost Center you want to delete.
- On the Cost Centers list, locate the Cost Center you want to delete.
- Hover over the Cost Center until the action icons appear and click the Delete icon.
- Confirm the removal of the Cost Center.
- When complete, click Process.
Managing Quote Changes in the Job Color Selection
You can manage the Quote Changes in the Job Color Selection, as follows:
- view the list of Quote Changes
- move the Quote Changes to the Items list
- hide Quote Changes in the Job Color Selection
To view Quote Changes:
The list of Quote Changes is shown in the right part of the screen, as follows:
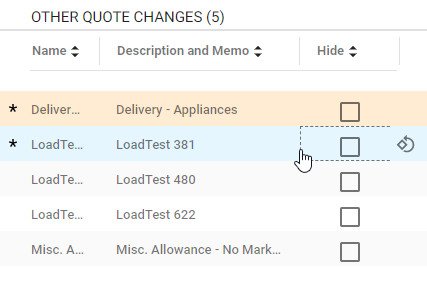
For each Quote Change the following information is shown:
| Name | Name of the Item (considered to be a Quote Change). |
| Description | Description and memo of the Item (considered to be a Quote Change). |
To move Quote Changes to Items list:
You can move the Item from the Quote Changes list to the list with regular Items.
- Select the heading and then the sub-heading which includes the Items list which you want to move the Item from the Quote Changes list.
- On the list with other Quote Changes, locate the Item you want to move.
- Hover over this Item until the action icons appear.
- Click the Move to Items
 icon.
icon. - When complete, click Process.
If you need to return the Item back to the Quote Changes, click the Move back to Quote Changes ![]() icon.
icon.
To hide Quote Changes in the Job Color Selection:
You can hide specific Items or even the entire list of Items from the Quote Changes in the Job Color Selection.
- On the list with Quote Changes locate the Item you want to hide in the Job Color Selection.
- Check the box in the Hide column for this Item.
- When complete, click Process.
Note
When you hide an Item in the Quote Changes, this Item will not appear under the Quote Changes heading in the produced Job Color Selection. If you hide all Items from the Quote Changes list, the Quote Changes heading will not be shown in the Job Color Selection.
To replace the Job Color Selection:
You may need to replace the Job Color Selection.
- On the toolbar, locate the Replace
 button and click it.
 - In the opened confirmation form, click Yes. This opens the Select Color Selection Master form.
- In the Select Color Selection Master form, select another Color Selection Master to replace the currently used one.
- Click Apply.
This will replace the original Job Color Selection with a new Color Selection Master pattern. So you will have to populate the Job Color Selection from scratch.
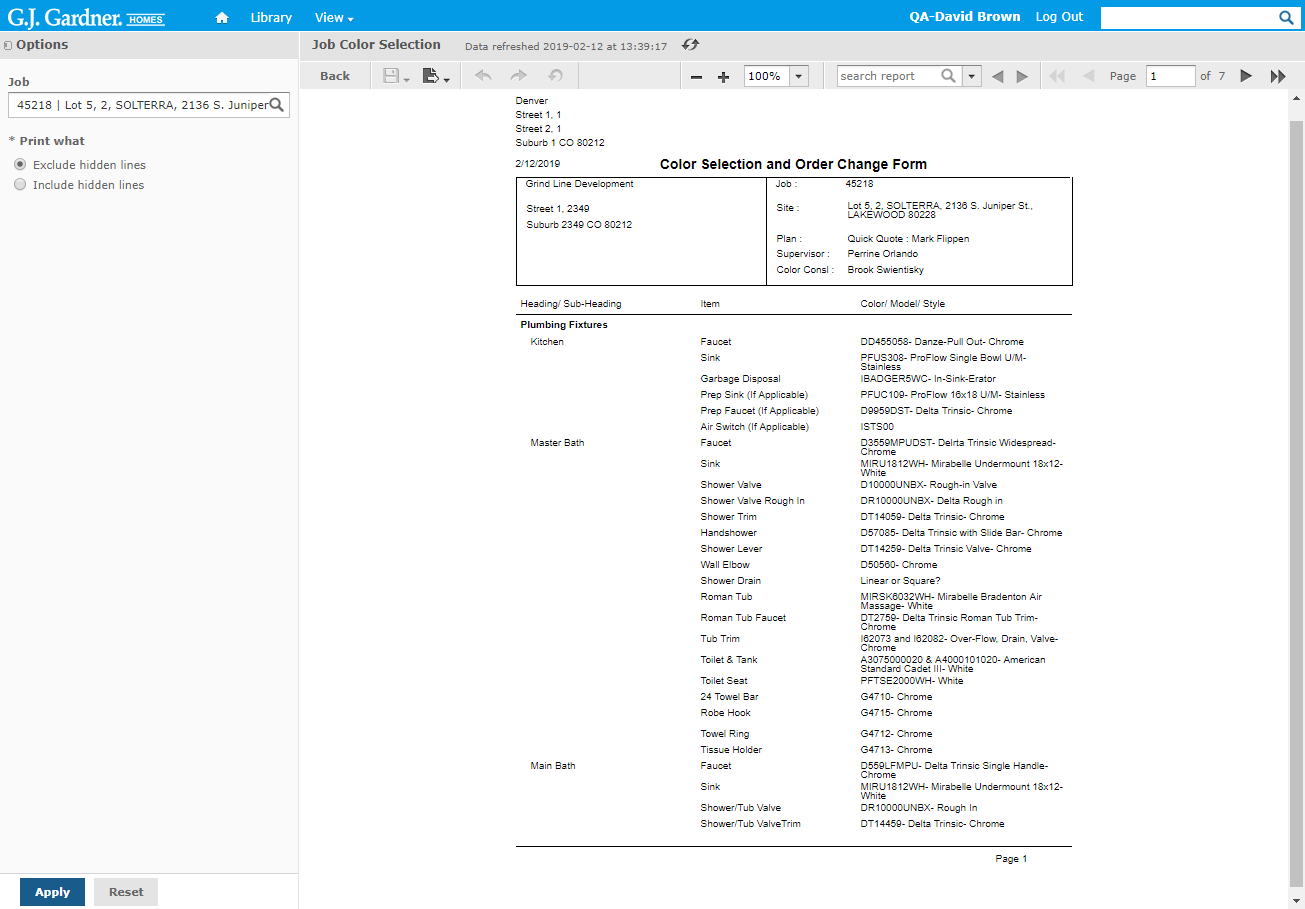
Previewing the Job Color Selection
- Open the Job Color Selection for a specific Job.
- In the top right part of the screen, locate the Preview
 icon. You will transition to the reporting system.
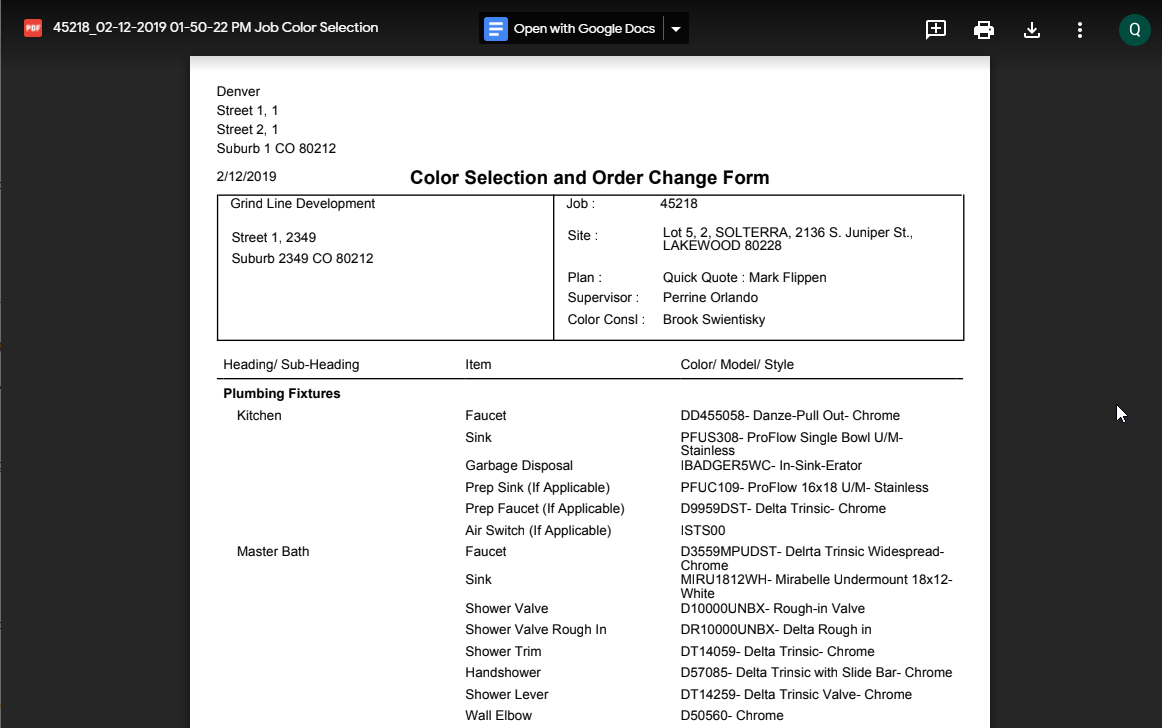
Click Apply. The Color Selection and Order Change Form report will be generated, as follows:
Producing the Job Color Selection
Once you have filled out the Job Color Selection, selected the Color Consultant, and specified the Signed Off by Office and Signed Off by Client dates, you can proceed to producing the Job Color Selection.
When you produce the Job Color Selection, the system generates a PDF file and uploads it into the customer’s folder on GDrive.
- Open the Job Color Selection for a specific Job.
- In the top part of the screen, locate the Produce button and click it.
- In the Link to Job Color Selection form, click the link to produced Job Color Selection. The Color Selection and Job Change report opens from the customer’s folder on GDrive, as follows: