
You can create estimates for the House Plan in four different ways, as follows:
- create estimates from scratch
- copy Cost Centers
- clone from House Plan
- clone from Job
Creating House Plan Estimates from Scratch
- On the list with House Plans, locate the empty House Plan which Estimates you want to define.
- Click within the cell in the GTO column. The House Plan Estimate form opens.
- In the House Plan Estimate form, select Start from Scratch.
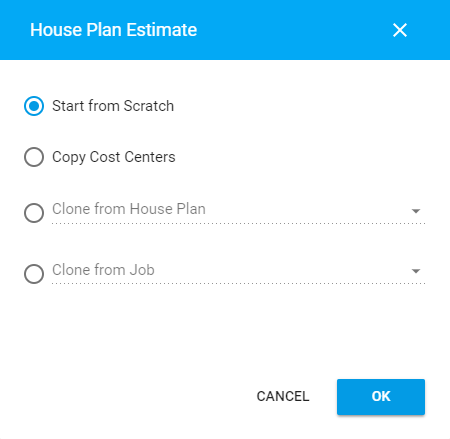
- Click OK. The page with the default Components and Cost Centers opens where you can manage them.
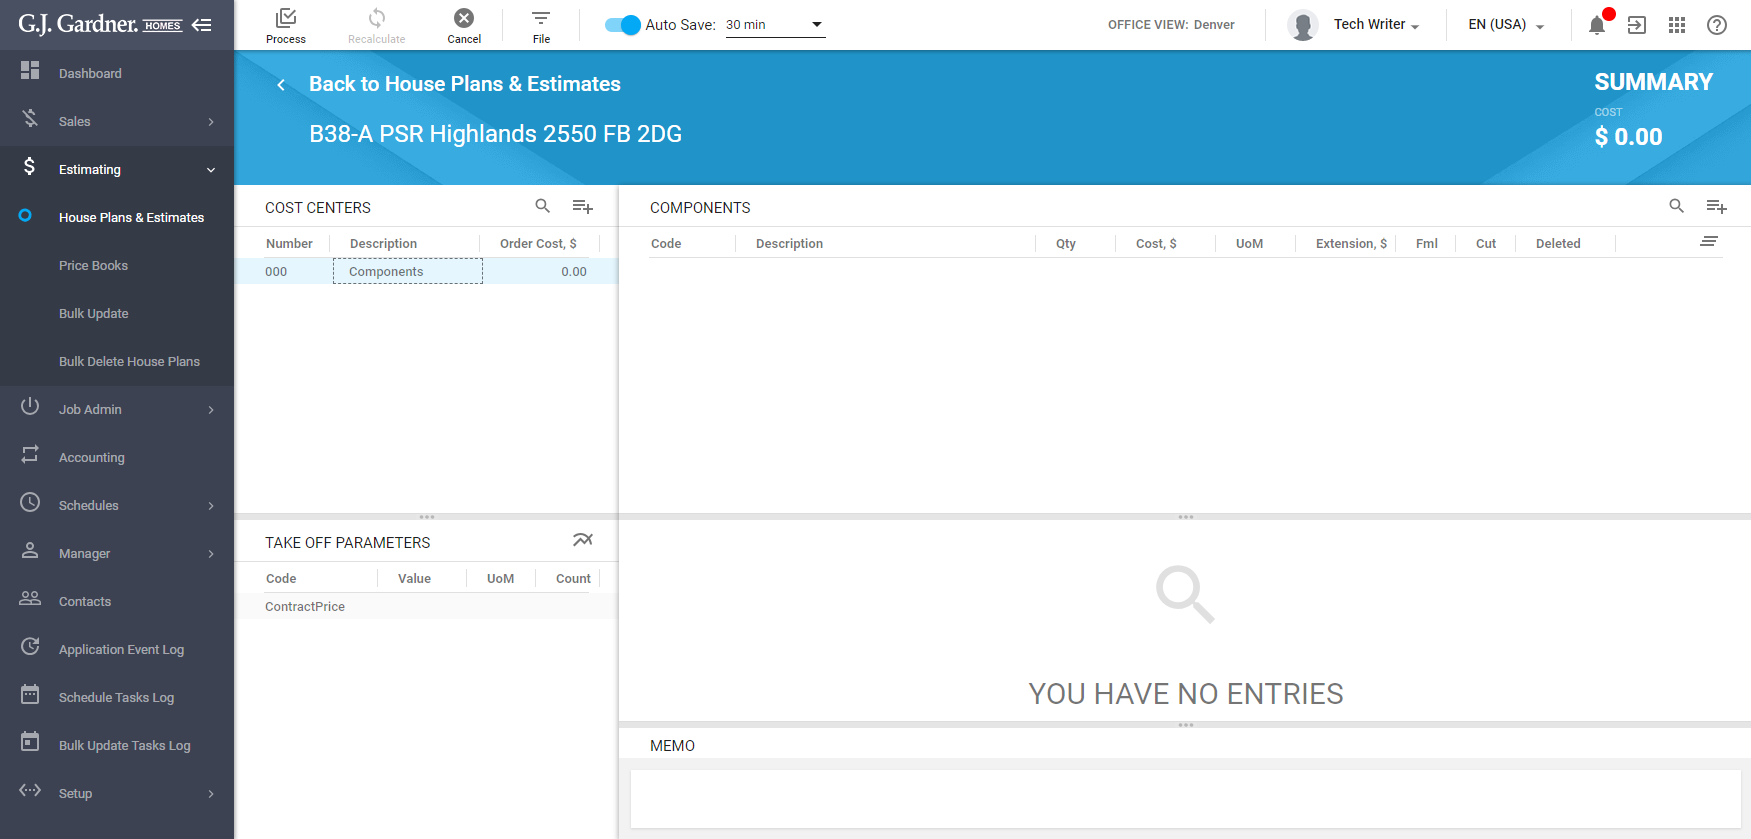
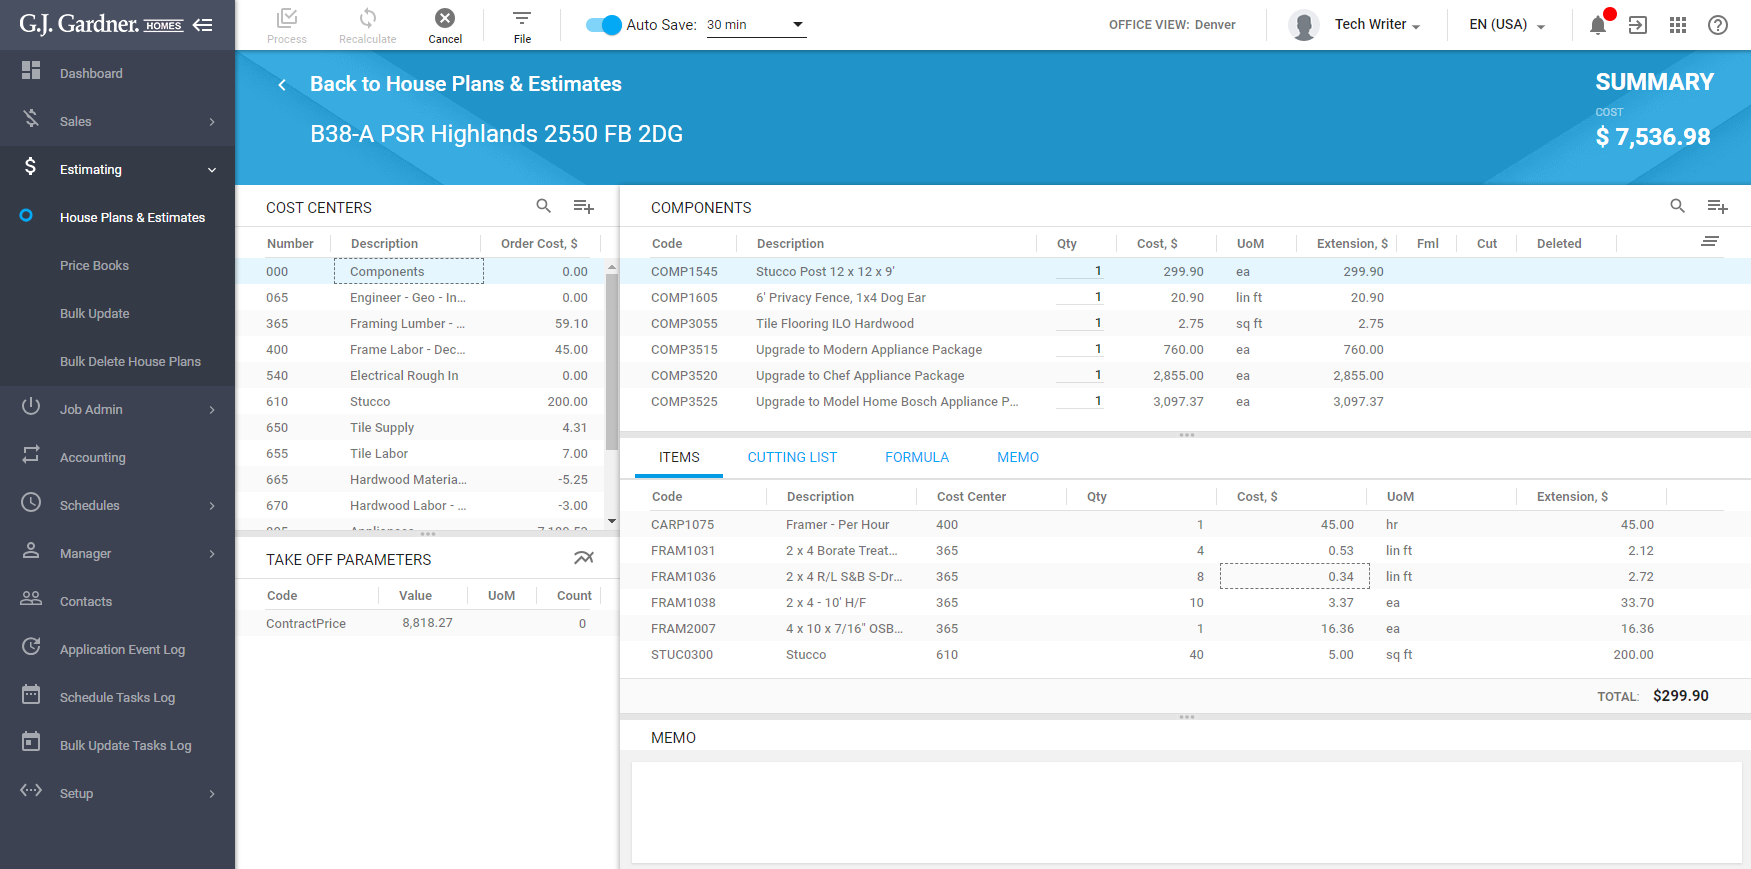
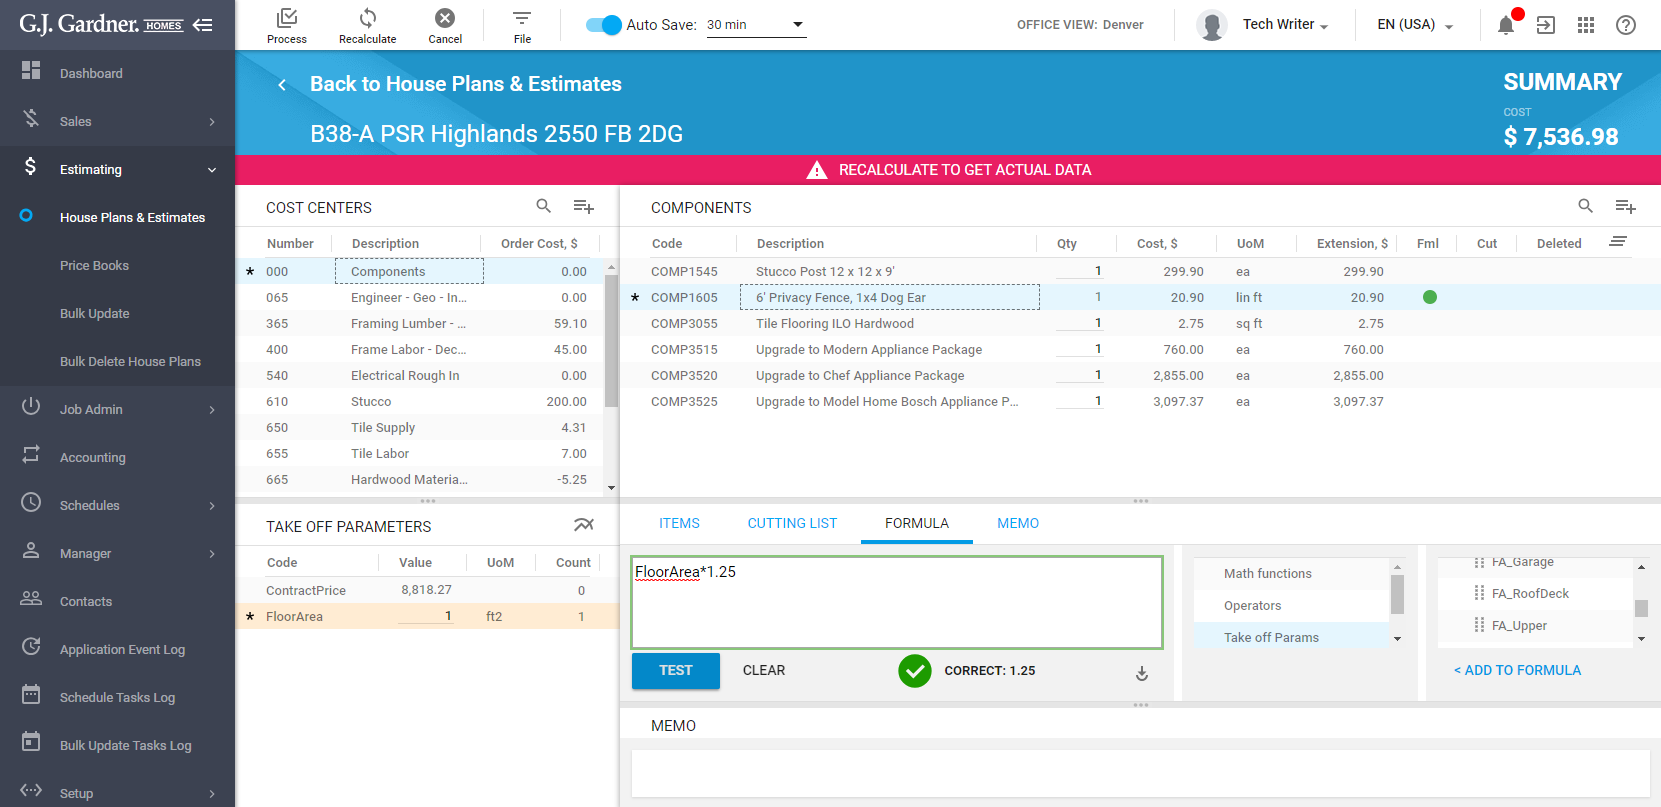
The House Plan page is comprised of the following blocks:
- Cost Centers
- Take Off Parameters
- Components / Items
- Items / Cutting List / Formula / Memo
- Memo
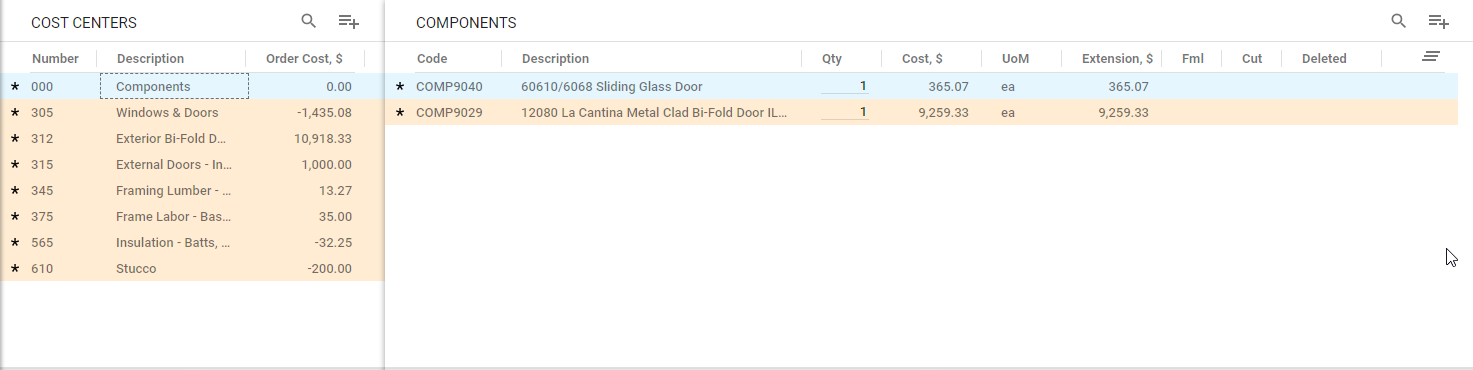
The Cost Centers block shows the following information:
| Number | Number of the Cost Center. |
| Description | Description of the Cost Center. |
| Order Cost, $ | Order cost of the Cost Center. |
The Take Off Parameters block shows the following information:
| Code | Code of the Take Off Parameter. |
| Value | Value of the Take Off Parameter. |
| UoM | Unit of Measure of the Take Off Parameter. |
| Count | The count value of the Take Off Parameter in the House Plan. Values are summed up for the same Take Off Parameter used in multiple Items or Components within the one House Plan. |
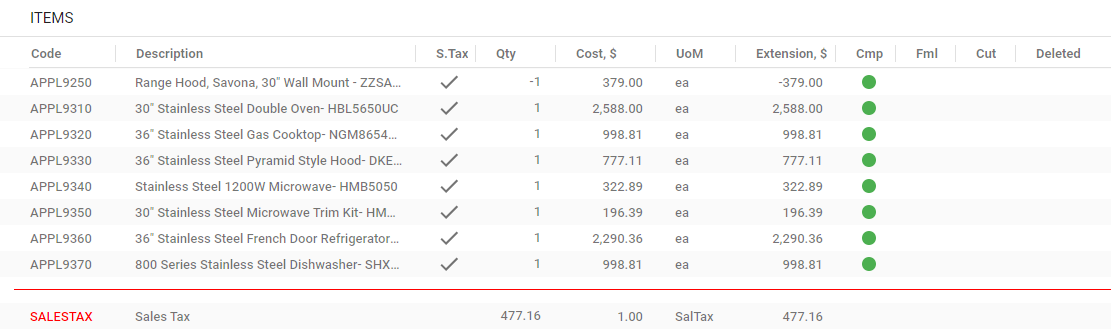
The Components / Items block shows the following information:
| Code | Code of the Item or Component. |
| Description | Description of the Item or Component. |
| S.Tax | Flag that the sales tax is applied to the Item. |
| Qty | Quantity of Items or Components in the House Plan. |
| Cost, $ | Cost of the Item or Component per one piece |
| UoM | Unit of Measure of the Item or Component. |
| Extension, $ | Extension of the Item or Component in dollars (Cost multiplied by Qty). |
| Fml | Flag that the Component or Item uses the formula. The green circle indicates that the formula is applied. |
| Cmp | Flag that the Item is a part of the Component. The green circle indicates that the Item is used in the Component. |
| Cut | Flag that the Item uses cuts. The green circle indicates that the Item is used in the Component. |
| Deleted | Flag that the Item is deleted from the system. |
The Items / Cutting List / Formula / Memo block is comprised of the four tabs that shows the following:
| ITEMS | |
| Code | Code of the Item or Component. |
| Description | Description of the Item or Component. |
| Cost Center | Cost Center which the Item attributes to. |
| Qty | Quantity of Items within the selected Component. |
| Cost, $ | Cost of the Item per one piece |
| UoM | Unit of Measure of the Item or Component. |
| Extension, $ | Extension of the Item or Component in dollars (Cost multiplied by Qty). |
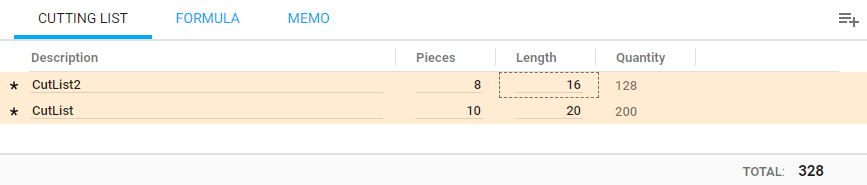
| CUTTING LIST | |
| Description | Description of the cutting list. |
| Pieces | Number of pieces per one cutting list. |
| Length | Length of one cutting list. |
| Quantity | Total quantity of the Item using the cutting list (Item Qty multiplied by pieces and length of the cutting list). |
| FORMULA | |
| Formula entry area | Area for specifying the formula that is applied to the Item or Component. |
| Math functions list | List of mathematics functions. |
| Take Off Parameters list | List of Take Off Parameters that can be used in the formula. |
| MEMO | |
| Memo entry area | Area for entry a memo about the Item or Component. |
The Memo block allows you to enter a memo for the House Plan.
Continue with managing Cost Centers, and adding Components and Items into the House Plan Estimates.
Creating House Plan Estimates by Copying Cost Centers
- On the list with House Plans, locate the empty House Plan which Estimate you want to define. An empty House Plan is indicated with 0/0 in the GTO column.
- Click on the row with the House Plan you want to open. The House Plan Estimate form opens.
- In the House Plan Estimate form, select Copy Cost Centers.
- Click OK. The page for managing Cost Centers, Components, and Take-off Parameters opens.
- When complete, click Process.
The system will automatically copy all the existing Cost Centers and add them into the House Plan Estimate. The further process of managing House Plan Estimates is similar to Creating House Plan Estimates from Scratch.
Creating House Plan Estimates by Cloning from Job
You can clone House Plan Estimates from the existing House Plan and further adjust them to your needs and your project.
- On the list with House Plans, locate the empty House Plan which Estimates you want to define. An empty House Plan is indicated with 0/0 in the GTO column.
- Click within the cell in the GTO column. The House Plan Estimate form opens.
- In the House Plan Estimate form, select Clone from Job.
- Select the Job which you want to close House Plan Estimates from.
- Click OK. The page for managing Cost Centers, Components, and Take-off Parameters opens.
- When complete, click Process.
The system will automatically clone all the existing Cost Centers, Items, Components and Take Off Parameters from the source House Plan. Adjust the House Plan Estimate for the actual House Plan. See the Creating House Plan Estimates from Scratch section for the details on configuring the House Plan Estimates.
Creating House Plan Estimates by Cloning from House Plan
You can clone House Plan Estimates from an existing House Plan and adjust them to suit a different plan.
- On the list with House Plans, locate the empty House Plan which Estimates you want to define. An empty House Plan is indicated with 0/0 in the GTO column.
- Click within the cell in the GTO column. The House Plan Estimate form opens.
- In the House Plan Estimate form, select Clone from House Plan.
- Select the House Plan which you want to clone the Estimate from.
- Click OK. The page for managing Cost Centers, Components, and Take-off Parameters opens.
- When complete, click Process.
The system will automatically clone all the existing Cost Centers, Items, Components and Take Off Parameters from the source Job. Adjust the House Plan Estimates for the actual House Plan. See the Creating House Plan Estimates from Scratch section for the details on configuring the House Plan Estimate.
Editing the House Plan Estimates
- On the list with House Plans, locate the House Plan Estimates you want to edit.
- Click within the cell in the GTO column. The page for managing Cost Centers, Components, and Take-off Parameters opens.
- Make the appropriate modifications in Cost Centers, Items, Components, and Take Off Parameters.
- When complete, click Process.
Managing Cost Centers
You can manage Cost Centers in House Plan Estimates.
You can perform the following operations on them:
- add Cost Centers into the House Plan
- remove Cost Center from the House Plan
To add a Cost Center:
- Locate the Cost Centers block.
- In the top right part of the Cost Centers block, locate the Add
 icon and click it.
 - In the Find Cost Centers form, browse through the list and select the Cost Center you want to add. Alternatively, you can look up for a specific Cost Center by its code or description. The already added Cost Centers are grayed out.
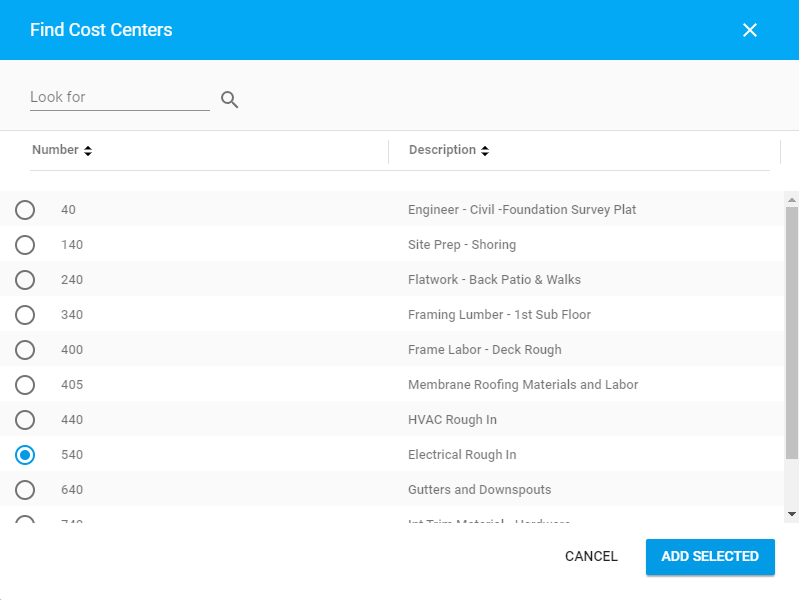
- Click Add Selected. The Cost Center will appear on the list with other Cost Centers
- When complete, click Process.
To remove the Cost Center:
- In the Cost Centers block, locate the Cost Center you want to remove.
- Hover over the Cost Center until the action icons appear.
- Click the Remove icon.
- When complete, click Process.
Note
You can only remove Cost Centers that do not have any Items assigned to them.
To view order details:
You can view order details for a specific Cost Center.
- On the list with Cost Centers, locate the one which order details you want to view.
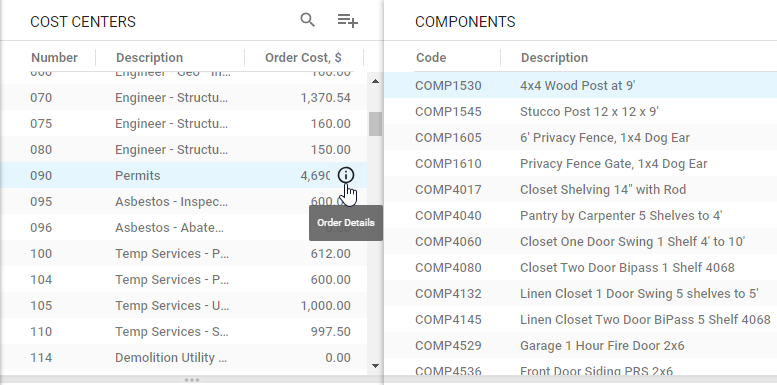
- Hover over the Cost Center until the action icons appear.
- Click the Order Details
 icon.
icon. - In the Order Details form, review Components or Items included into the order.
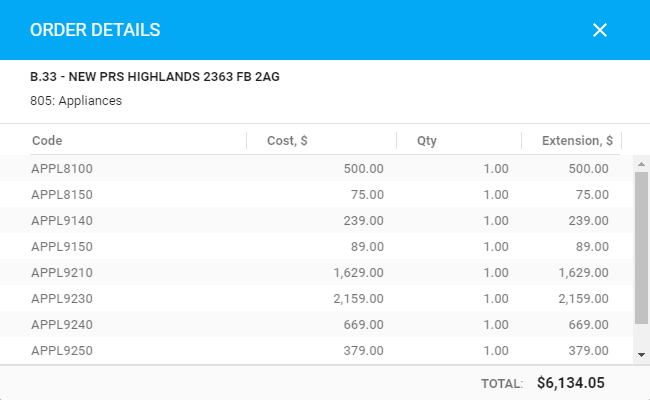
- When complete, close the form.
Managing Items and Components
You can manage Items and Components that are included into the House Plan Estimates.
You can perform the following operations on them:
- add Items and Components into the House Plan
- remove Items and Components from the House Plan
Viewing Components and Items in Cost Centers
You can view Components and Items within a specific Cost Center.
On the Cost Centers list, select the Cost Center you wish to view Components or Items in.
For each Component and Item, the following information is displayed:
| Code | Code of the Component or Item. |
| Description | Description of the Component or Item. |
| S.Tax | Flag that the sales tax is applied to the Item.
This information is not available for Components. |
| Qty | Quantity of Components or Items in that row. |
| Cost, $ | Unit Cost in dollars for one Component or Item.
Cost of the Component is calculated on the basis of the Items it is comprised of. |
| UoM | Unit of Measure applied to the Component or Item. |
| Extension, $ | Total sum for the Component or Item (quantity multiplied by the cost of the Component or Item). |
| Cmp | Flag that the Item is a part of a Component.
It is not shown for Components. |
| Fml | Flag that the Quantity of the Component or Item is calculated by a formula. |
| Cut | Flag that the Quantity of the Component or Item is calculated by the Cutting List. |
| Deleted | Flag that the Component or Item is marked as deleted in the Price Book. |
Below the list with Items, you may see the additional Sales Tax line. It shows the sales tax amount applied to Items within the selected Cost Center.
Adding an Item or Component
- In the Cost Centers block, select the Cost Center which you want to add an Item or Component into. You can add new Components only in the default Cost Center numbered as ‘000’ and named as ‘Components’. Items can be added in all Cost Centers except the default Cost Center for Components.
- Depending on the Item or Component you want to add, locate the Items or Components block correspondingly.

- In the top right part of the Items/Components block, locate the Add icon and click it.
- In the Find Items & Components form, browse through the list and select Items or Components you want to add. Alternatively, you can look up for a specific Item or Component by its code or description. The Filters box is disabled in this form for Components and Items.
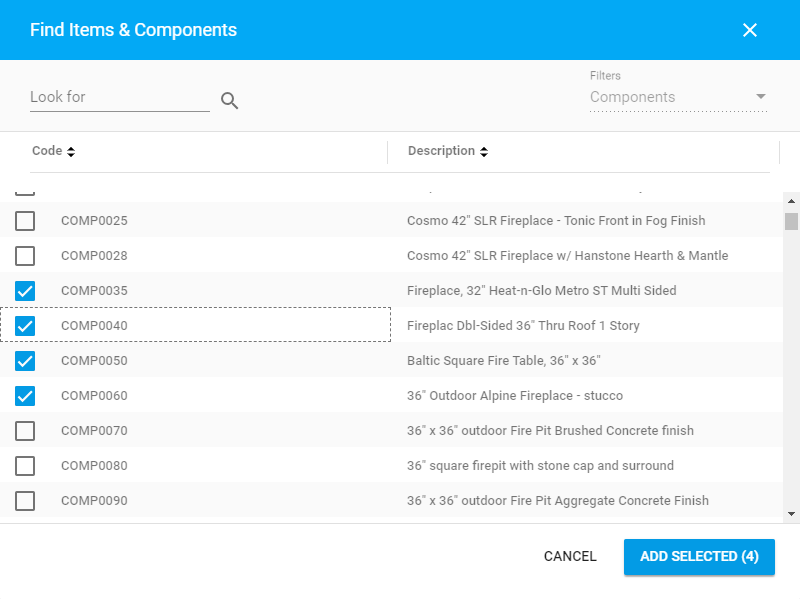
- Click Add Selected. The selected Items or Components will appear on the list.
- When complete, click Process.
If you add a Component, the system will automatically add all its Items which the Component is comprised of. Additionally, all the Cost Centers which these Items attribute to will be added too.
Removing an Item or Component
You can remove Items or Components from the House Plan Estimates. When you remove a Component from the House Plan Estimates, the system will automatically remove all the associated Items. You cannot remove an Item that is used as a part of the Component.
- Select the Cost Center which contains the Items or Components you want to remove.
- In the Items or Components block, locate the Item or Component you want to remove.
- Hover over the Item or Component until the action icons appear.
- Click the Remove
 icon.
icon. - When complete, click Process.
Viewing Items within the Component
- Select the Cost Center which stores Components.
- In the Components block, select the Component which Items you want to view. The list with Items will appear under the Components block.
For each Item, the following information is available:
| Code | Code of the Item. |
| Description | Description of the Item. |
| Cost Center | Cost Center which the Item attributes to. |
| Qty | Quantity of Items in the Component. |
| Cost, $ | Cost in dollars for one Item. |
| UoM | Unit of Measure applied to the Item. |
| Extension, $ | Total sum for the Item (quantity multiplied by the cost of the Item). |
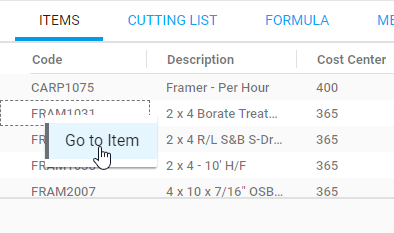
To transition to the specific Item of the Component, right-click the Item and select Go to Item. You will transition to the corresponding Item.
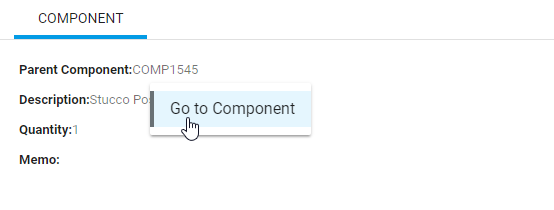
Viewing Component which Item Attributes to
- Select the Cost Center which stores Items.
- In the Items block, select the Item which comes from the Component you want to view. Information about the associated Component will appear under Items block.
To transition to the specific Component which the Item is mapped to, right-click in the Component area and select Go to Component. You will transition to the corresponding Component.
Managing Cutting Lists of the Item/Component
- Select the Cost Center which stores the Item or Component you want to manage the Cutting Lists for.
- Below the Item or Components block, locate the area with the tabbed menu.
- Select the Cutting List tab.
Here you can add new Cutting Lists and remove the unnecessary ones.
To add a new Cutting List:
- In the right part of the area with the tabs, locate the Add
 icon and click it.
 - Position your mouse pointer within the appeared text line.
- Enter description of the Cutting List.
- Enter the number of pieces within the cutting list.
- For each piece, specify the length per one piece.
- When complete, click Recalculate.
- Once the quantity of the Item or Component is recalculated, click Process.
If you are using the cutting list for an Item or Component, you will no longer be able to change the quantity of this Item or Component.
To remove the Cutting List:
- On the list with Cutting Lists, locate the one you want to remove.
- Hover over the Cutting List until the action icons appear.
- Click the Remove icon.
- When complete, click Recalculate.
- Once the cost is recalculated, click Process.
Applying formula for Quantity calculation
You can apply a formula to calculate Quantity of an Item or Component. You cannot add a formula for to an Item that has a Cutting List or if that Item comes from a Component.
By default, you can construct a formula while working with Items and Components. You also have an opportunity to override the base formula with a custom one while estimating the House Plan. This will not affect the base formula. The defined formula will be used to calculate the Quantity in this specific House Plan Estimates.
You can construct a formula from the following sets of elements:
| Math functions | Mathematical functions. |
| Operators | Mathematical operators. |
| Take Off Params | Take Off Parameters. |
| Trig functions | Trigonometric functions. |
For the details on building formulas, please see Formula Builder.
To construct a formula:
- Select the Item or Component which you want to add a formula for.
- In the area with the tabbed menu, select Formula.
- Select the appropriate element set and then drag an individual function or parameter to the Formula box.
- Add the appropriate operator into the function.
- Continue until the Formula is complete
- To verify the formula, click Test.
- When complete, click Save.
To clear the constructed formula, click Clear.
For the details on constructing the formulas, please see Expression Builder.
Note
You cannot save the incorrect formula. The system will position the cursor where an error in the formula occurs.
Note
If you change the formula of an existing Item or Component, you will be prompted to propagate the modified formula to all or to specific House Plans which used the original formula.
Note
When you test the specified formula, the system verifies it and calculates the resulting value upon the correctness of the formula. If the formula contains the ContactPrice ToP, the system will show the ‘~’ symbol indicating that the resulting value may vary.
To propagate the formula to House Plans:
- Modify the original formula.
- Click Process. The Propagate Formula form opens. Alternatively, you can click the Propagate icon under the Formula box.
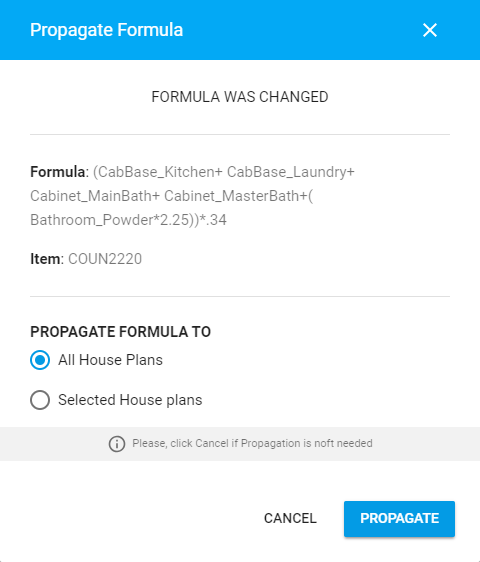
- Select the way of propagating the modified formula to other House Plans:
All House Plans The modified formula will be propagated to all the House Plans where this formula was used. Selected House Plans The modified formula will be propagated to the selected House Plans only. You will need to select the specific House Plans. - Click Propagate.
Note
If you do not want to propagate the modified formula to House Plans, click Cancel.
Note
Please consider that the modified formula will not be updated in any existing Job Estimates.
Adding a memo for Item/Component
You can add a memo for a specific Item/Component. This memo will be visible in the interface of the system and will not be included into any document.
- Below the Item or Components block, locate the area with the tabbed menu.
- Select the Memo tab.
- Enter the memo about the Item/Component.
- Click Process.
Managing Take Off Parameters
For the details on measuring Take Off Parameters with GTO, please see the Measuring Take Off Parameters section.
Updating Values of Take Off Parameters
- Open the House Plan Estimates.
- Locate the Take Off Parameters block.
- In the Take Off Parameters block, locate the parameter you want to update.
- Position the mouse pointer within the text field of this Take Off Parameter.
- Enter the value you want.
- When complete, click Recalculate.
- Click Process.
Note
If you update the value of the Take Off Parameter that was measured in GTO, all the related measurements of this Take Off Parameter on the floor plan will be removed automatically.
Viewing Usage of Take Off Parameters
- In the Take Off Parameters block, locate the parameter which usage you want to view.
- Hover over this Take Off Parameter until the action icons appear.
- Click the Display Usage icon. The Take Off Parameter Usage form opens.
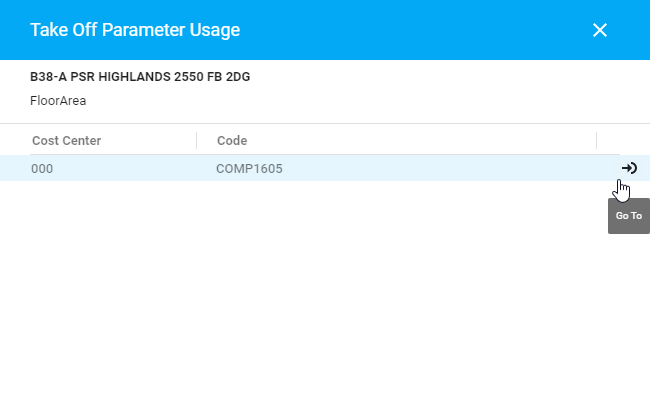
- When complete, click Close.
To transition to the Item or Component which uses the Take Off Parameter, click the Go To ![]() icon.
icon.