
Graphic TakeOff (GTO) is where we import a plan and measure Take-Off Parameters (ToPs), are used in a series of formulas behind the scenes to calculate the Base Price of a house plan or estimate to standard inclusions.
To start with a GTO, you need to scan a floor plan and save it as JPG, PNG, or PDF file. You can upload a file that does not exceed 10 MB (megabytes) into the system.
Work with the Graphical Take Off is comprised of the following steps:
- Upload a floor plan.
- Adjust the image position.
- Define the image scale.
- Measure and count ToPs.
1. Open the GTO Window
There are two ways in which we can perform a GTO:
- Create a Quick Quote in RFQ Management.
- When creating a House Plan or Job Estimate.
From a Quote
Create a new quote for a lead and click the GTO ![]() icon in the quote details section.
icon in the quote details section.
From an Estimate
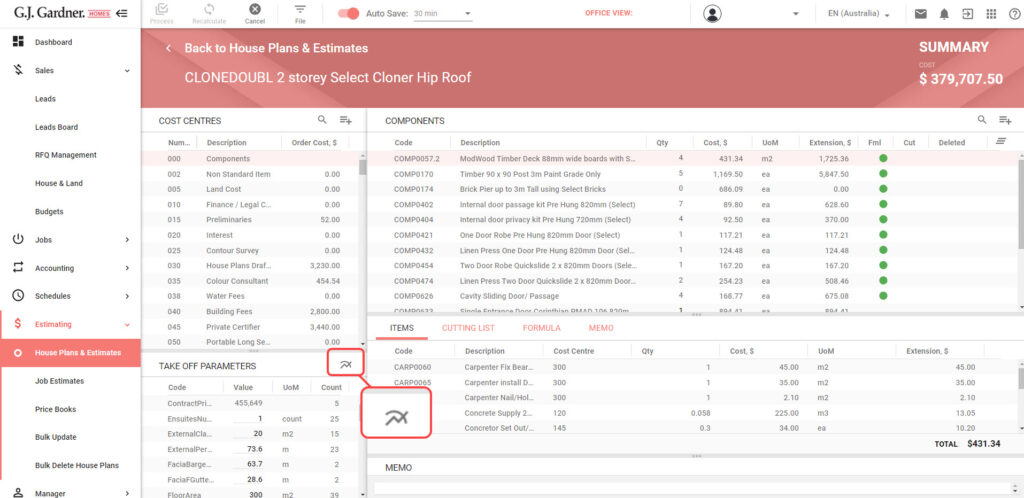
Open a House Plan or Job Estimate and click the GTO ![]() icon in the Take Off Parameters section.
icon in the Take Off Parameters section.
2. Import a Floor Plan
When you launch GTO for the first time you will be prompted to import a plan.
- Launch the Graphical Take Off by clicking the GTO
 icon. The GTO screen with the GTO Import Plan Image window opens.
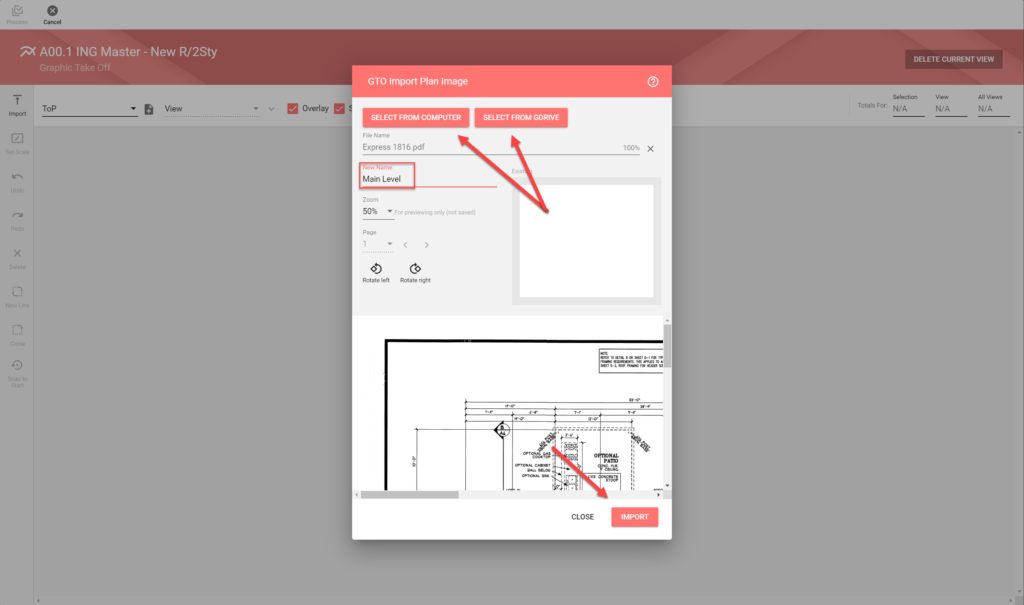
- Click the Select from Computer or Select from GDrive button to choose a file to upload.
- Edit the New Name field to change the name to something more descriptive than the file name.
- Adjust the preview of the floor plan by selecting the appropriate zoom distance.
- If you upload a PDF file with multiple pages, you can select the page which you want to import. Move forward and backward through the document by clicking the Back page
 icon and Next page
  icon.
icon. - Change the orientation of the page with the Rotate left
 icon or the Rotate right
  icon.
icon. - When complete, click Import.
- Repeat these steps for each additional page you want to import and click Close when finished.
Be patient! Larger files and multiple pages take longer to upload.
3. Adjust the Floor Plan Image
Once you have imported the floor plan image(s) , you can adjust the orientation, rotate it, and even crop the image. These options are only available before you set scales.
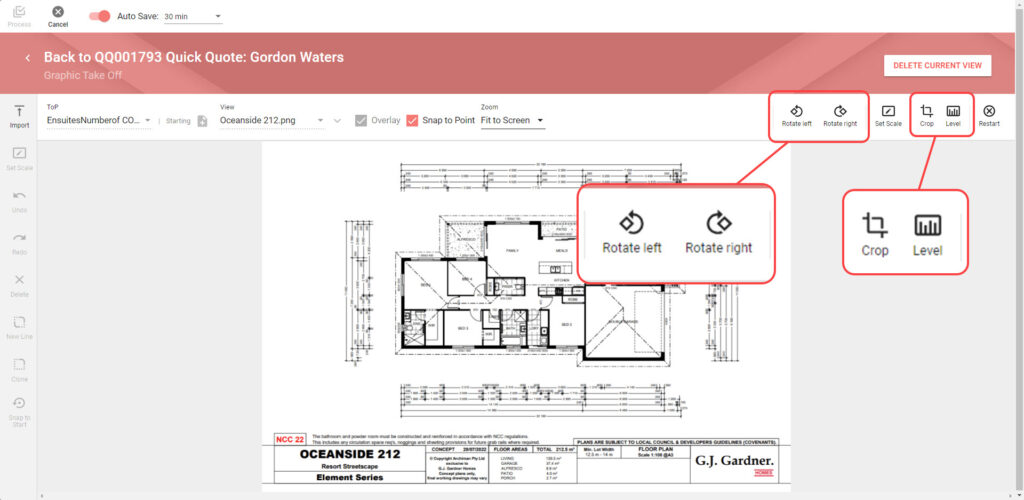
| Rotate the current view 90 degrees counterclockwise. | |
| Rotate the current view 90 degrees clockwise. | |
| Click the icon and select the area to crop then click Apply. | |
| Click the icon and rotate the image to set the appropriate angle then click Apply. |
When complete, click Process.
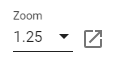
4. Adjust the Zoom Distance
The easiest way to zoom in/out on an image is by holding the Ctrl button on your keyboard and scrolling with your mouse wheel. If you don’t have a mouse wheel, click the Zoom dropdown at the center top of the screen and select the desired zoom level.
5. Set Image Scale
Once you have uploaded the floor plan image into the system, you need to set the image scale. This is needed for taking the correct measurements of ToPs. To do this you need to set the horizontal and vertical scale, so the system can further use them for calculating the rest of the values.
- In the toolbar, click the Set Scale
 icon.
icon. - Read the instructions in the popup and click OK to close.
- You need to set two points for the horizontal scale, and two points for the vertical scale. Use the longest available measurements on the plan for these scales.
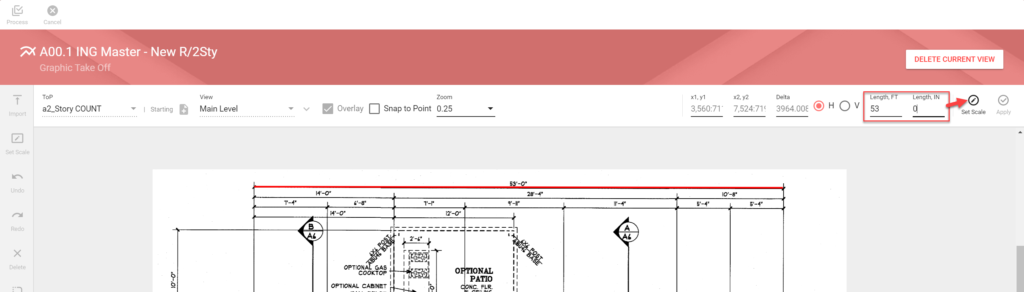
- Set the first point for the horizontal scale, then click in another place of the image. The red horizontal line appears.
- Enter the length of the line into the Length box.
- In the toolbar, click Set Scale. Once the horizontal scale is measured, you need to set the vertical scale.
- Set the first point for the vertical scale, then click in another place of the image. The red vertical line appears.
- Enter the length of the line into the Length box.
- In the toolbar, click Set Scale.
- When complete, click Apply.
Once the horizontal and vertical scales have been defined, you can proceed to take measurements of ToPs.
6. Measure ToPs
Once you have imported the floor plan image and set the scale, you can proceed to measuring or counting ToPs. Please note that even if you do not plan to measure Take Off Parameters that relate to length or area, you still need to set the image scale.
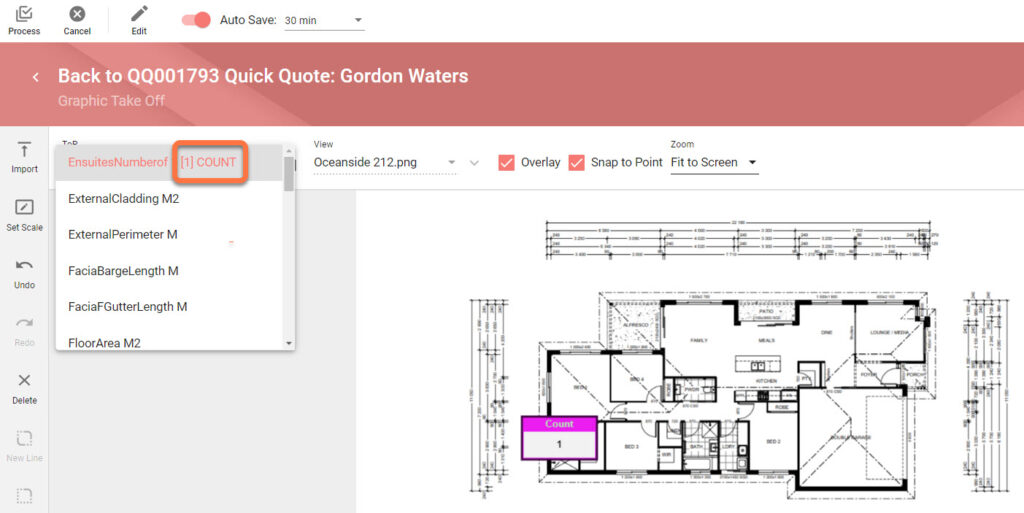
Take Off Parameters can fall into the three groups, as follows:
| COUNT | ToPs that can be counted (i.e. a bath, a toilet, or a door). |
| M | ToPs measured as the length of a line (i.e. length of the wall). |
| M2 | ToPs measured as a closed area (i.e. floor area). |
These abbreviations stand next to the name of the Take Off Parameter in the select box, so you can better understand what type of the Take Off Parameter you deal with.
Types of Measurments
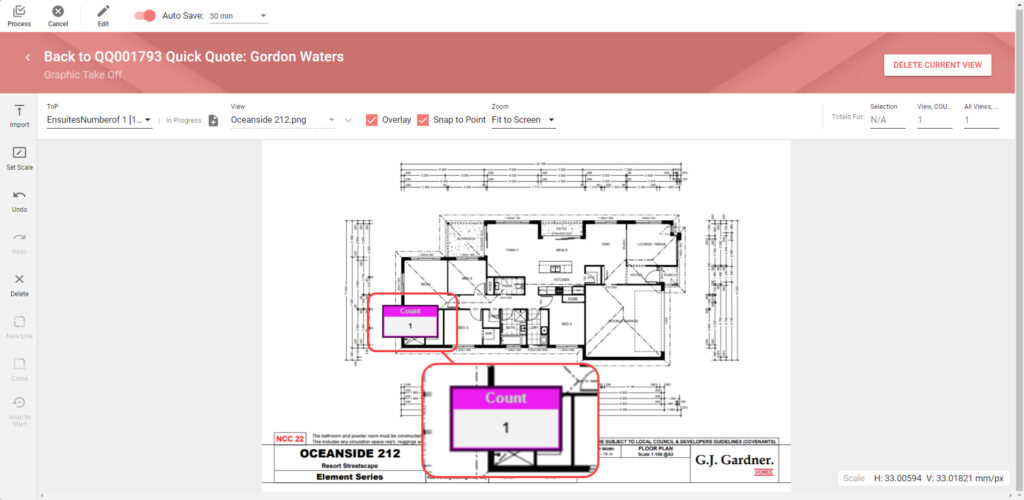
Using Count Items
In the ToP box, select the Take Off Parameter of the COUNT type.
Start placing the markers on the floor plan image by clicking the area where this Take Off Parameter locates. A new marker appears after every click.
You can delete the added markers one by one starting from the last one, click the Delete ![]() icon on the sidebar. You may need to repeat this procedure several times if you need to delete the marker that was added several items prior to the last one.
icon on the sidebar. You may need to repeat this procedure several times if you need to delete the marker that was added several items prior to the last one.
If needed you can move the marker to another place, drag it across the canvas to the appropriate position.
You can undo the actions by clicking the Undo ![]() icon. To restore the canceled action, click the Redo
icon. To restore the canceled action, click the Redo ![]() icon.
icon.
In the ToP box, you can see the count for a specific Take Off Parameter.
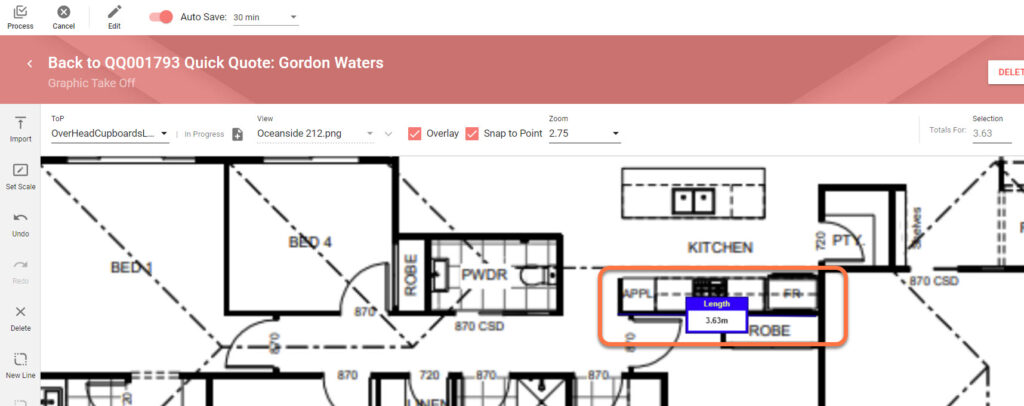
Using M Measurements
In the ToP box, select linear measurement ToP.
Start placing the points by clicking on the floor plan image. The system shows the length of each segment.
You can delete the added points one by one starting from the last one, click the Delete ![]() icon on the sidebar. You may need to repeat this procedure several times if you need to delete the point that was added several points prior to the last one.
icon on the sidebar. You may need to repeat this procedure several times if you need to delete the point that was added several points prior to the last one.
If you need to measure length of different pieces of the same Take Off Parameter on the floor plan, click the New Line![]() icon. Start adding new points on the canvas.
icon. Start adding new points on the canvas.
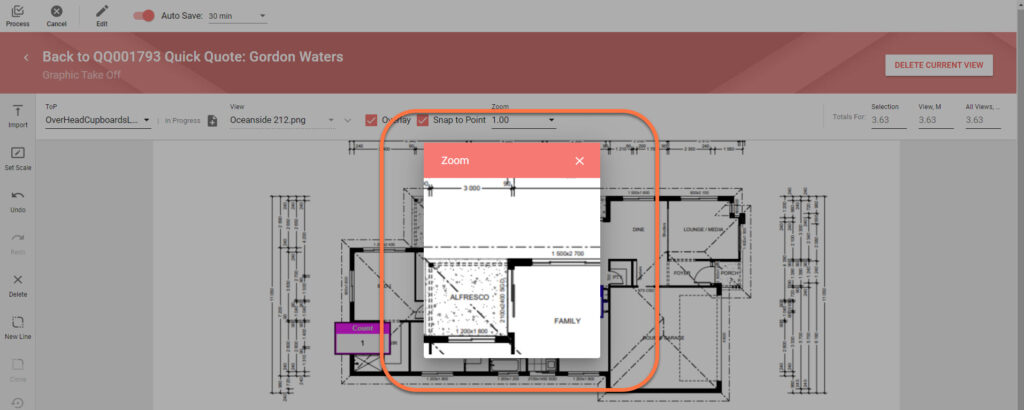
If you need to place the point precisely, you can right-click in the area where you want to place the point and in the opened Zoom form place the point. Click inside of the zoom window where you want to place the point.
If you need to close the cut (for example, to measure the perimeter), click the Snap to Start ![]() icon. The system will automatically connect the first and the last point of you cut.
icon. The system will automatically connect the first and the last point of you cut.
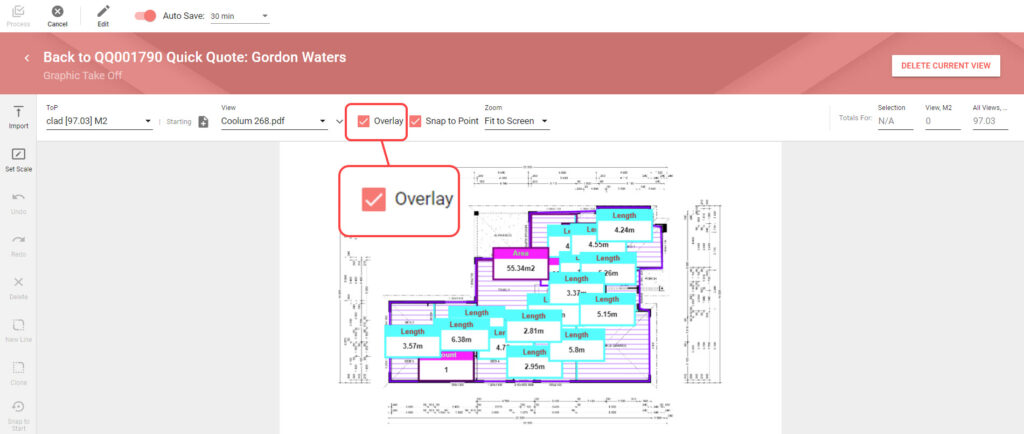
If you have multiple linear measurement ToPs that overlap each other and you need to see only a specific Take Off Parameter on the floor plan, clear the Overlay box in the toolbar.
You can clone the area and convert it into an area measurement ToP. This way you needn’t take dimensions of the same area twice, you need to select the area once and measure the perimeter and area without placing the same points.
You can undo the actions by clicking the Undo ![]() icon. To restore the canceled action, click the Redo
icon. To restore the canceled action, click the Redo ![]() icon.
icon.
While setting the key points determining the area, you can use the Snap to Point option. It allows you to increase the measurement accuracy while producing the Graphical Take Off. It analyzes the key points of the plan (for example, corners, wall, door opening) and sticks the user point closer to the key point. Clicking close to the desired point, the system will automatically stick to the key point.
Using M2 Measurements
In the ToP box, select an area ToP.
Start placing the points on the floor plan image by clicking the left mouse button. The system will show the area with the dashed line. If you need to close the area, click the Snap to Start ![]() icon. The system will automatically connect the first and the last point of your area.
icon. The system will automatically connect the first and the last point of your area.
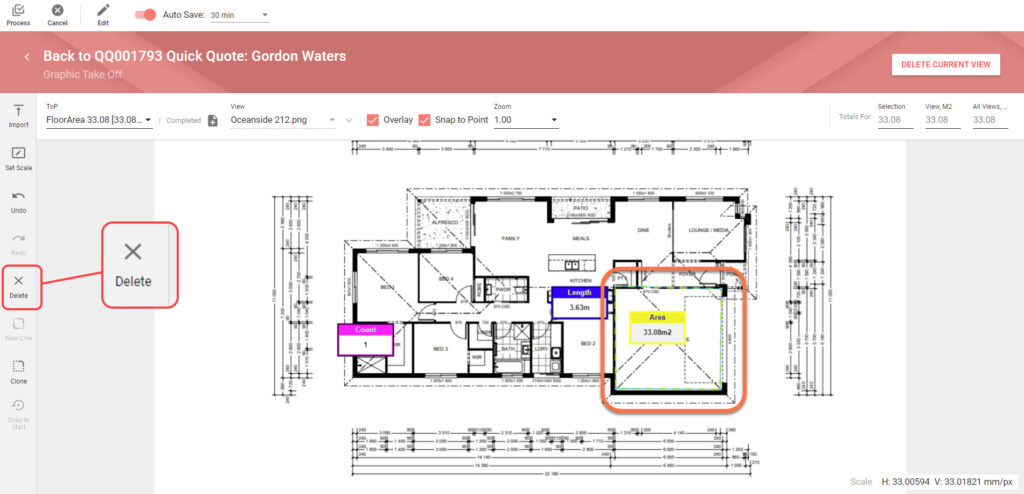
You can delete the added points (of the area) one by one starting from the last one, click the Delete ![]() icon on the sidebar. You may need to repeat this procedure several times if you need to delete the point that was added several points prior to the last one.
icon on the sidebar. You may need to repeat this procedure several times if you need to delete the point that was added several points prior to the last one.
If you need to measure area size of a different area within the same Take Off Parameter, click the New Area ![]() icon. Start adding new points on the canvas.
icon. Start adding new points on the canvas.
If you need to place the point precisely, you can right-click in the area where you want to place the point and in the opened Zoom form place the point.

If you have multiple area ToPs that overlap each other and you need to see only a specific ToP on the floor plan, clear the Overlay box in the toolbar.
You can clone the area and convert it into a linear ToP. This way you needn’t take dimensions of the same area twice, you need to select the area once and measure the perimeter and area without placing the same points.
You can undo the actions by clicking the Undo ![]() icon. To restore the canceled action, click the Redo
icon. To restore the canceled action, click the Redo ![]() icon.
icon.
While setting the key points determining the area, you can use the Snap to Point option. It allows you to increase the measurement accuracy while producing the Graphical Take Off. It analyzes the key points of the plan (for example, corners, wall, door opening) and sticks the user point closer to the key point. Clicking close to the desired point, the system will automatically stick to the key point.
Viewing Totals for ToPs
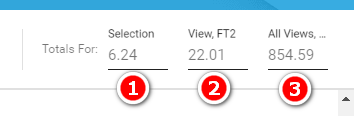
You can view the measurement totals for a specific ToP. In the toolbar locate the Totals For group. It is comprised of the three values, as follows:
- Selection – shows the measurement of the ToP for current selection (area).
- View – shows the aggregated measurement of the ToP on the current view.
- All Views – shows the aggregated measurement of the ToP on all views of the floor plan.
Adding a New ToPs
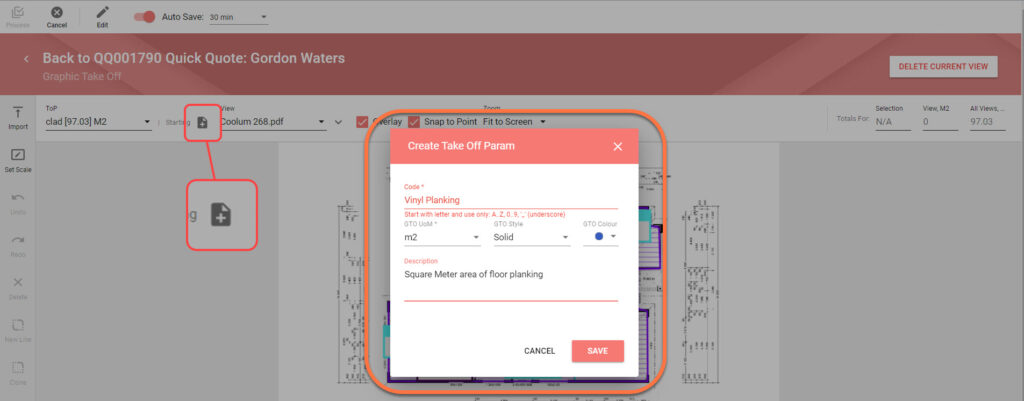
If some ToP does not exist in the system, but you want to measure or count it, you can add a new Take Off Parameter on the fly.
- To the right side of the ToP box, click the Add ToP
 icon.
icon. - In the Create Take Off Param form specify information about the Take Off Parameter.
- Once complete, click Save.
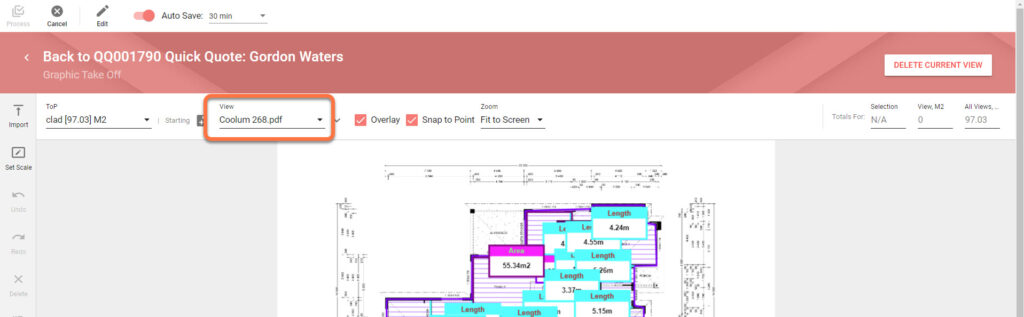
Switching Between Views
If you imported multiple pages, you can switch between them to measure ToPs on each view. Click the View dropdown andsSelect the view you want to load.
Deleting the Current View
You may need to delete the old view of the floor plan if it was updated.
- In the top right part of the screen locate the Delete Current View button.
- Click Delete Current View.
- Confirm the removal of the current view.
All the current measurements of ToPs will be deleted with the view.
Editing Parameters
You can edit parameters of the floor plan and Take Off Parameters which you measured or counted.
Cloning ToPs
Sometimes taking linear measurements forms an area similar to another ToP. For example, measuring the External Perimeter of the house may follow the same path as the Floor Area. Closed linear measurements that form an area may be cloned to area measurements and vice versa
- On the sidebar, click the Clone
 icon.
icon. - In the Clone Take Off Parameter Points window, select the ToP you would like to clone the area measurement to.
- When complete, click Clone.
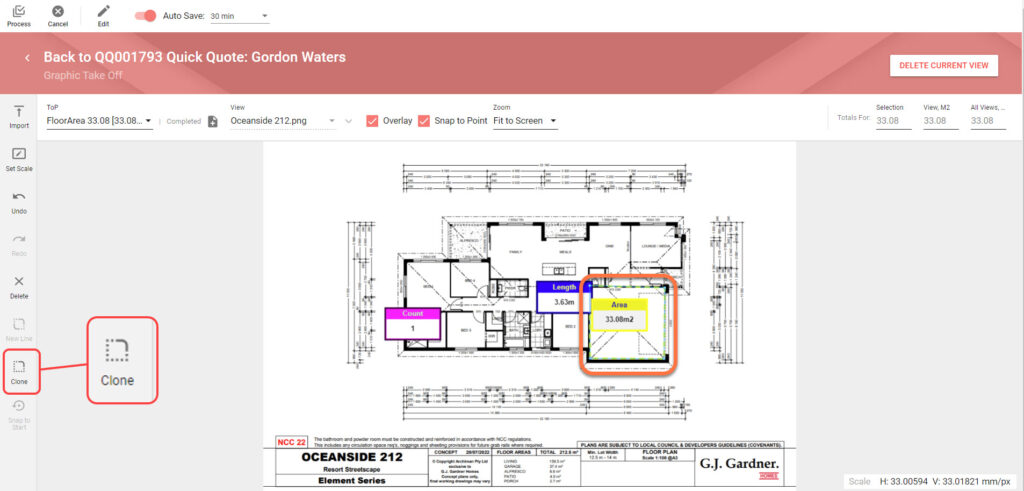
A new area will appear above your initial area.
Once you have placed all the points for the linear ToP, click Process.
In the ToP box, you can see the measurement for a specific Take Off Parameter.
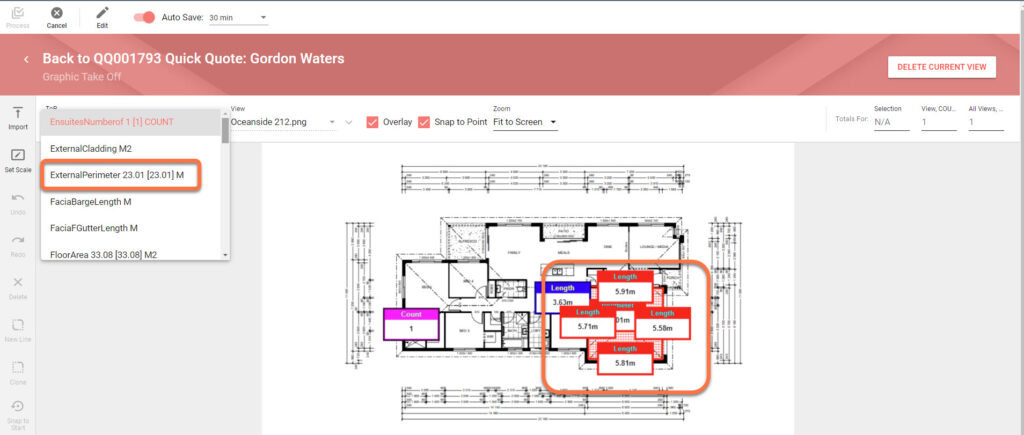
Changing the Take Off Parameter
You may need to change the Take Off Parameter from one to another without deleting the existing measurements.
- Open the view and select the Take Off Parameter you want to change.
- In the top left part of the screen, locate the Edit
 button and click it.
 - In the opened contextual menu, select Change this ToP.
- When complete, click Apply.
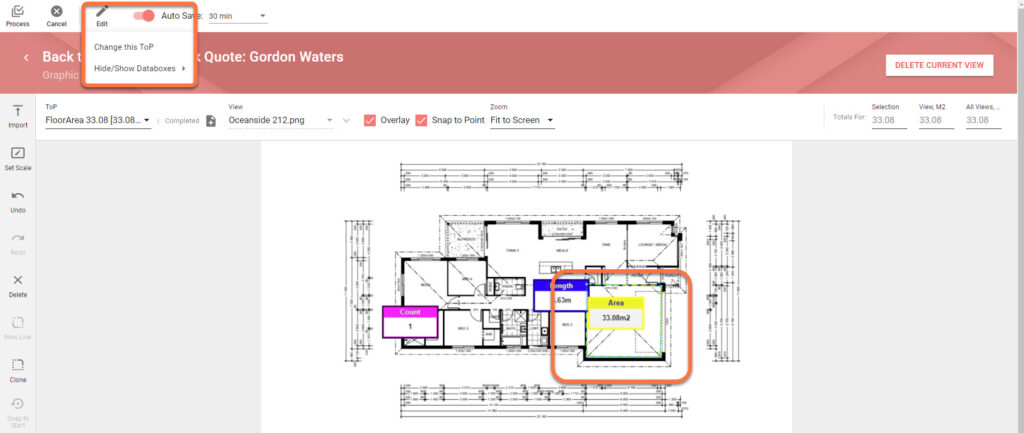
The system will automatically re-calculate the Take Off Parameters and their values.
Hiding / Showing Databoxes
A databox is a square with a measurement values for a specific Take Off Parameter.
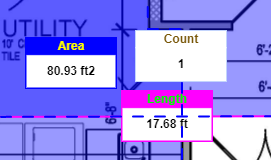
You can show or hide databoxes depending on the situation.
- In the top left part of the screen, locate the Edit button and click it.
- In the opened contextual menu, select Hide/Show Databoxes.
- Select the option to show databoxes, as follows:
Show no Databoxes All databoxes are hidden for all measurements. Show Selection Only The databox is shown for the current selection only. Show this ToP Only Databoxes are shown for all selections of the currently selected Take Off Parameter. Show All Databoxes are shown for all Take Off Parameters.
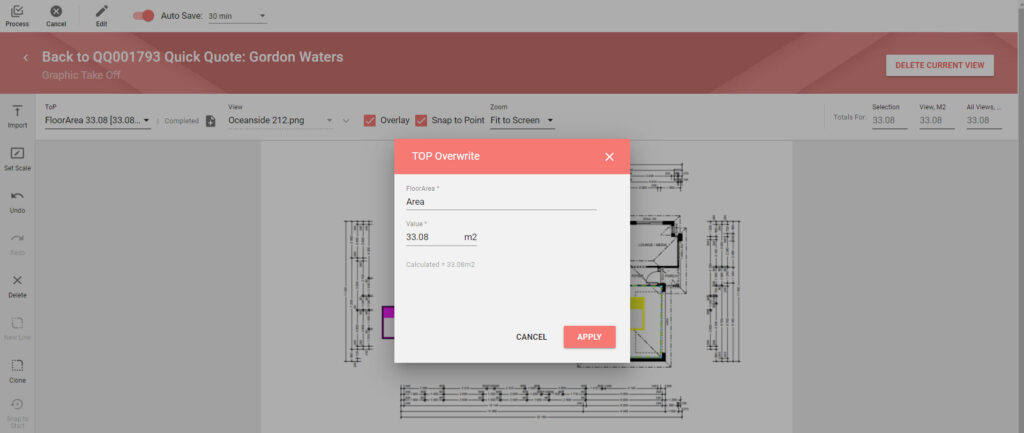
Overwriting the Value for a ToP
If the measurement is not accurate and you know the exact value, you can enter it manually and overwrite the measured value. On the floor plan locate the measurement for which you want to enter the value for.
- Double-click the marker.
- In the TOP Overwrite form, update the count number for the Take Off Parameter.
- When complete, click Apply.
Once you have placed all the markers for the ToP, click Process.
After all changes have been saved click, Process to return to the Quote or Estimate you started from.