The Job Estimate is created when the Sale is completed by the Salesperson and authorized by the Franchisee. At this time a To Do message is sent to the Estimator. The Job Estimate is created by first copying from the House Plan used on the successful quotation. Next the Variations are added (or subtracted) from the Job Estimate. Each Variation is flagged and requires confirmation by the Estimator before Orders can be produced.
Note
It is possible to edit Job Estimate in Authorise mode only.
- On the navigational sidebar select Jobs.
- In the expanded Sales section, select Jobs List.
- Search for the needed Job.
- Hover over the Job and click the Job Estimate icon.
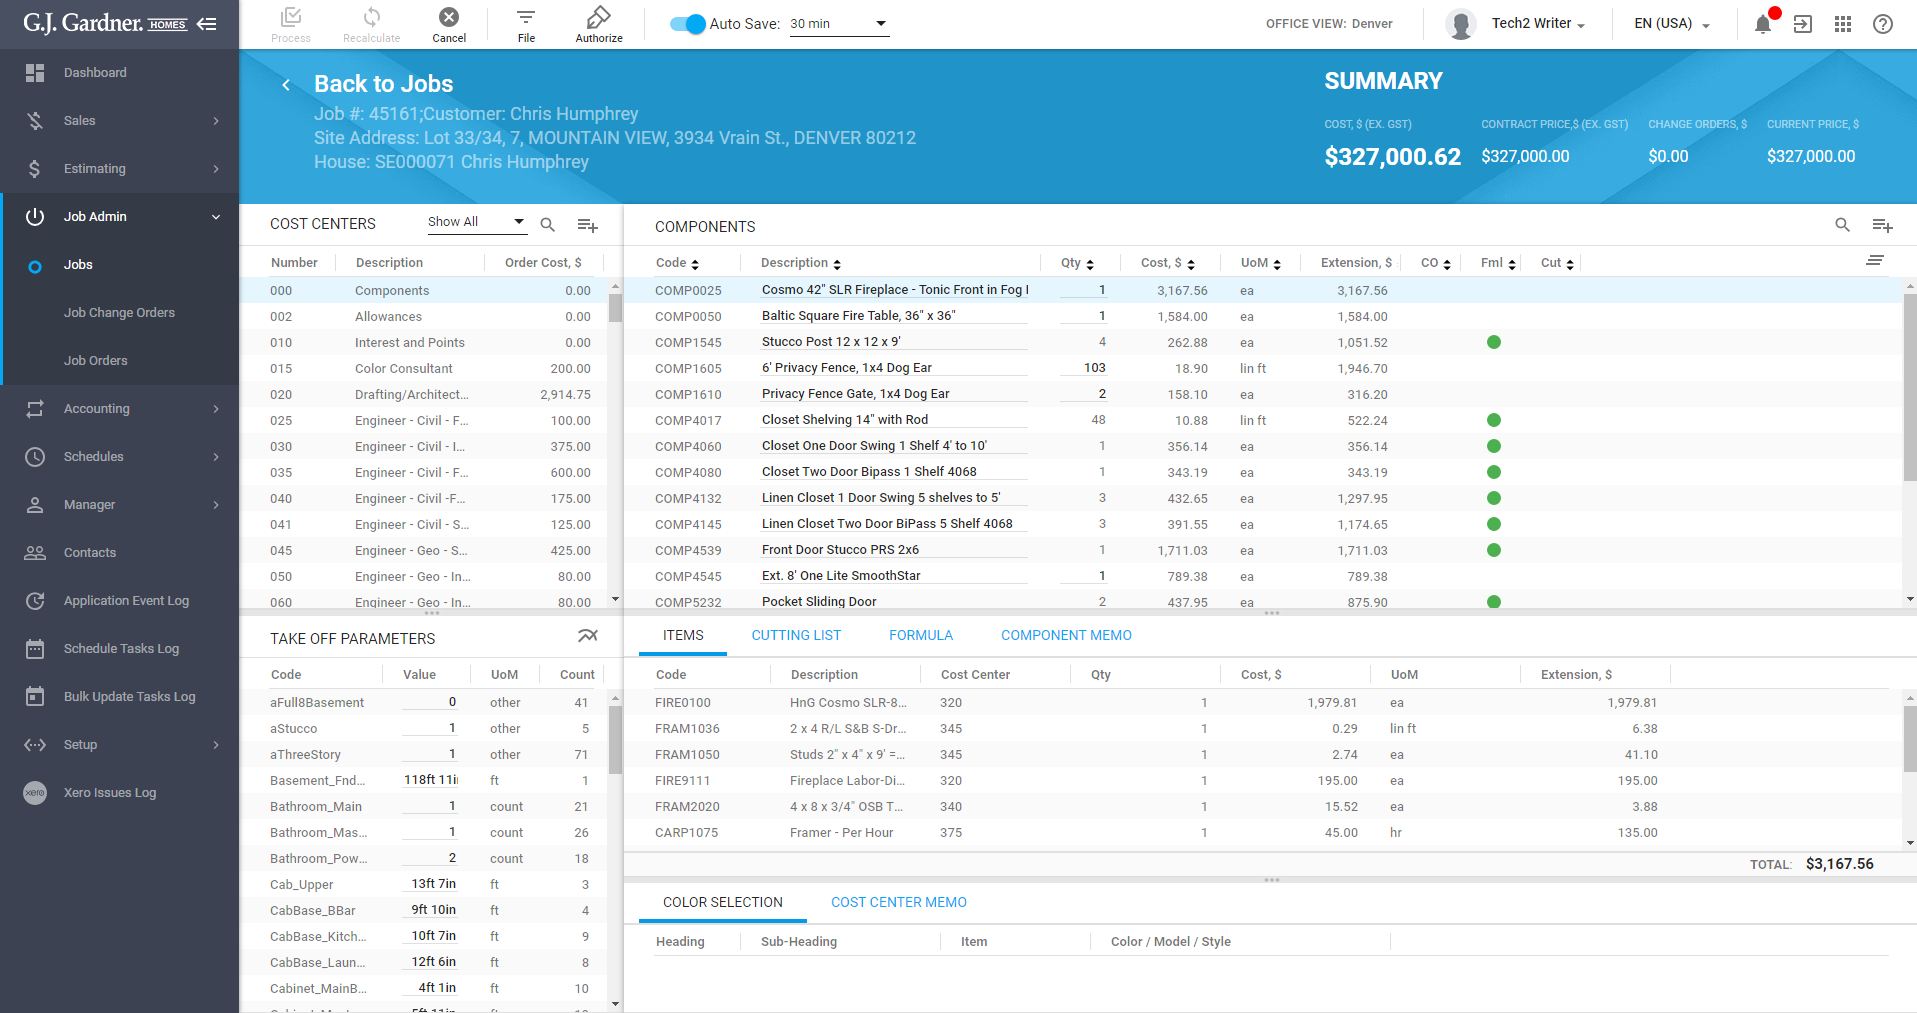
- The Job Estimate page comprises three resizable blocks. The upper left one is for Cost Centers, the middle one is for Components and Items, and the lower left one is for Take off Parameters.
Components and Items block contains the following sub-tabs:
- Items (for Components)
- Cutting list (For Items);
- Formula (For Items);
- Item memo (For Items);
- Component memo (for Components)
- Orders (For Items);
- Color selection;
- Cost center memo.
The page opens as follows:
Cost Centers block
Cost Centers block contains the list of cost centers pulled from the Base House Plan. For each Cost Center the following information is displayed:
| Number | The number of the Cost Center. |
| Description | The description of the Cost Center. |
| Order Cost, $ | The total cost of the order. |
To filter Cost Centers
The filter Cost Centers, click the Arrow ![]() icon and select form the dropdown list a needed order cost. By default Show all value is set. Once a value is selected, the system show Cost Centers according to the selected order cost.
icon and select form the dropdown list a needed order cost. By default Show all value is set. Once a value is selected, the system show Cost Centers according to the selected order cost.
To go to a specific Cost Center
- Click the Find
 icon.
icon. - In the opened Go to Cost Center # form, enter either a needed Cost Center number or select it from the list.
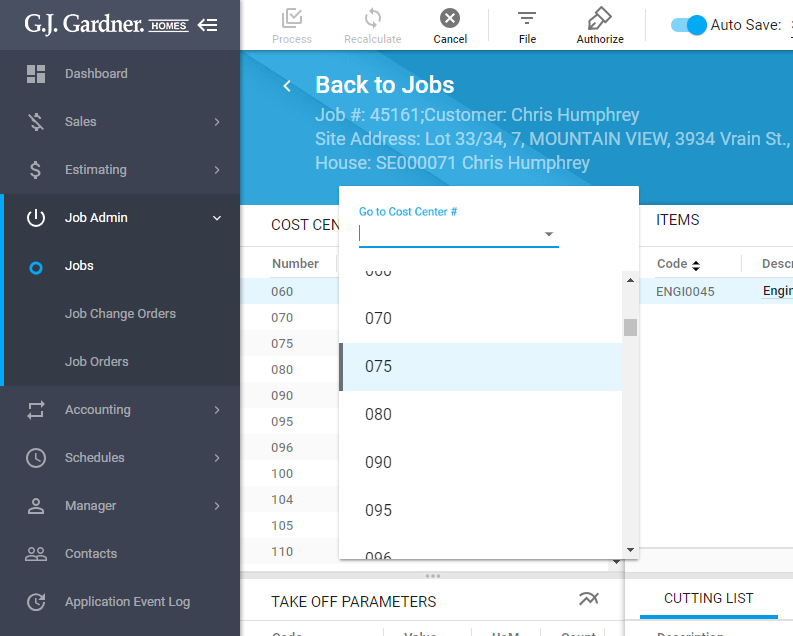
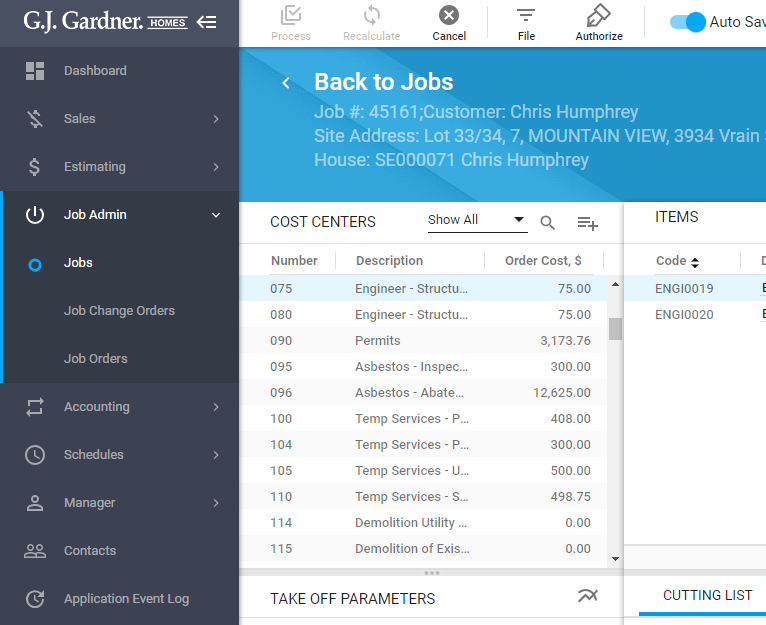
- Once selected, the system highlights the Cost Center.
To see the order details of a cost center
- Hover over a cost center (except Components) and click the Information
 icon. The Orders form shows what the Order will contain when it is produced.The Order Details form opens, as follows:
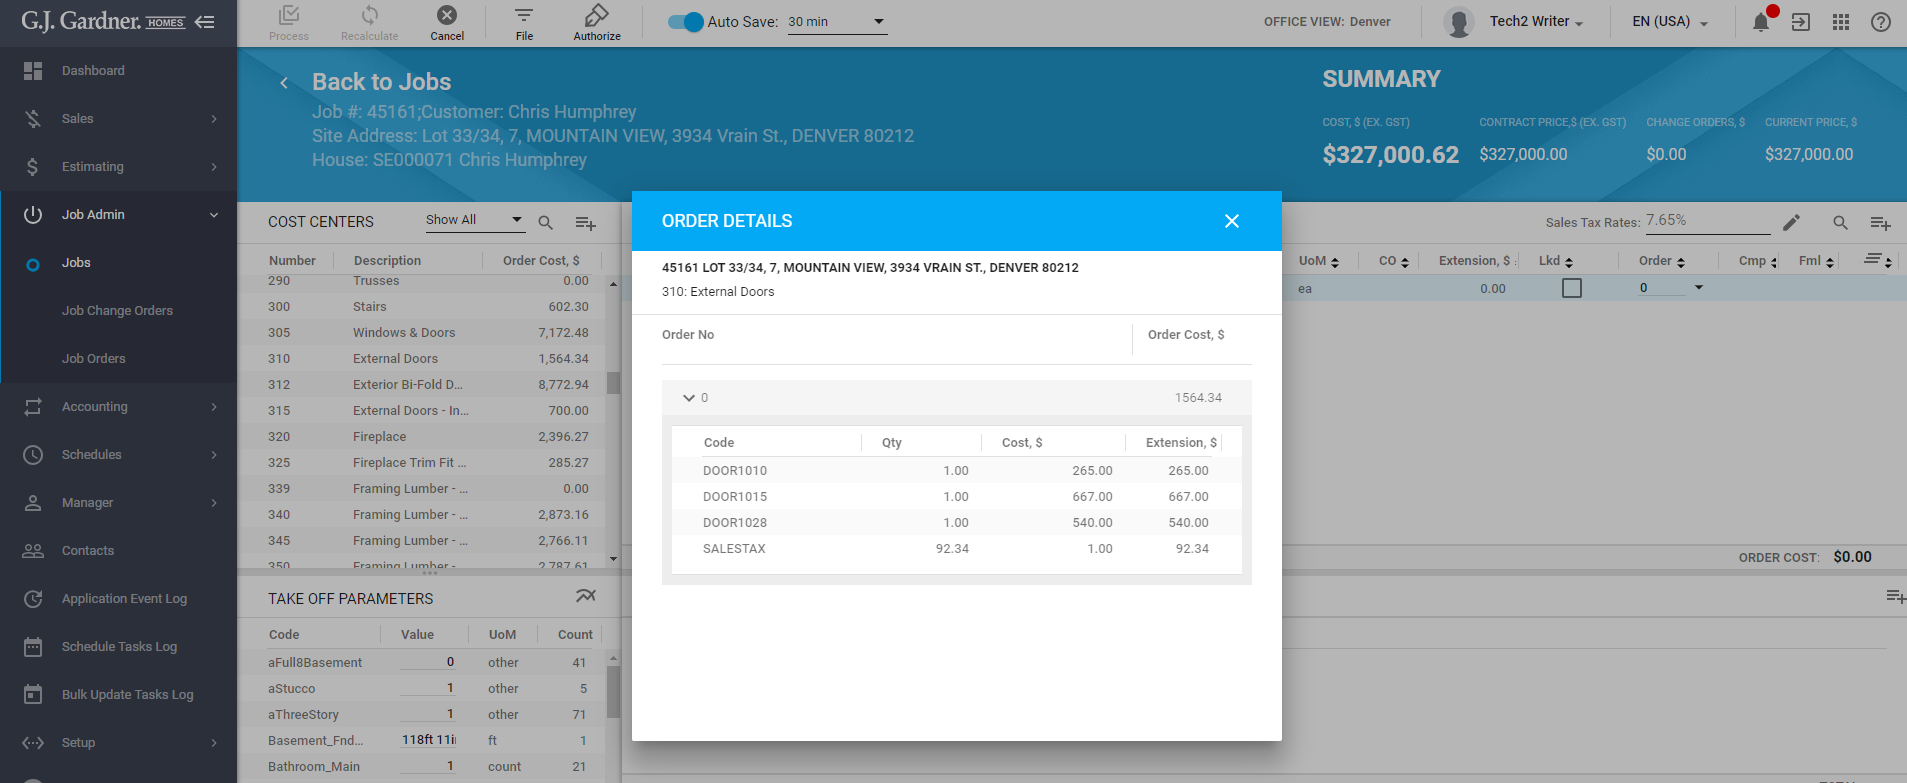
- Here the following information is displayed:
Order No The number of the order. Order Cost, $ The cost of the whole order in US dollars. Expand icon Click it to view the list of added items. Code A unique identifier of an Item. Qty The quantity of each item. Cost, $ The cost of each item. Extension, $ The calculated cost of Items within the Component (Item cost multiplied by Quantity).
To add a new Cost Center
- Click the Add
 icon.
icon. - In the opened Find Cost Centers form search for a needed Cost Center.
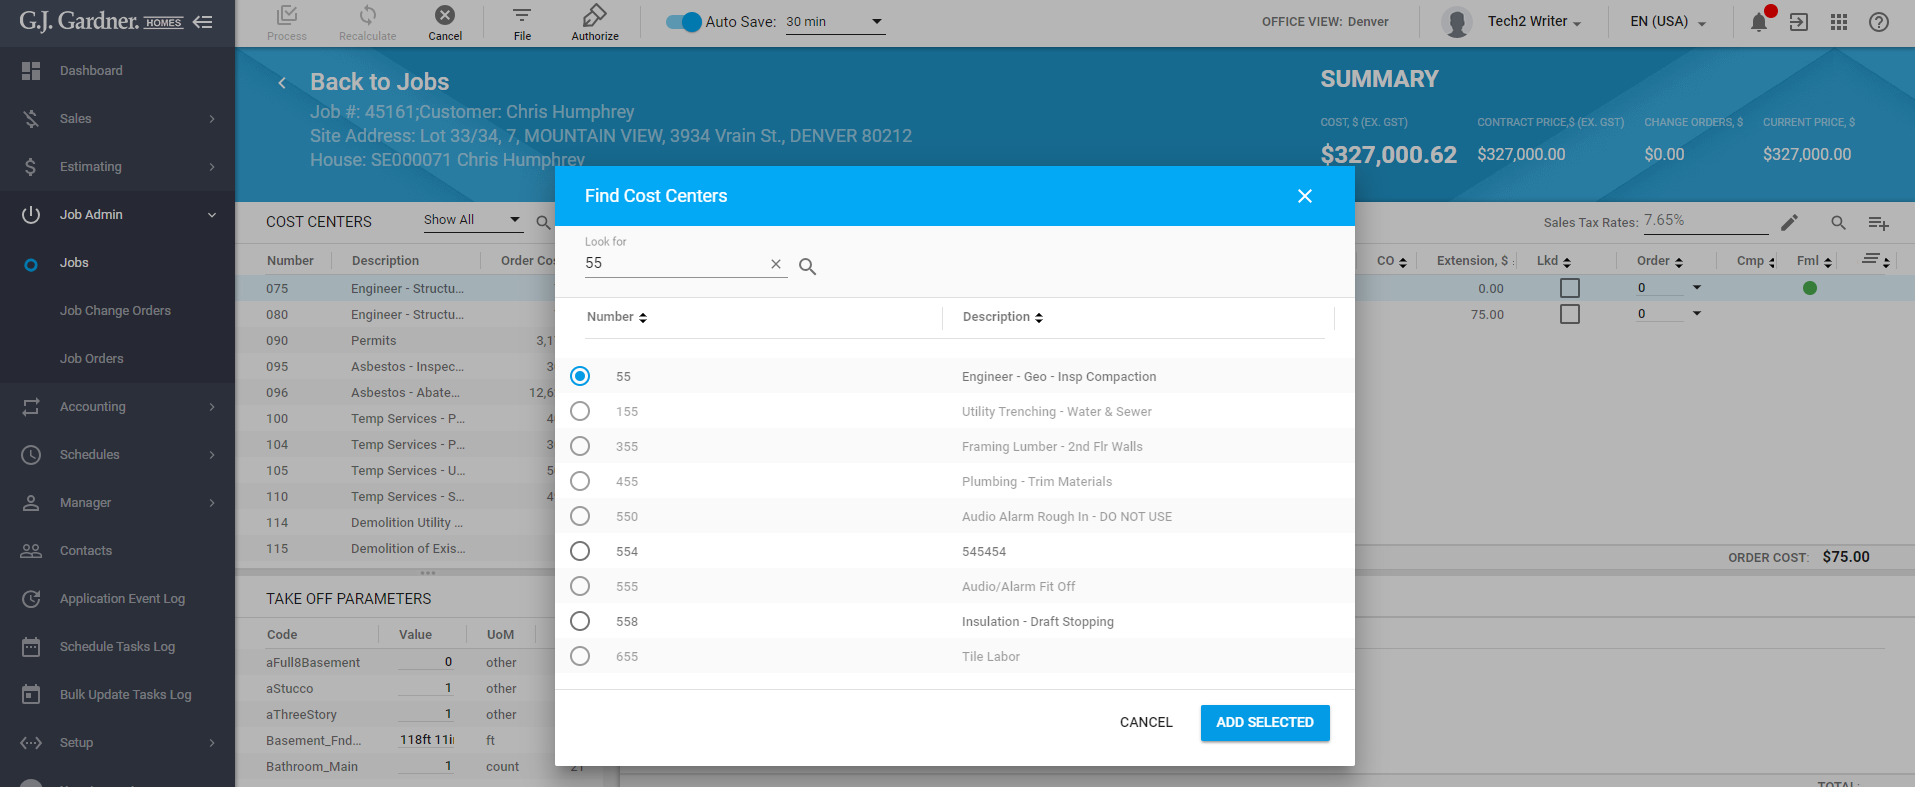
- Tick the radio button next to the Cost Center.
- Click the Add Selected button. The Cost Center is added according to its number. A new record is highlighted in light-orange and marked with the asterisk.
- Click the Recalculate
 icon to get the up-to-date costs.
Components block
Component is a set of items. When you create a component, you add items to it and nominate in which center the item should be displayed.
To access Components, click the first line in the Cost Centers list. All the others Cost Centers contain Items.
In the Components block, the following information might is available:
| Code | A unique identifier of a component. |
| Description | The description of a component.
Double click the field to edit the description. |
| Qty | The quantity of items used within the Component.
The quantity can be changed manually if there is no formula or cutting list for the item. Double click the field to edit the quantity. Once the quantity is changed, click the Recalculate |
| Cost, $ | Cost in US dollars per one component. |
| UoM | Unit of measure of a component. |
| Extension, $ | The calculated cost of component according to the quantity (Component cost multiplied by Quantity). |
| VAR | A Change Order pulled from Quote or Job Change orders. |
| Fml | Mark that the formula is used for calculation of an Item cost.
The green circle |
| Cut | Mark that the cutting list is used for calculation of an Item cost.
The green circle |
To view Items added to a Component
- Click a component in the Components block.
- In the Items tab at the bottom of the Components block there is a list of all items added to the component. Find a needed item.
- Right click the item you want to view > Go to Item.
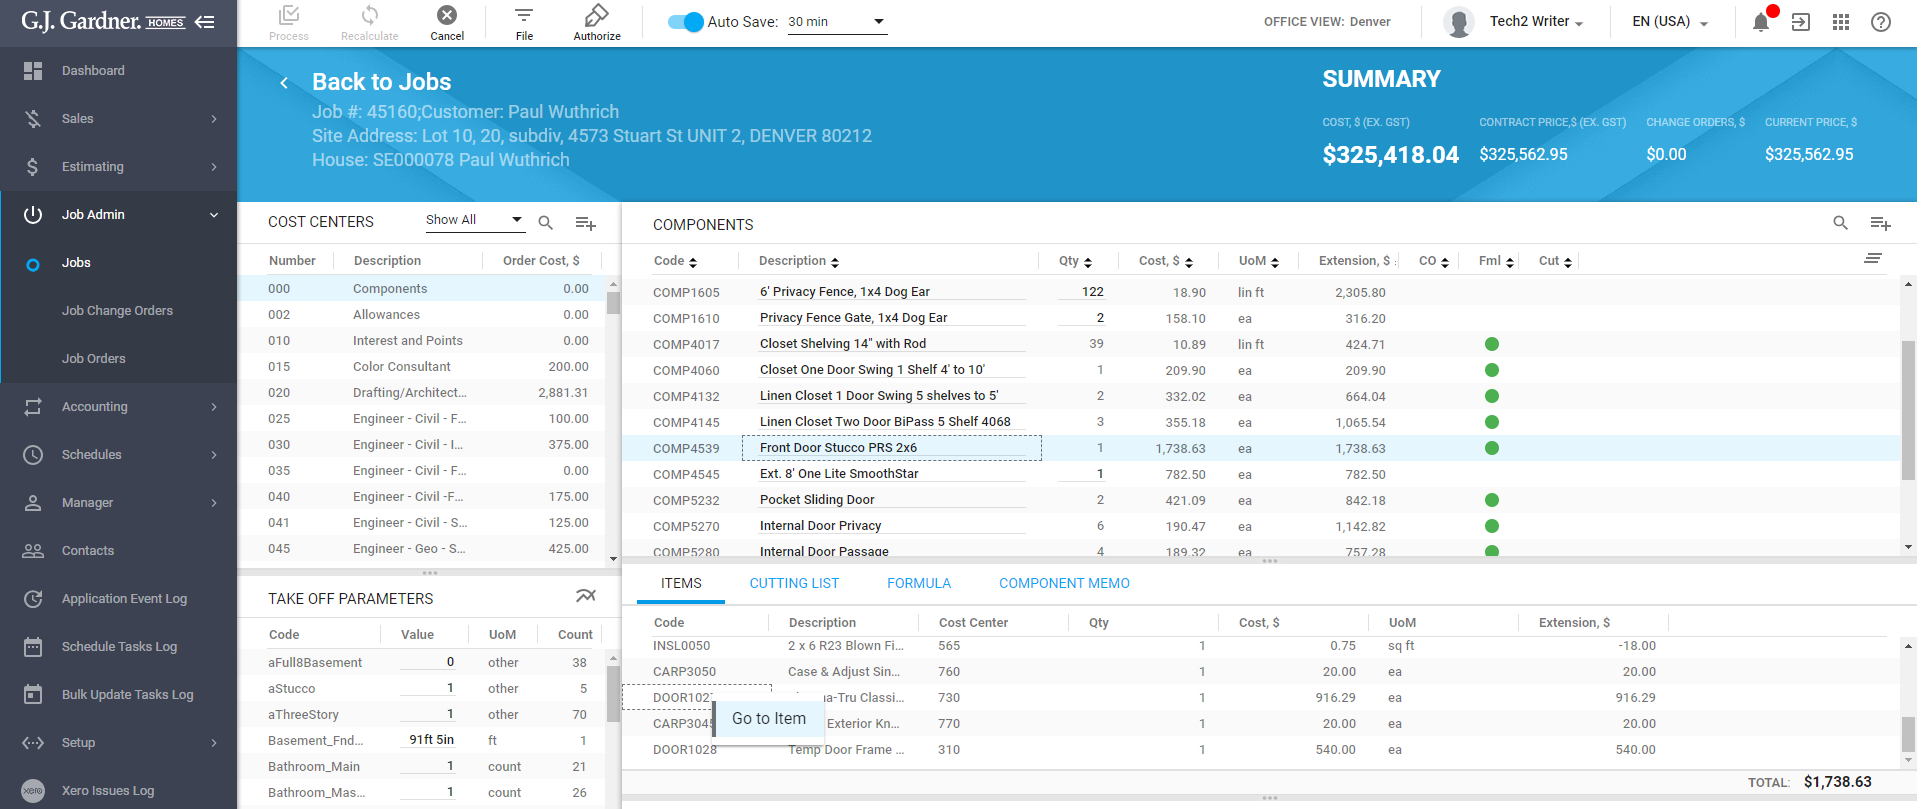
- The system redirects you to the Cost Center and highlights the item which is part of a component.
To go to a specific Component
- Click the Find icon.
- In the opened Go to Component form, all components are shown. You can either enter a needed Item number or select it from the list.

- Once selected, the system highlights the component.
To add a new Component
- Over the right top part of the list with Components, click the Add
 icon.
icon. - In the opened Find Items & Components form there is a list of all active components in the system. Search for the required component(s).
- Tick the checkbox next to the component(s).
- Click the Add Selected button.
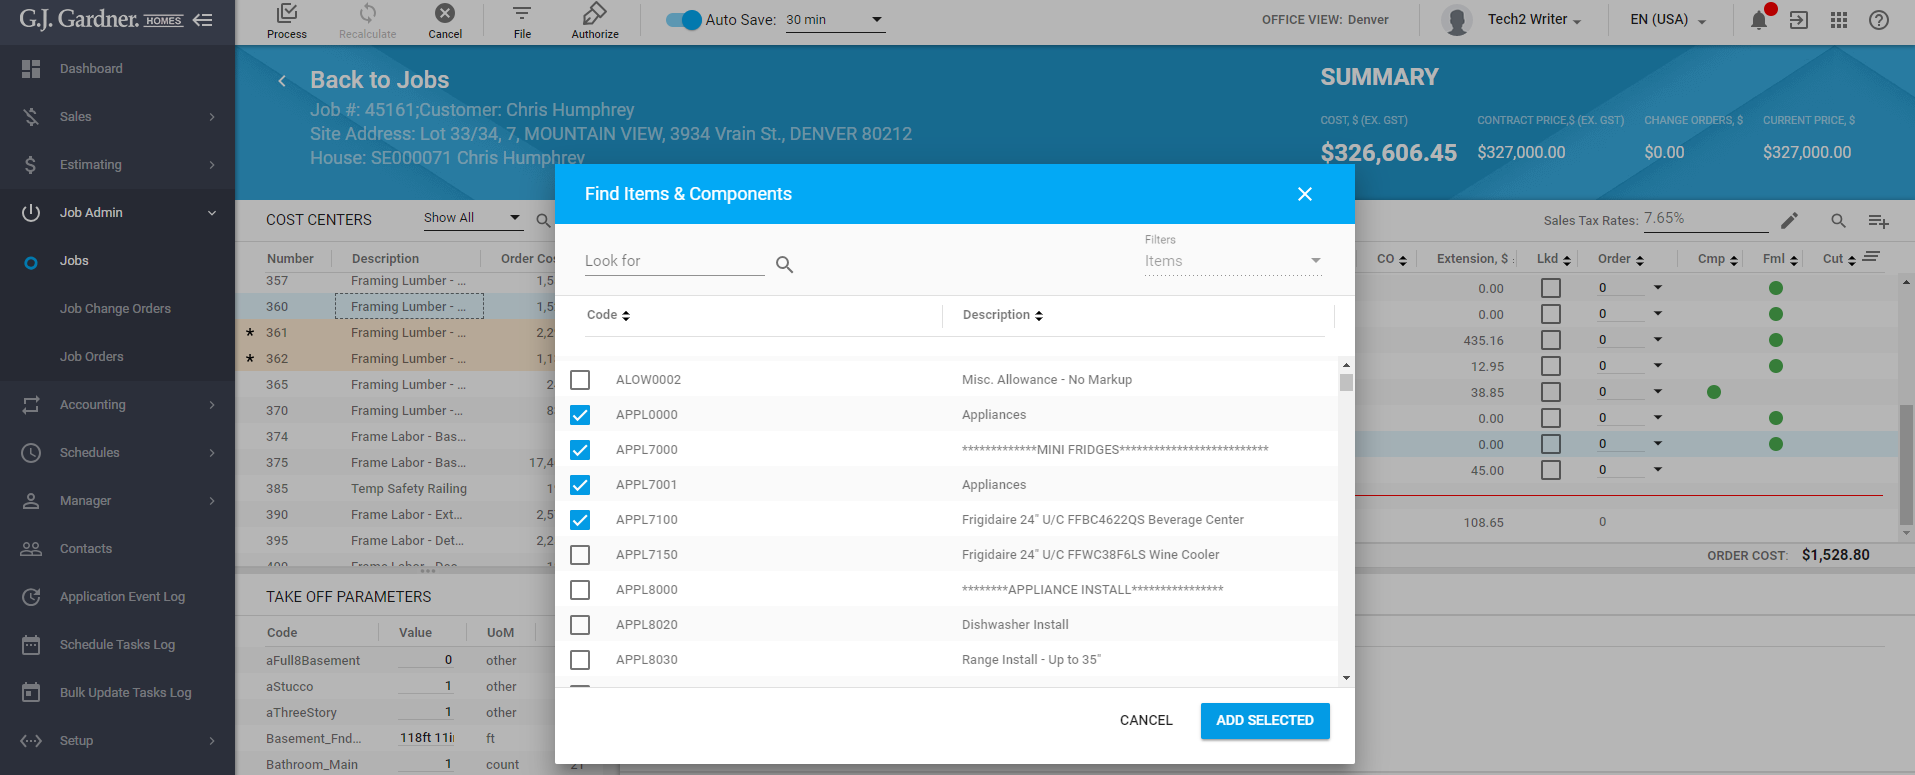
- The components are added at the top of the list. New records are highlighted and marked with the asterisk.
- Click the Recalculate
 icon to get the up-to-date costs.
Items block
The Items block is similar to the Components block. All Cost Centers, except the first line in the list named Components, contain Items.
The following information is available in the Items block:
| Code | A unique identifier of an item. |
| Description | The description of an item.
Double click the field to edit the description. |
| S.Tax (availabe for USA only) | Mark that the sales tax is applied to a component. |
| Qty | The quantity of items used within the Component.
The quantity can be changed manually if there is no formula or cutting list for the item. Double click the field to edit the quantity. Once the quantity is changed, the system recalculates the actual cost of the component. |
| Cost, $ | Cost in US dollars per one Item which is pulled from Quote.
Double click the field to edit the cost. If a cost is edited, click the Recalculate |
| UoM | Unit of measure of an item. |
| VAR | Unconfirmed Changed Order.
If there an unconfirmed changed order, there is the |
| Extension, $ | The calculated cost of Items within the Component (Item cost multiplied by Quantity). |
| Lkd | A checkbox to locked an item. |
| Order | Order shows which order in a particular Cost Center is set. |
| Cmp | Mark that the component is used for calculation of an Item cost.
The green circle |
| Fml | Mark that the formula is used for calculation of an Item cost.
The green circle |
| Cut | Mark that the cutting list is used for calculation of an Item cost.
The green circle |
To change a Cost Center of an Item
- Hover over an item you need to change a Cost Center and click the Change CC
 icon.
icon. - In the opened Select Cost Center form search for a Cost Center.
- Tick the radio button next to the Cost Center.
- Click Select.
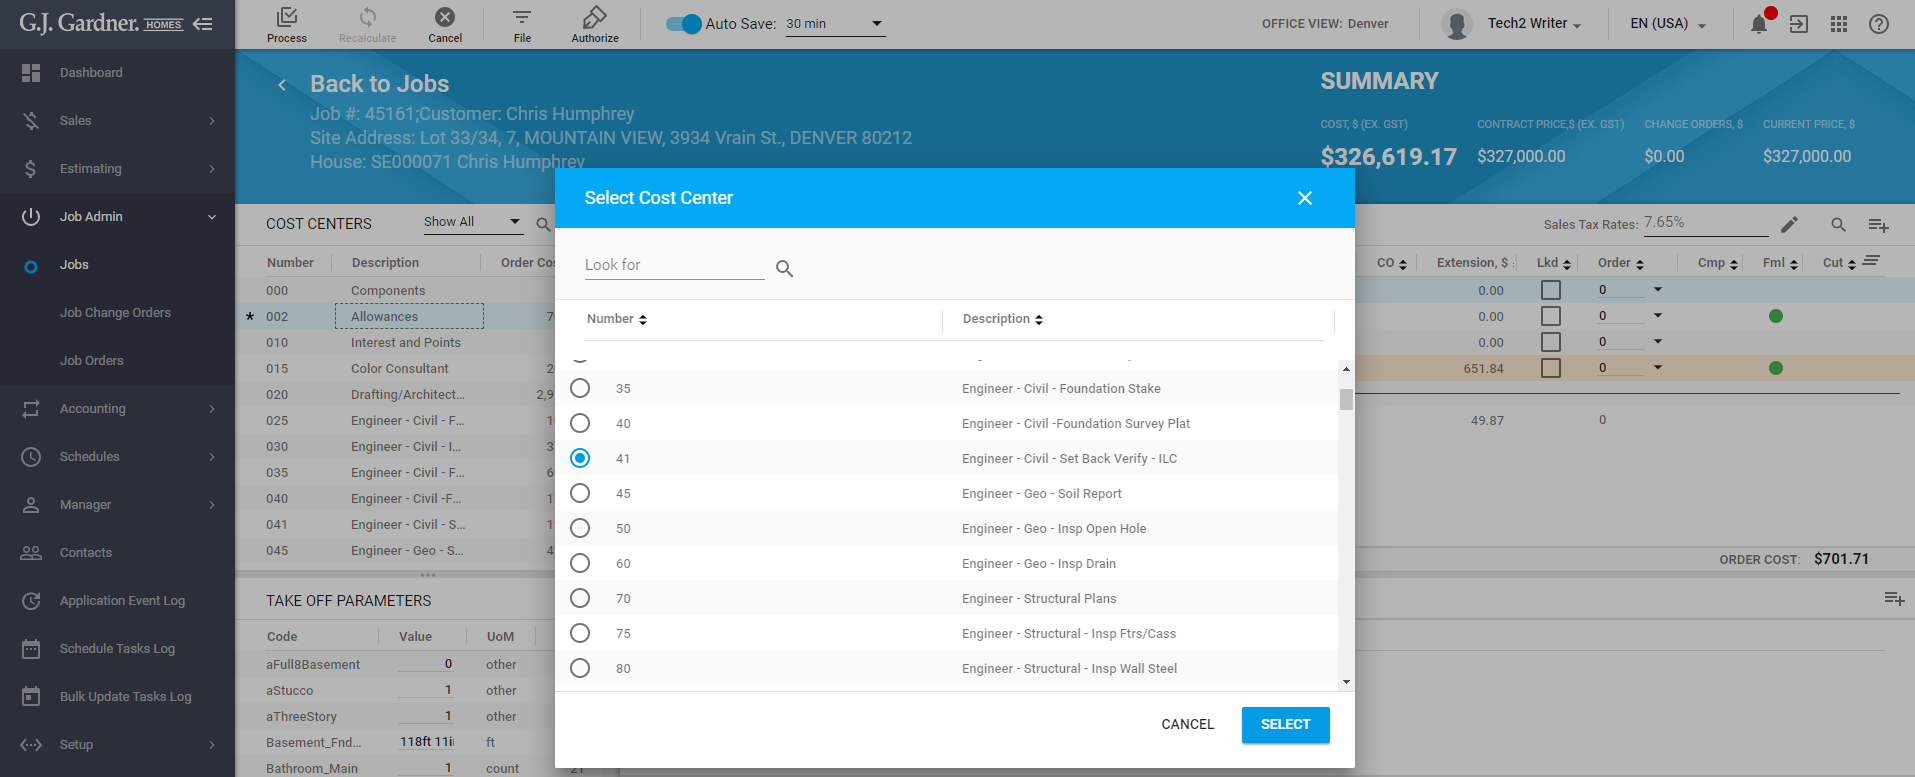
- The item is moved to the selected Cost Center. You are redirected to the appropriate Cost Center’s item. A new record is highlighted in light-orange and marked with the asterisk.
- Click Recalculate to get the up-to-date costs.
To view and edit Cutting list/Formula/Item Memo
- Click the required Cost Center in the Cost Centers block.
- Click the required item in the Items block.
- In the lower part of the Items block there are tree tabs: Cutting list, Formula and Item Memo.
Note
Formula and Item Memo tabs are editable. If there is a green circleicon in the Fml column in the upper part of the Items block, a formula is added to the item. Switch to the Formula tab. There has to be a formula for the item. You can add, edit or delete formula.
| To edit a formula. |
|
| To add a formula. |
|
| To delete a formula. |
|
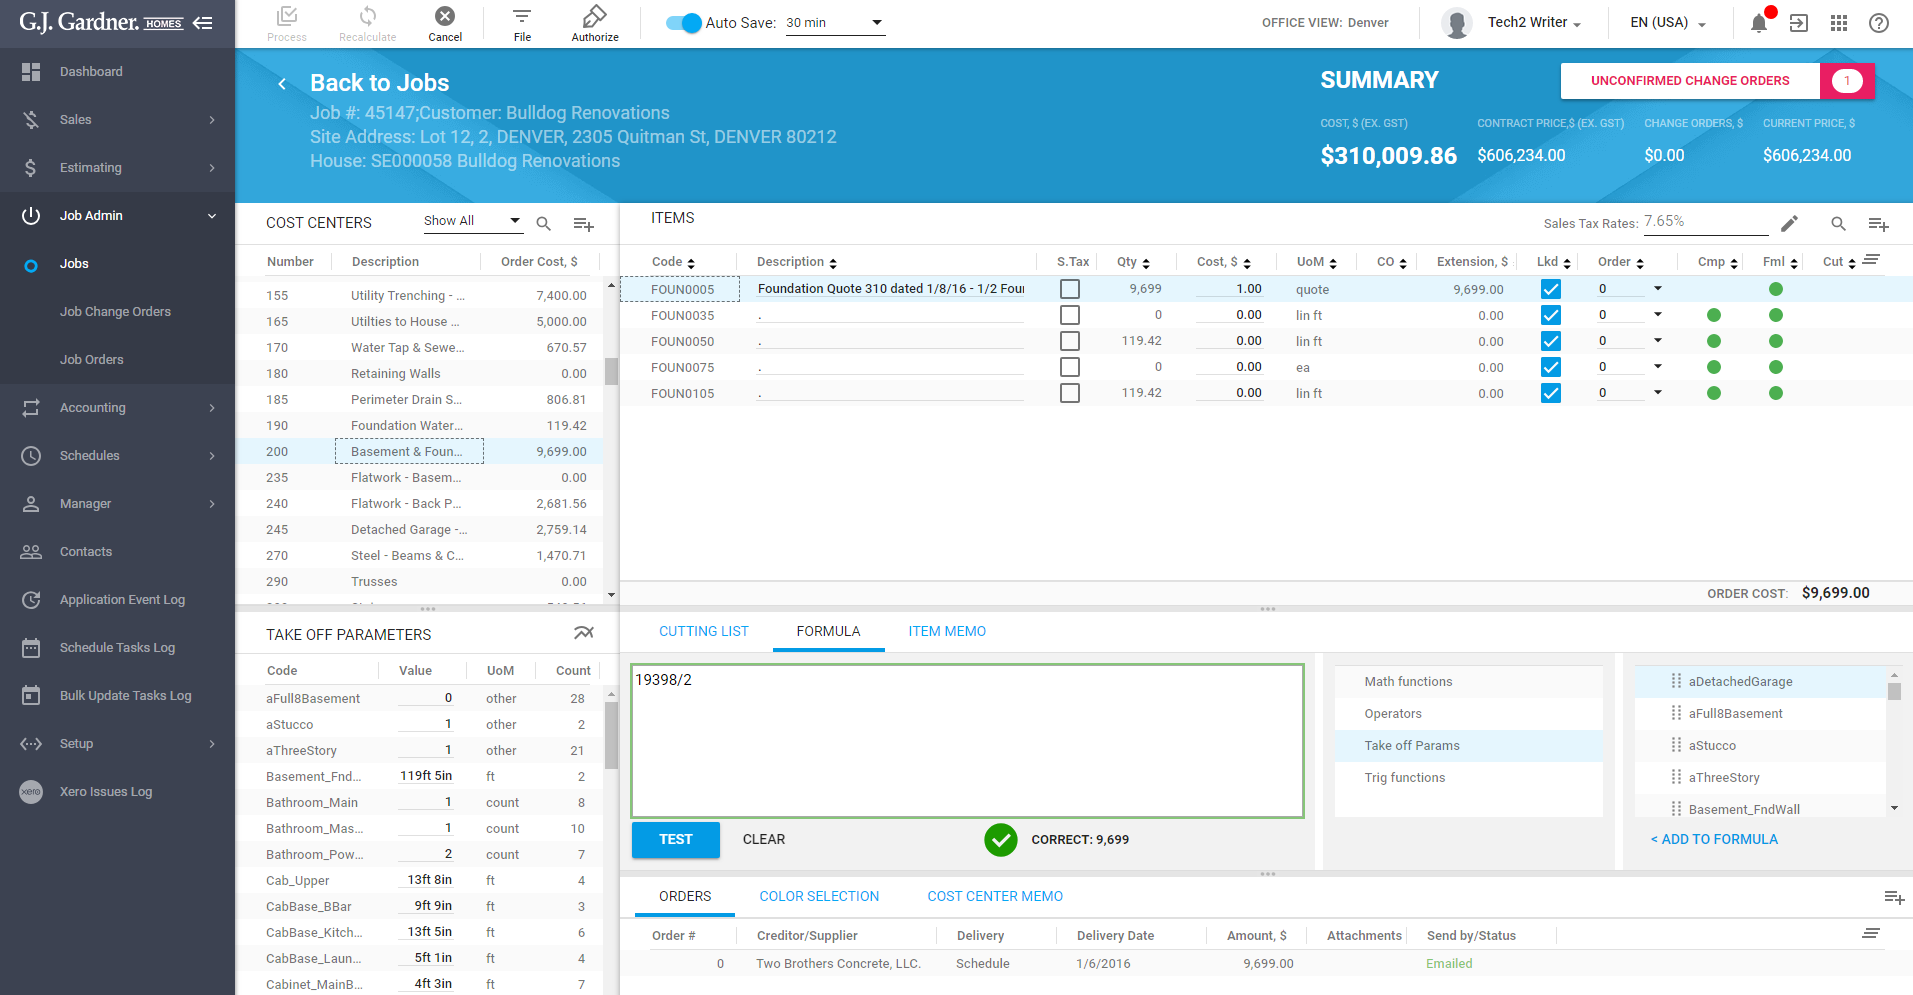
If there is a green circle ![]() icon in the Cut column in the upper part of the Items block, a cutting list is added to the item. You can either add a new item, update or delete the existing items.
icon in the Cut column in the upper part of the Items block, a cutting list is added to the item. You can either add a new item, update or delete the existing items.
| To edit an item in the cutting list. |
|
| To add a new item to the cutting list. | Click the Add
A new row highlighted in light-orange is added. Enter the description, pieces and length in the appropriate columns. When entered, click Recalculate. A green circle |
| To delete an item from the cutting list. | Hover over an item you want to delete and click the Delete
The system deletes the item without confirming the action. A green circle |
Switch to the Memo tab. Enter additional information on the item.
When complete, click Process.
To manage unconfirmed Change Orders
When you open a Job estimate and see the Unconfirmed Change Orders button, that means Change Orders have been made, either before completion (i.e. at the RFQ stage) or after completion. The changes must be confirmed by the Estimator. The number shows Unconfirmed Change Order.
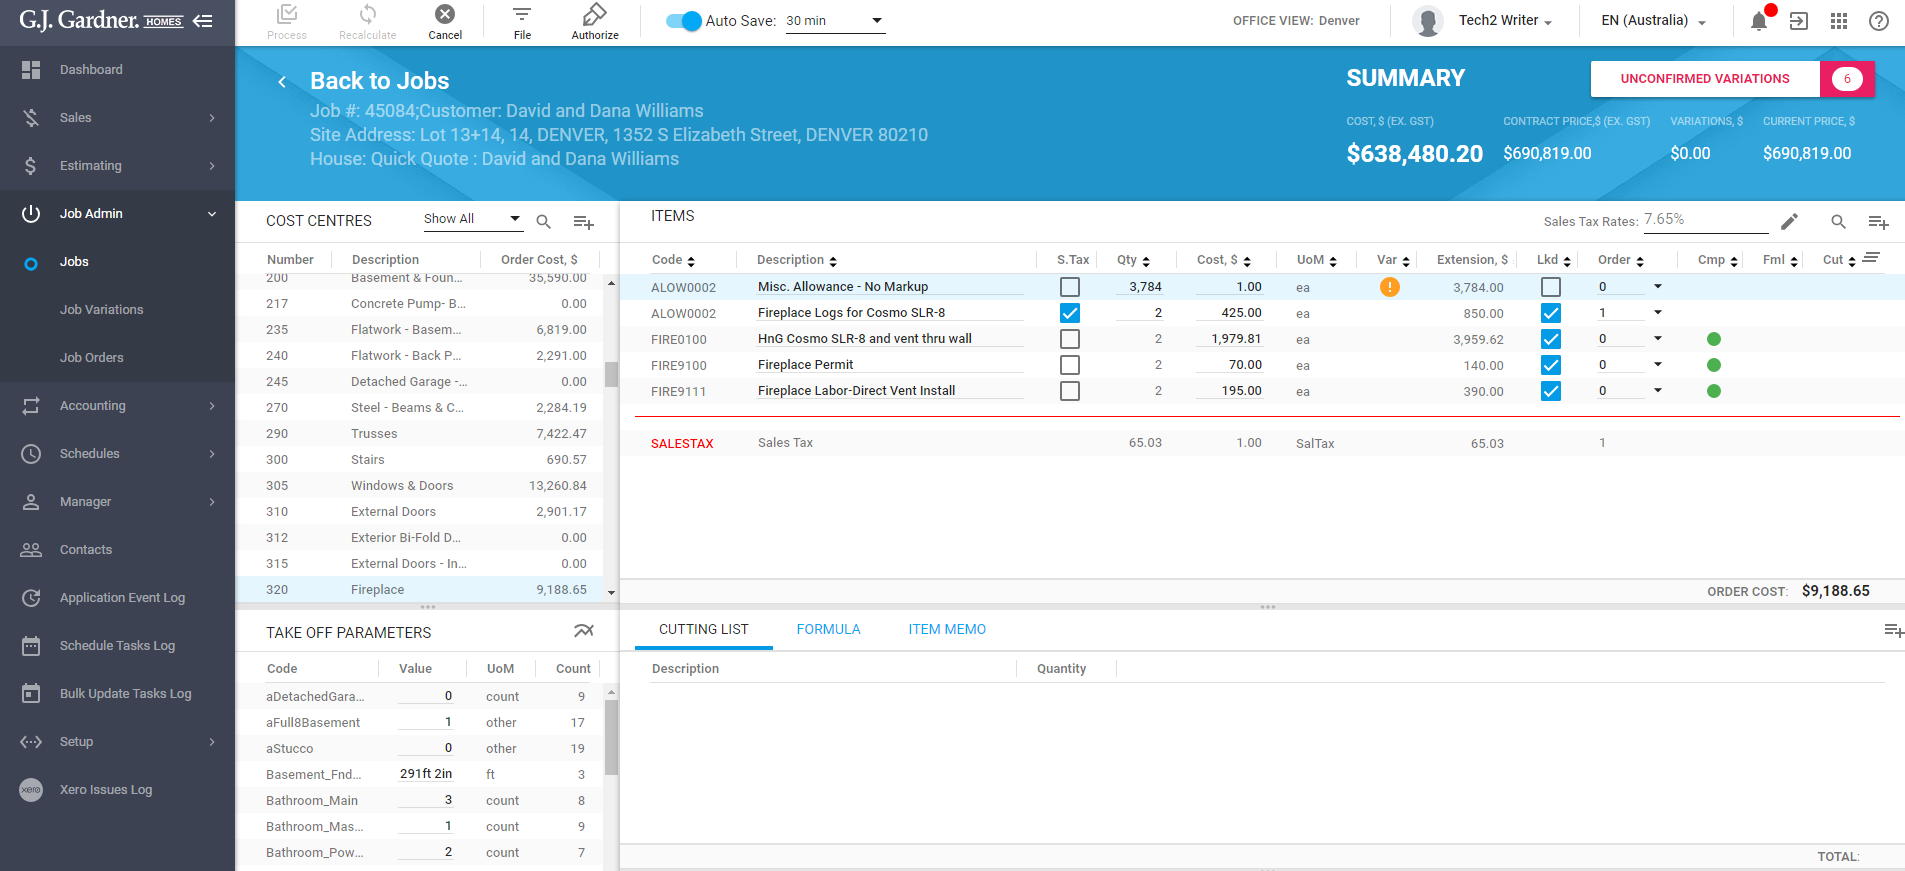
- Click the Unconfirmed Change Orders button.
- You are redirected to an item or component which is not confirmed.
- To confirm a Change Order, double click the the icon
 in the CO column.
 - The icon disappears from the column, the number on the Unconfirmed Change Orders button is changed.
- To get the up, click Process.
- Repeat the steps above for all Unconfirmed Change Orders.
To delete an Item
An Item can be deleted in the following cases:
- An Item is not a part of component;
- An Item was added by mistake;
- An Item is not needed for a Job.
To delete an Item:
- Hover over an item you need to delete and click the Delete
 icon.
icon. - The system opens a dialog form to confirm the action. Click Yes.
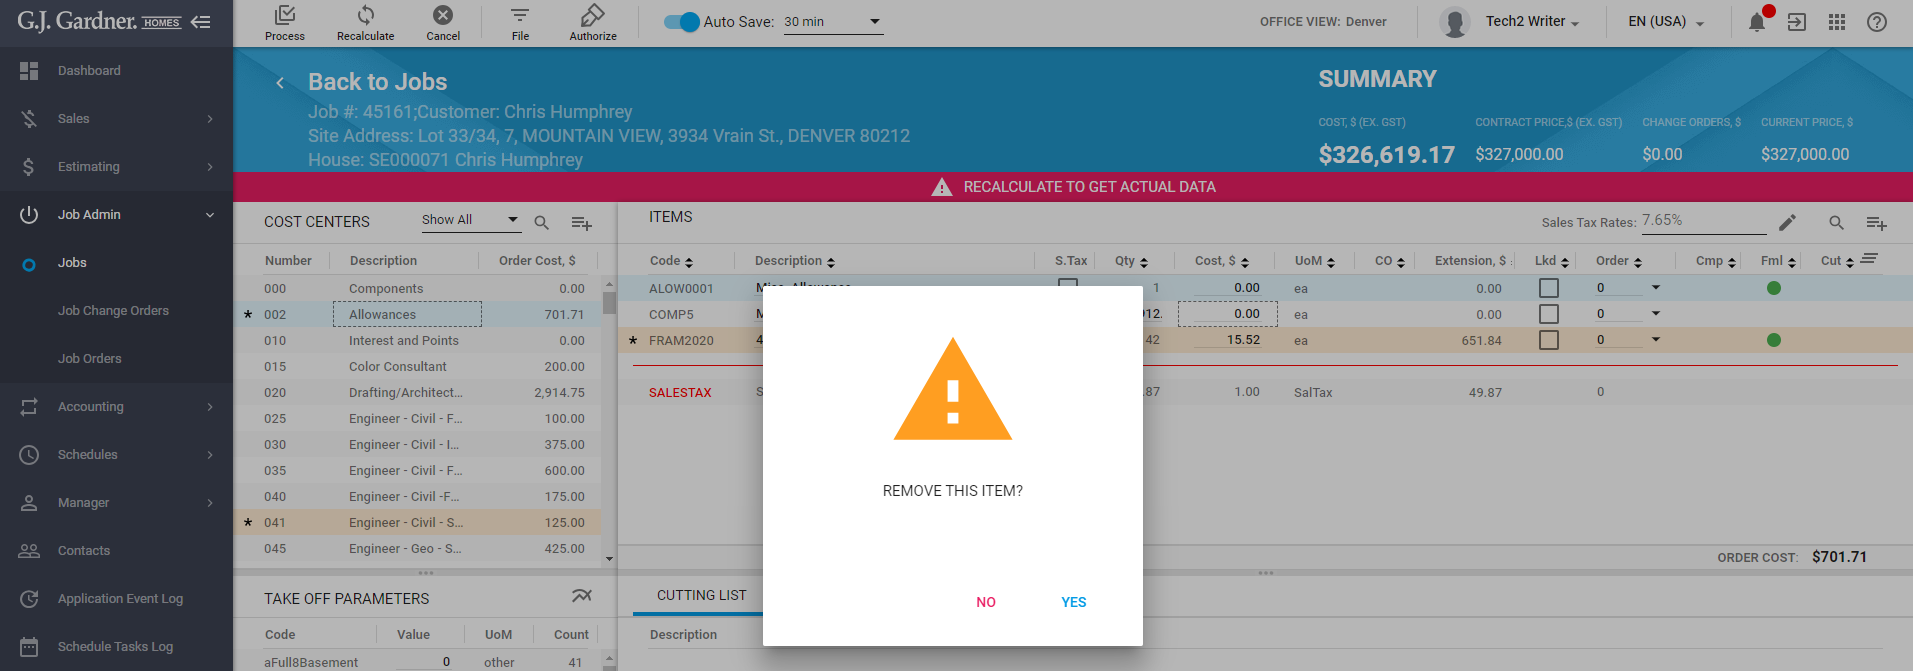
- The item is deleted. Click Recalculate to get the up-to-date costs.
To go to a specific Item
- Click the Find
 icon.
icon. - In the opened Go to Component form all items are shown. You can either enter a needed item number or select it from the list.

- Once selected, the system highlights the item.
To manage Sales Tax
- Tick the checkbox in the item you want to apply the sales tax.
- Click Recalculate to get the up-to-date data.
- After recalculation the Salestax row is added under items. The extension of the sales tax to pay for the item is also shown.

- To change sales tax rates, click the Edit
 icon over the right top part of the list with Items.
 - In the opened Select Sales Tax Rates to Add form select …
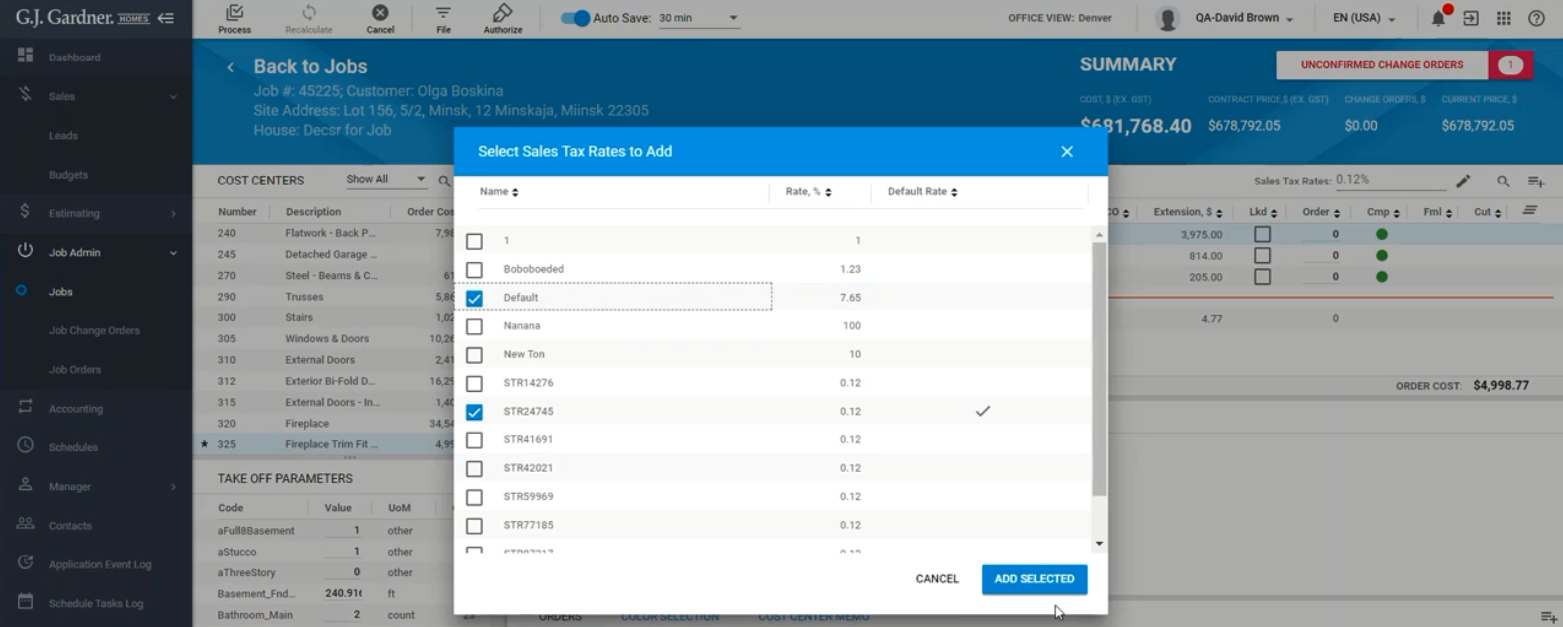
- When selected, click the Add selected button.
- In the Sales Tax Rates field new values are added. They are separated by a semicolon.
- Click Recalculate.
The system calculates the sales tax for the added rates and shows the total amount in the Extension column.
To calculate Sales tax separately
The system calculates Sales tax separately, if they are parts of different change orders. To add a new order:
- Click the item you need to add a new order.
- Click the Add
 icon in the Orders tab.
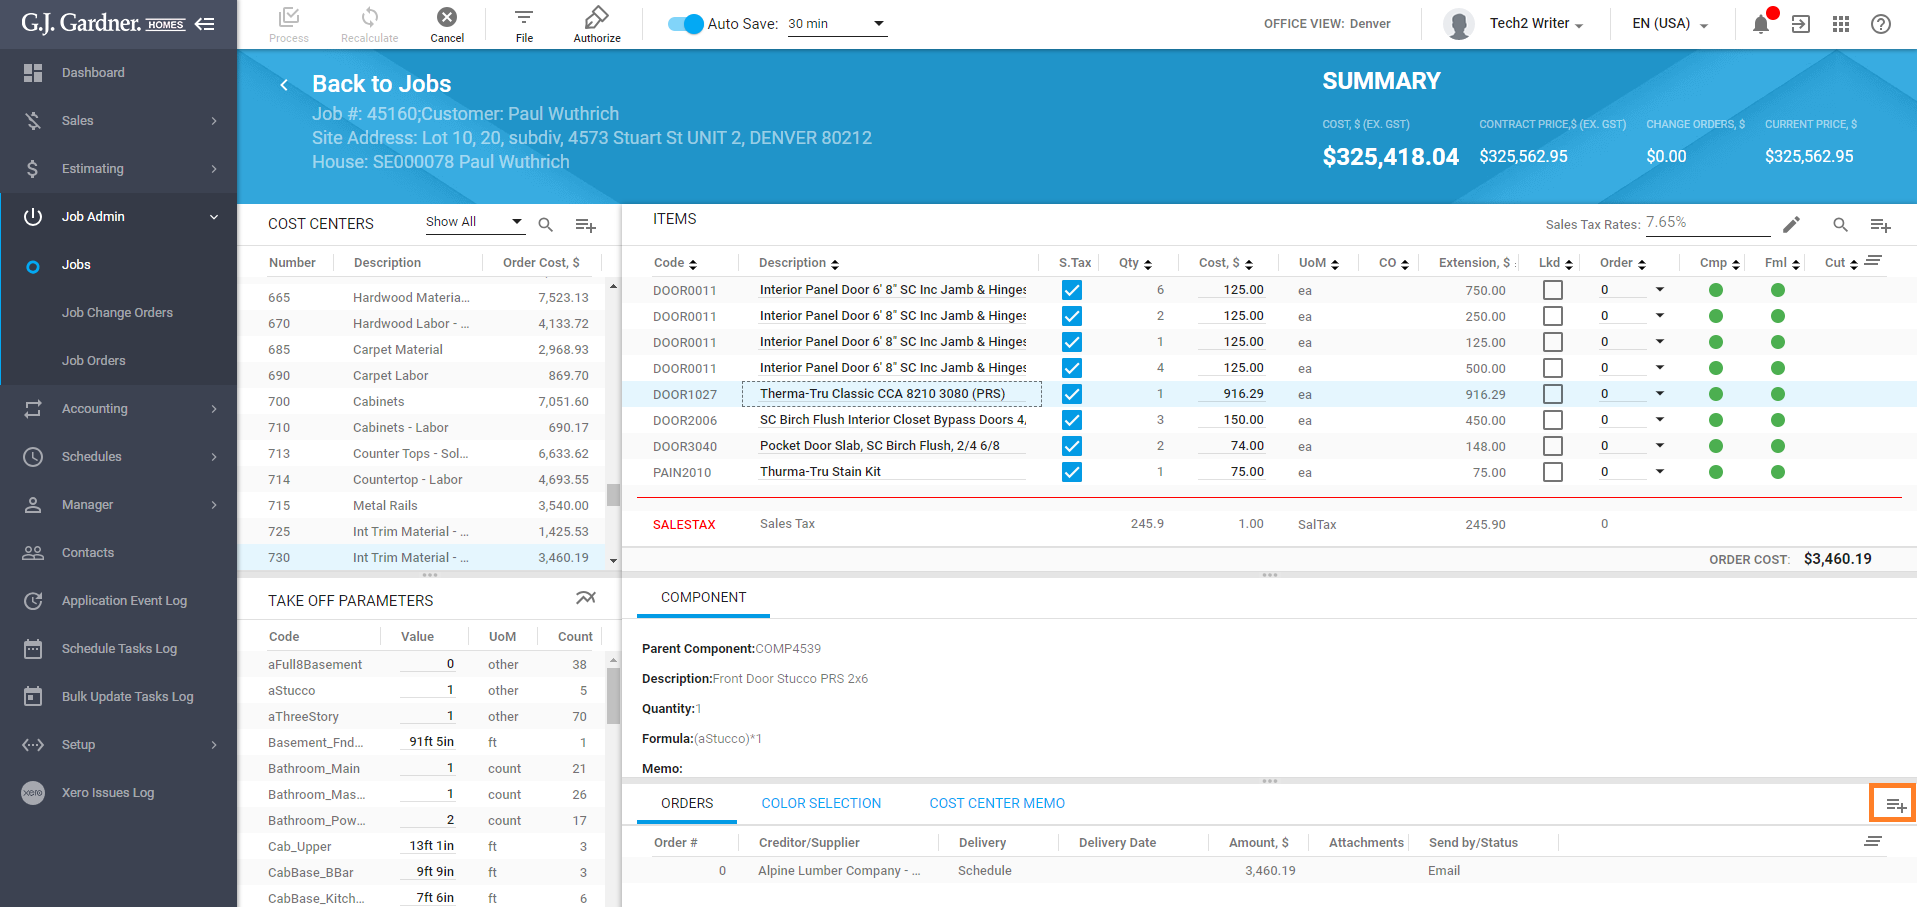
- The Create Order form opens. It looks as follows:
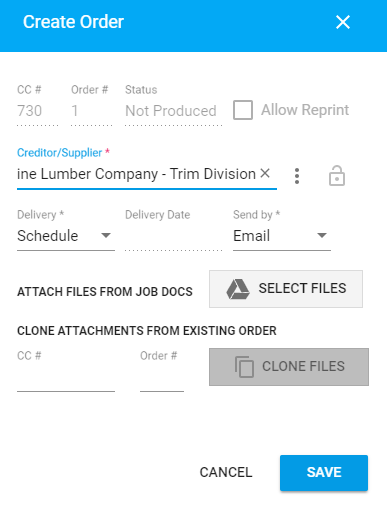
СС# The number of the Cost Center. Order# The next number of the Order. Status The order status. Allow Reprint The checkbox becomes available after producing. Creditor/Supplier The default Creditor/Supplier for the Cost Center. You can change it by clicking the Clear icon and selecting a new one from the dropdown list. The default Creditor/Supplier is in bold at the top of the list. You can create a new Creditor/Supplier by clicking the icon.
Delivery Click the field and select Schedule or Entered value. Delivery Date (available if Entered is selected at the previous step) Click the field and select the delivery date form the date picker. Send by By default the delivery method is defined by the Creditor/Supplier. To change it, click the field and select Email or Printer value.
Attach files from Job Docs To attach files from Google Drive, click the Select files button. By default Job Docs folder of the particular opens. CC# If you want to copy attachments from an existing order, enter the number of the Cost Center from which attachments have to be copied. Order# Enter the number of the Order from which attachments have to be copied. Clone files Available if CC# and Order# field are filled in. Click the button to clone files from entered Cost Center and Order.
- When complete, click Save.
- The first order is created. It can be select in the Order column.
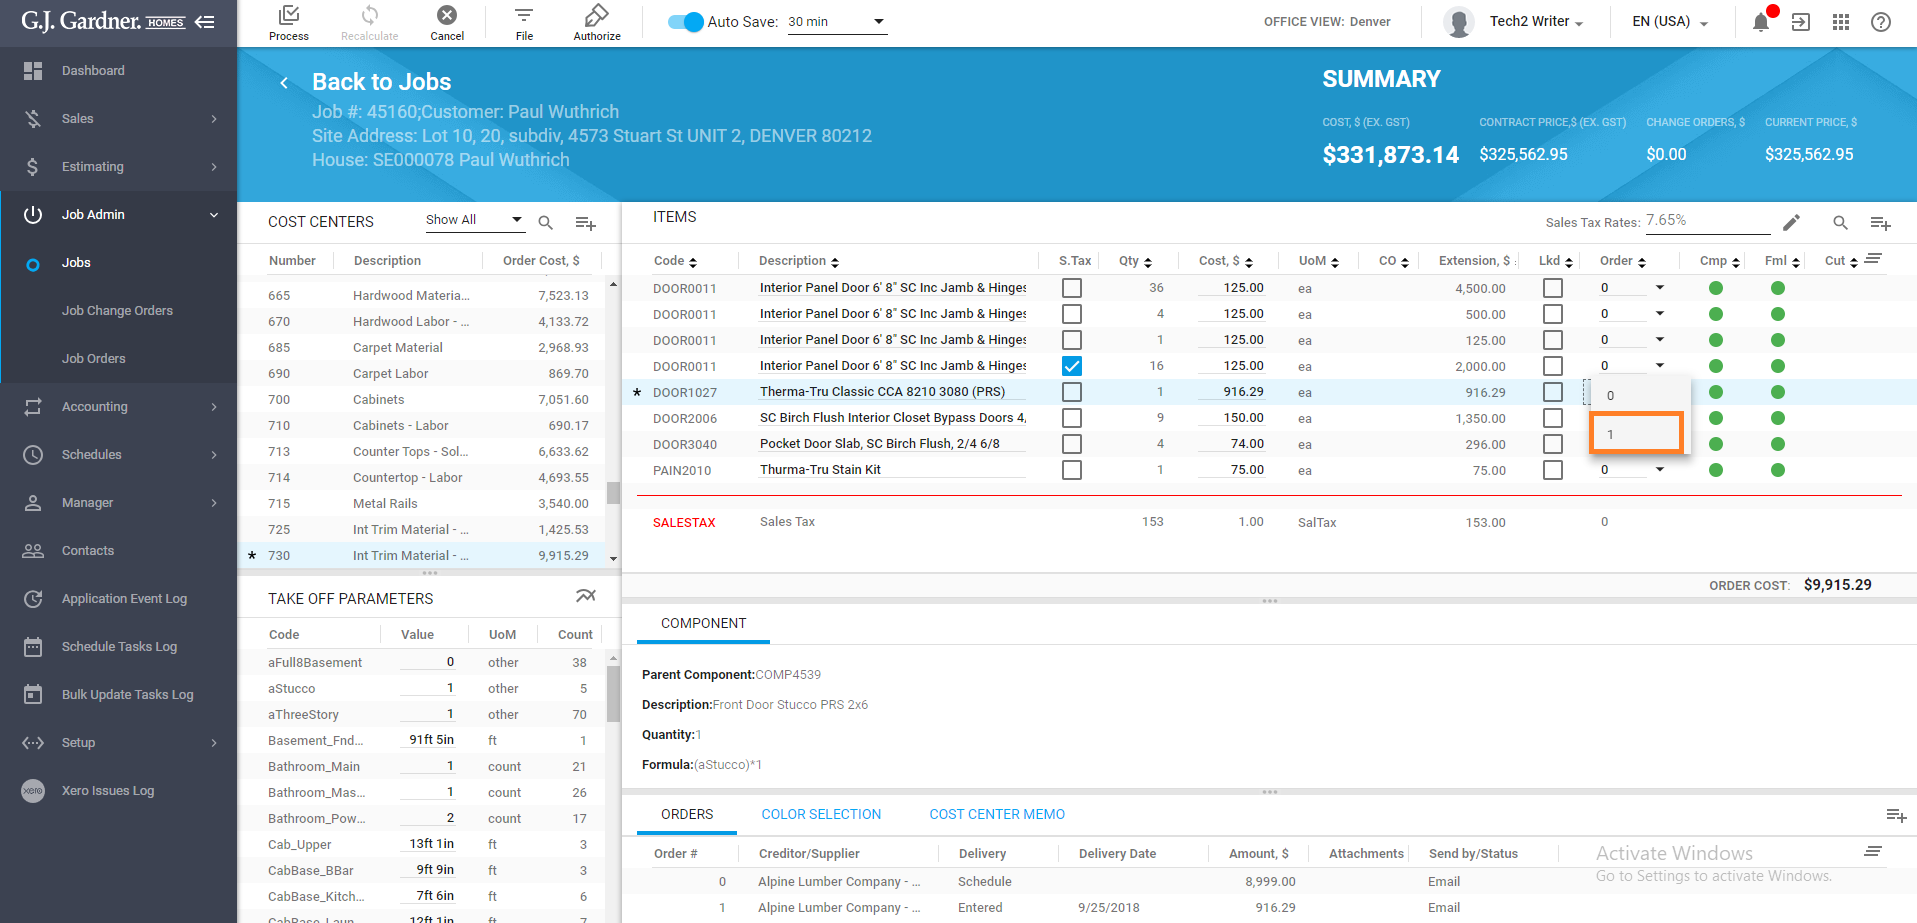
- Click Recalculate to get the up-to-date data.
- Tick the newly created order.
- Click Process to save changes.
- Sales tax is shown for both selected orders.

To go back to Component
- Click the item you want to view the component.
- Right click the Component block as it is shown on the screenshot below:
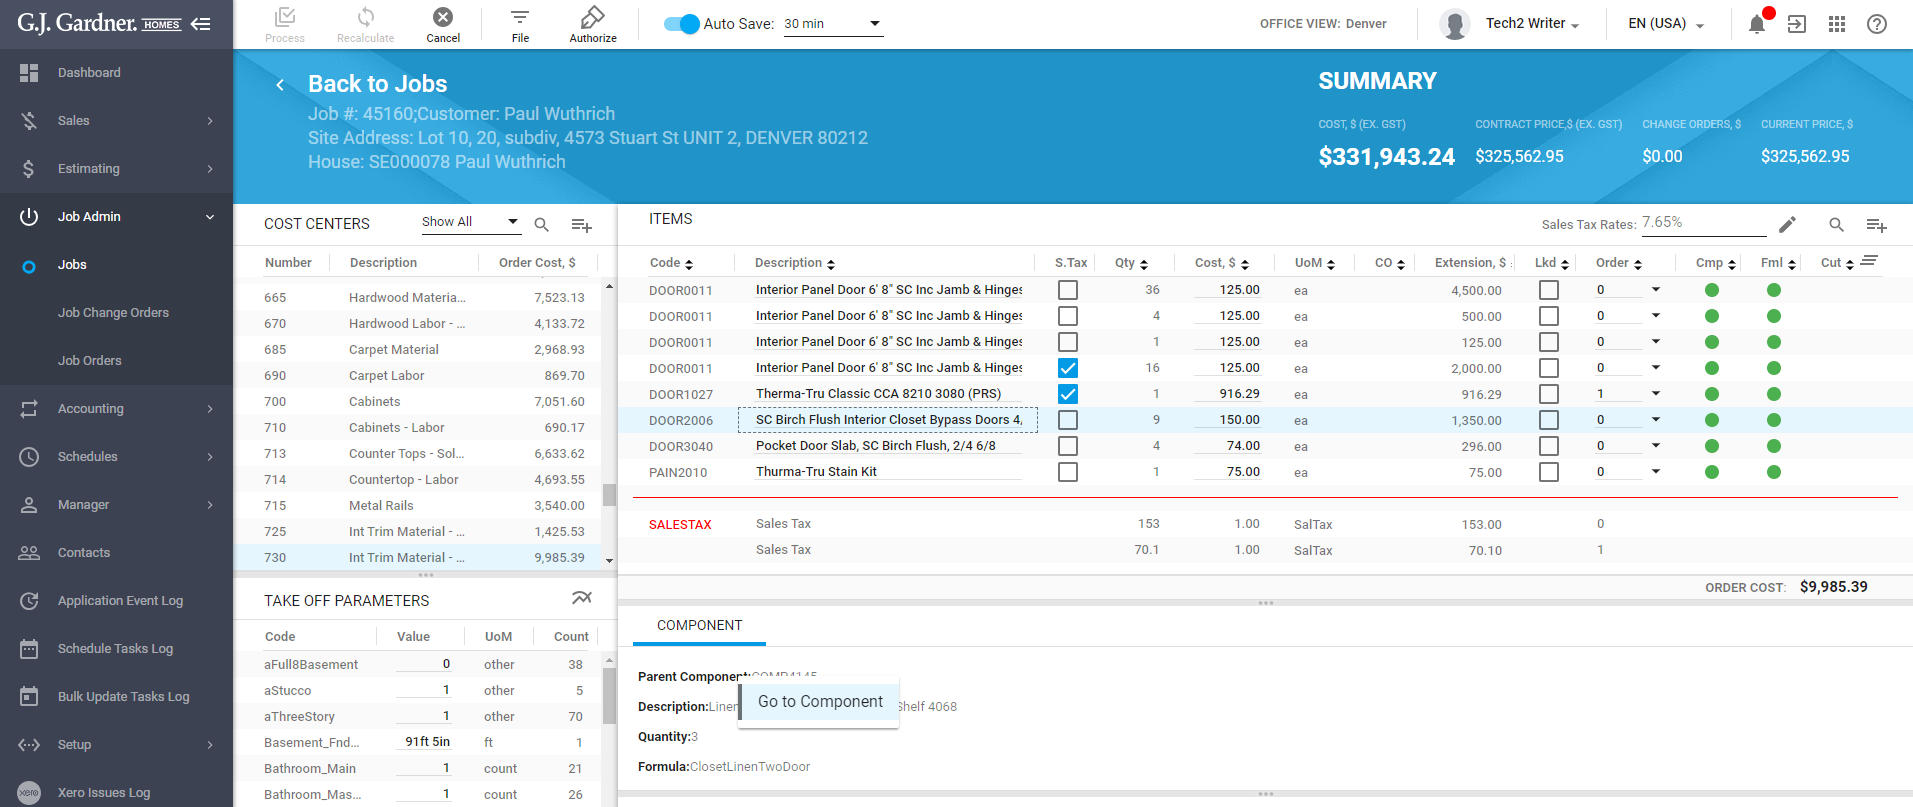
- Click Go to Component.
- You are redirected to the item’s component.
Take off parameters
The block contains the list of Take off parameters added to the Job Estimate. The following information is available in the Take off parameters block:
| Code | A unique identifier of a take off parameter. |
| Value | |
| UoM | Unit of measure of a take off parameter. |
| Count | Number of times the take off parameter used in formula/item/components. |
To add a new Take Off Parameter to an Item
- Click a Cost Center.
- Click an Item.
- Open the Formula tab.
- Switch to Take off Params.
- Select the element set which is missing in the list and then drag it to the Formula box.
- The element is added to the Formula box and Take off Params list in alphabetical order. It is marked with the asterisk and is highlighted in light-orange.
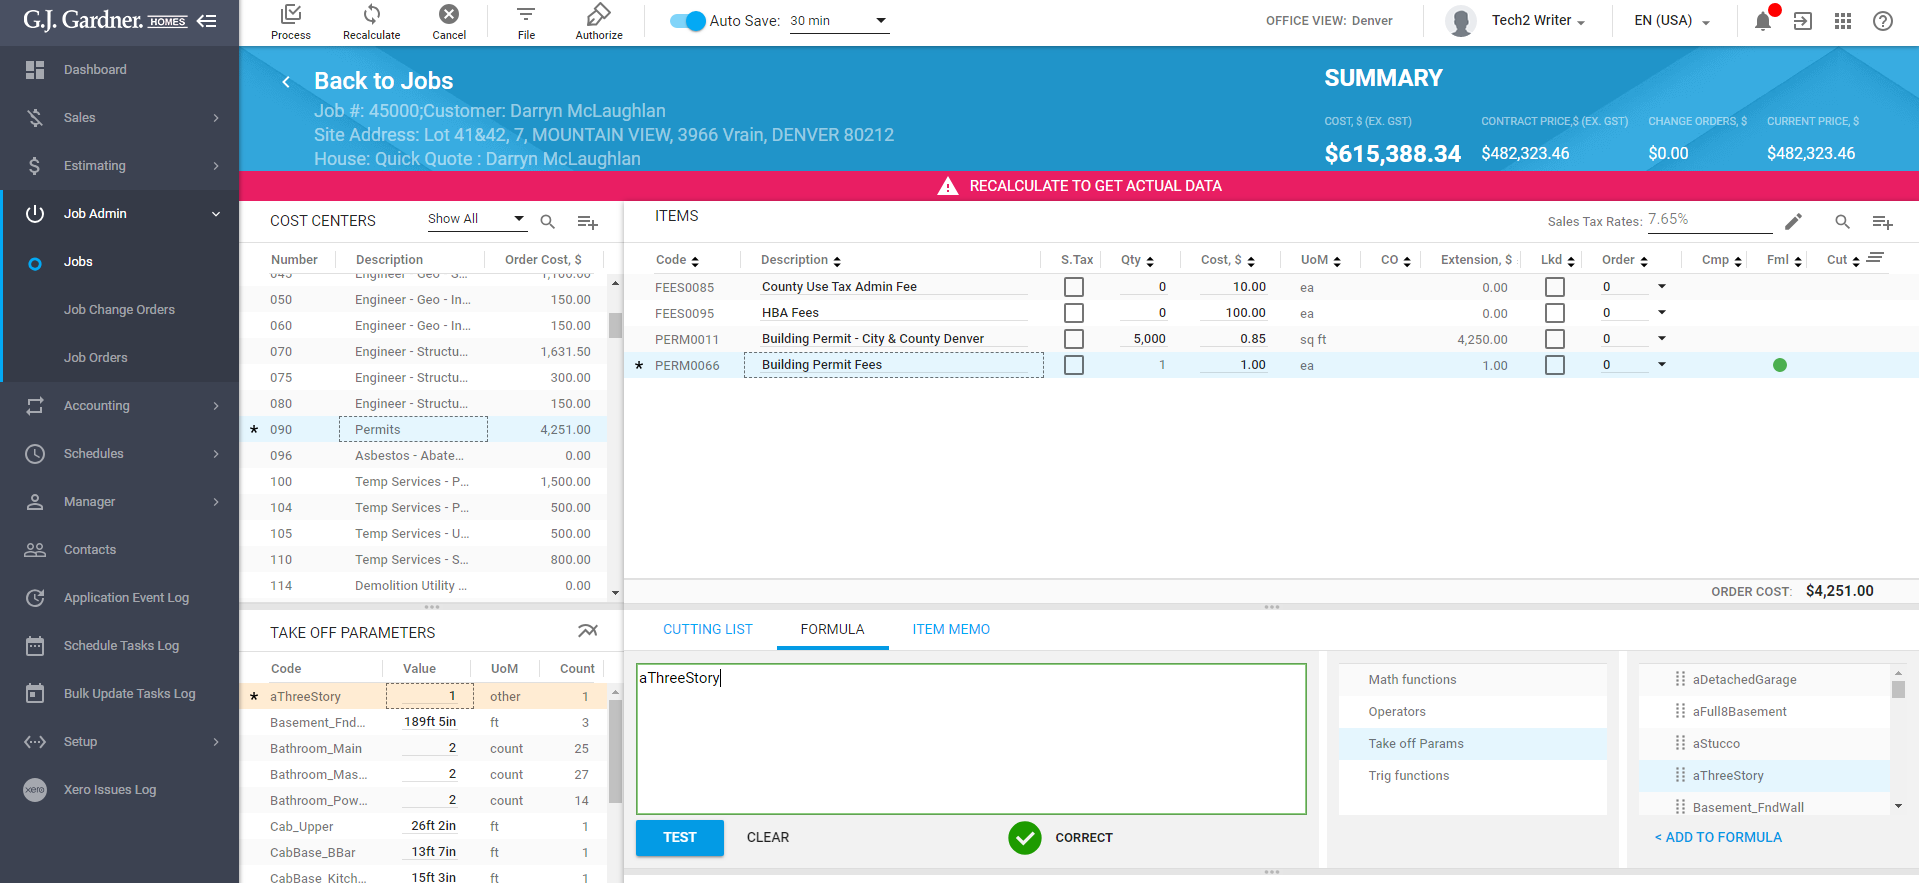
- Click the Process icon, to get the up-to-data data.
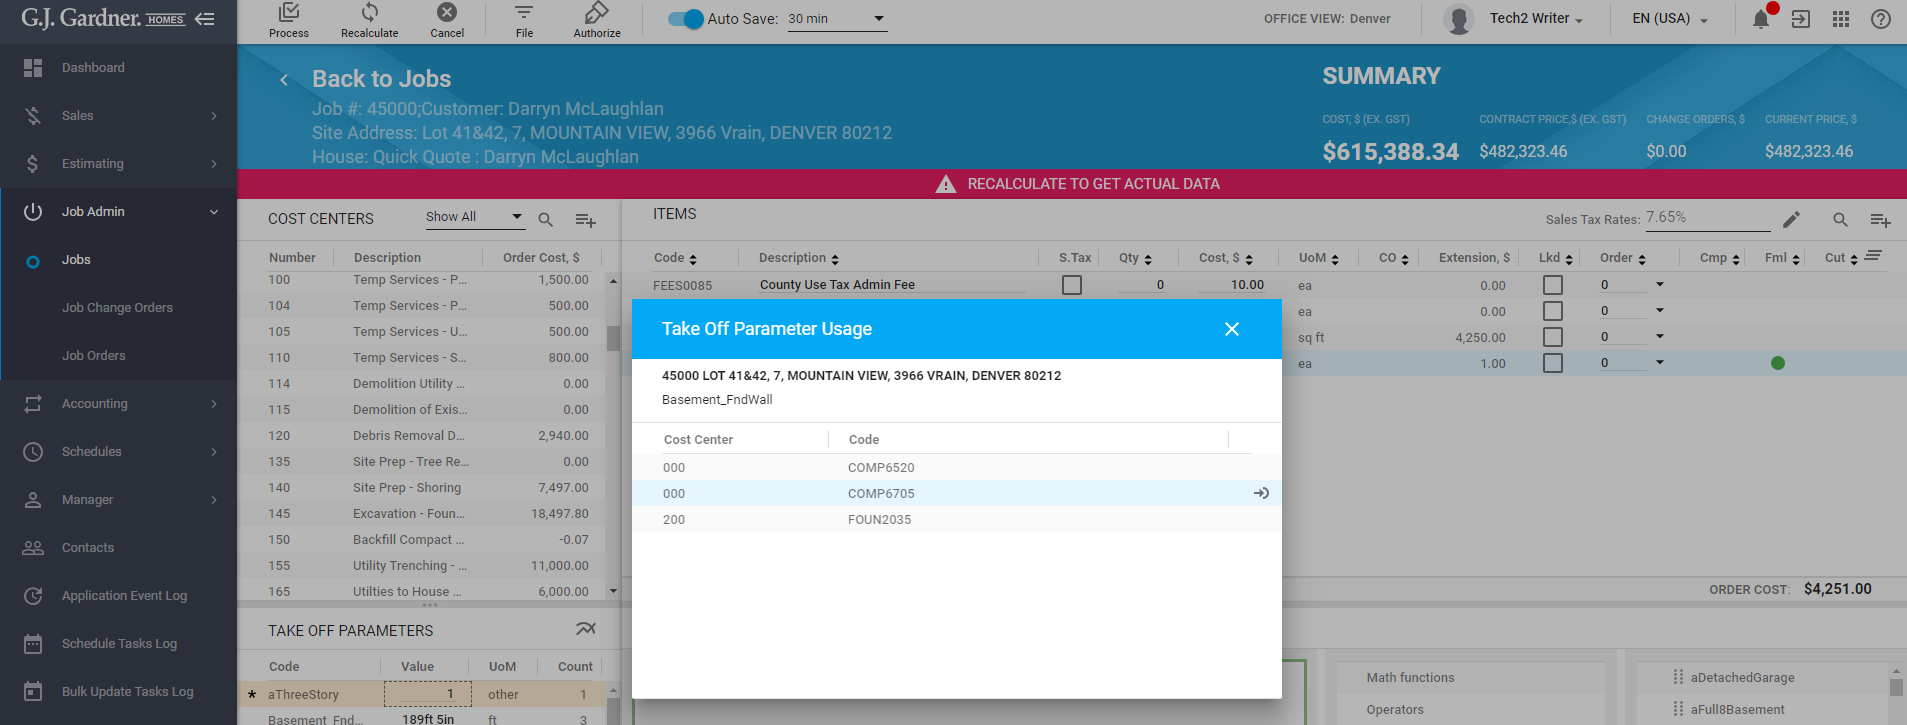
To view usage of Take Off Parameter
- In the Take Off Parameters block, locate the parameter which usage you want to view.
- Hover over this Take Off Parameter until the action icons appear.
- Click the Display Usage
 icon.
icon. - The Take Off Parameter Usage form opens. It contains the list of items, components and formula where this take of parameter is used.
- To check the formula, hover over an element which formula you want to view.
- Click the Go to
 icon.
icon. - When clicked, the system redirects you to the selected item. Switch to the Formula tab to view the formula.
To update values of Take Off Parameters
- In the Take Off Parameters block, locate the parameter you want to update.
- Double click the value you need to update.
- Enter the value you want.
- When complete, click Recalculate, to get the up-to-date data.
- Click Process, to save changes.
- The data in the Quantity column is recalculated according to the entered value.
To view Job Estimate links
- Open a Job Estimate you want to see links.
- Click the File icon at the top of the page.
- When clicked, select either BOM or Orders.
- BOM – link to Bill of Material report.
- Orders – link to the form of producing Job Orders.
- When one of the options is selected, you are redirected to the corresponding page.
To lock an Item for repricing
- On the navigational sidebar select Job.
- Search for a needed Job.
- Hover over the Job and click the Job Estimate icon.
- On the opened page, search for a needed Cost Center and click it.
- Tick the checkbox in the Lkd column.

- The item is locked for repricing.
To unlock an Item for repricing
- On the navigational sidebar select Job.
- Search for a needed Job.
- Hover over the Job and click the Job Estimate
 icon.
icon. - On the opened page, search for a needed Cost Center and click it.
- Untick the checkbox in the Lkd column.
- The item is unlocked for repricing.
To reprice Cost/UoM
Note
It is not possible to reprice locked items.
- On the navigational sidebar select Setup.
- In the expanded Setup section, select Estimating.
- Switch to the Items tab.
- Search for a needed item.
- Hover over the item and click the Edit
 icon.
icon.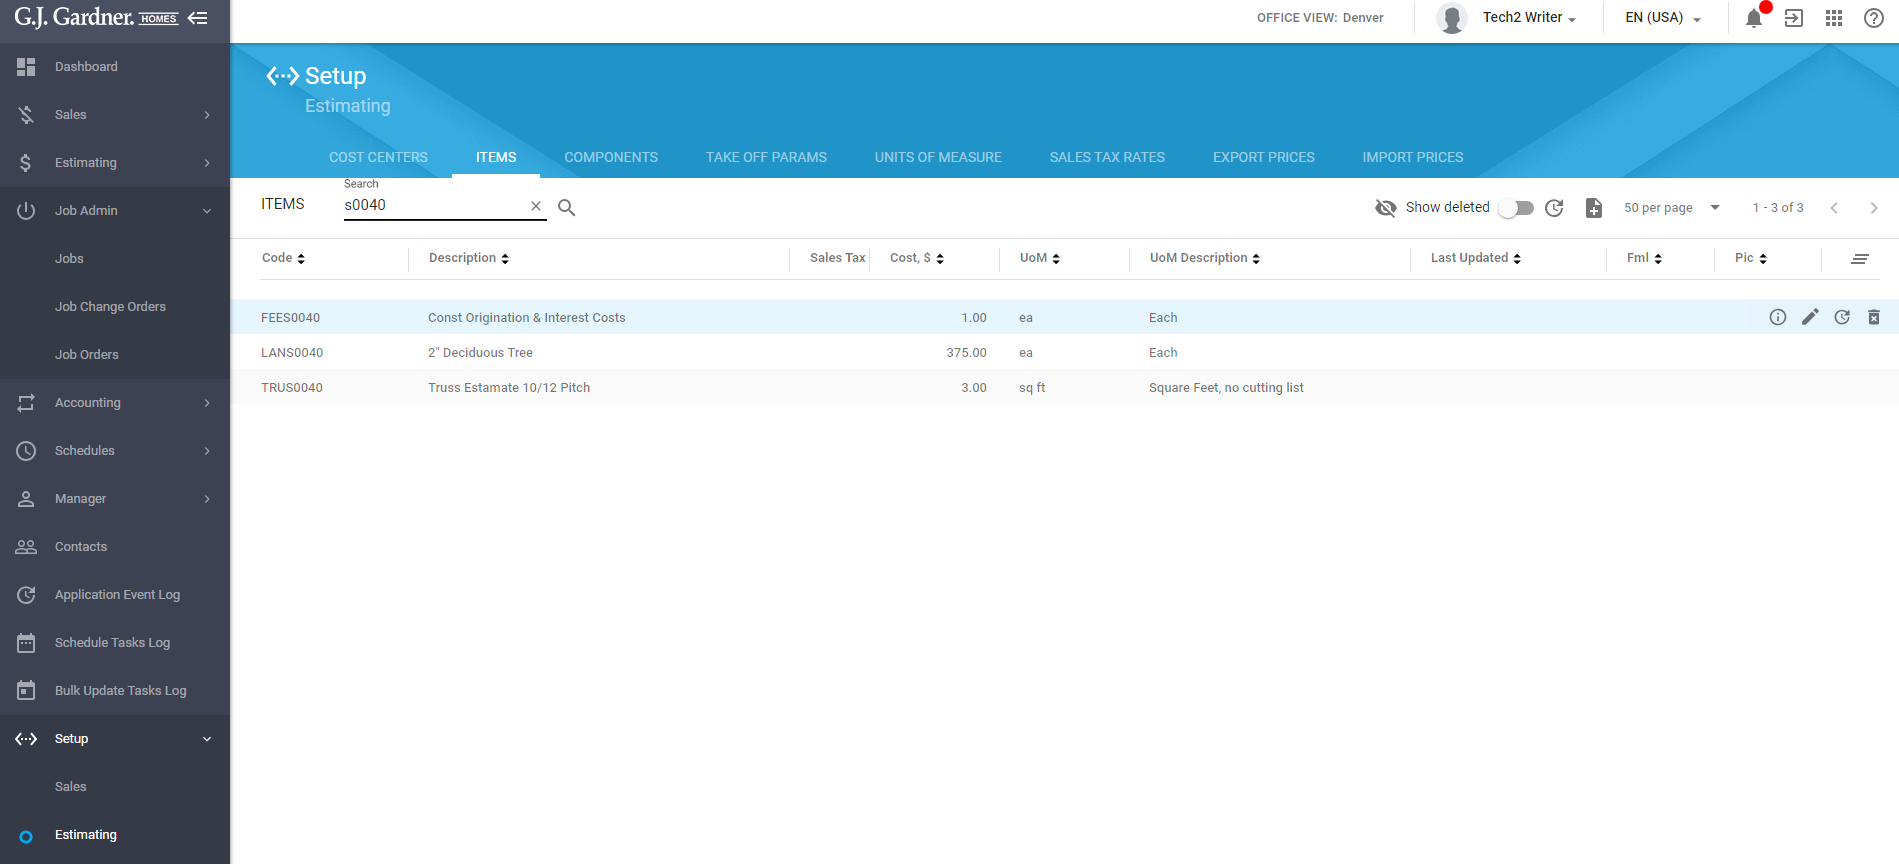
- On the opened page, edit the Cost and/or UoM.
- When done, click Process, to get the up-to-date data.
- On the navigational sidebar select Job.
- Search for a Job you’ve just edit Cost and/or UoM.
- Hover over the Job and click the Job Estimate
 icon.
icon. - Click File at the top of the page.
- When the File menu opens, click Reprice. The systems updates the Cost and/or UoM columns according to the entered data.
- Click Recalculate.
To lock Job Estimate for editing
Note
You need to have special permissions to use this functionality.
- When all estimates are done, click the Authorise
 icon at the top of the page to lock the Job Estimate for editing form all other users.
 - The system opens a dialog to confirm the action. Click Yes.
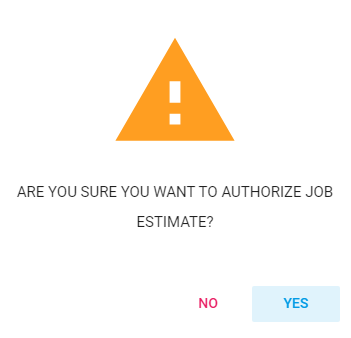
- The changes are saved. The icon is changed to Unauthorise. The others users are not able to edit this Job Estimate.
To unlock Job Estimate for editing
Note
You need to have special permissions to use this functionality.
- Open a Job Estimate you want to unlock.
- Click the Unauthorise icon at the top of the page.
- The system opens a dialog to confirm the action. Click Yes.
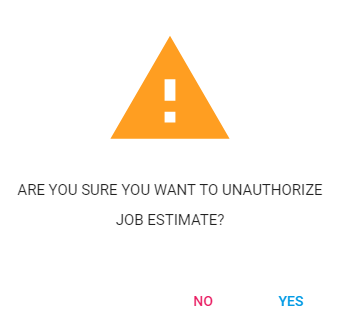
- The changes are saved. The icon is changed to Authorise. The others users are able to edit this Job Estimate.

