
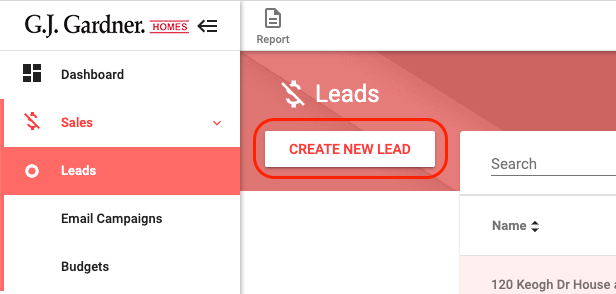
Create New Lead
- Click Sales > Leads.
- Click Create New Lead.
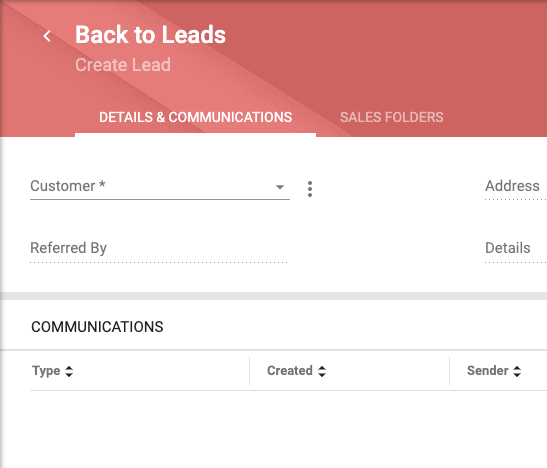
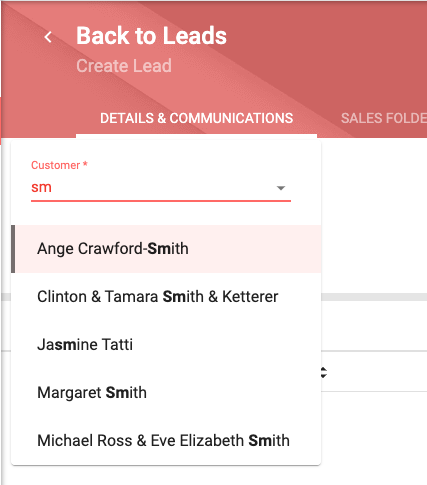
- Select Customer from dropdown list, if available, check and amend as necessary;
- Click
 icon to the right of Customer’s name,
 - Click
 View Contact Info,
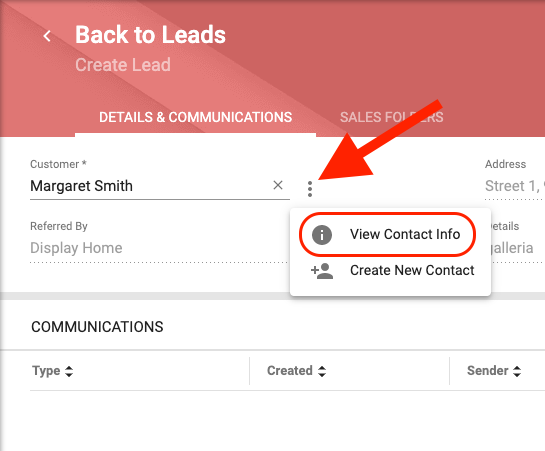
- Edit Contact page will open, amend as necessary,
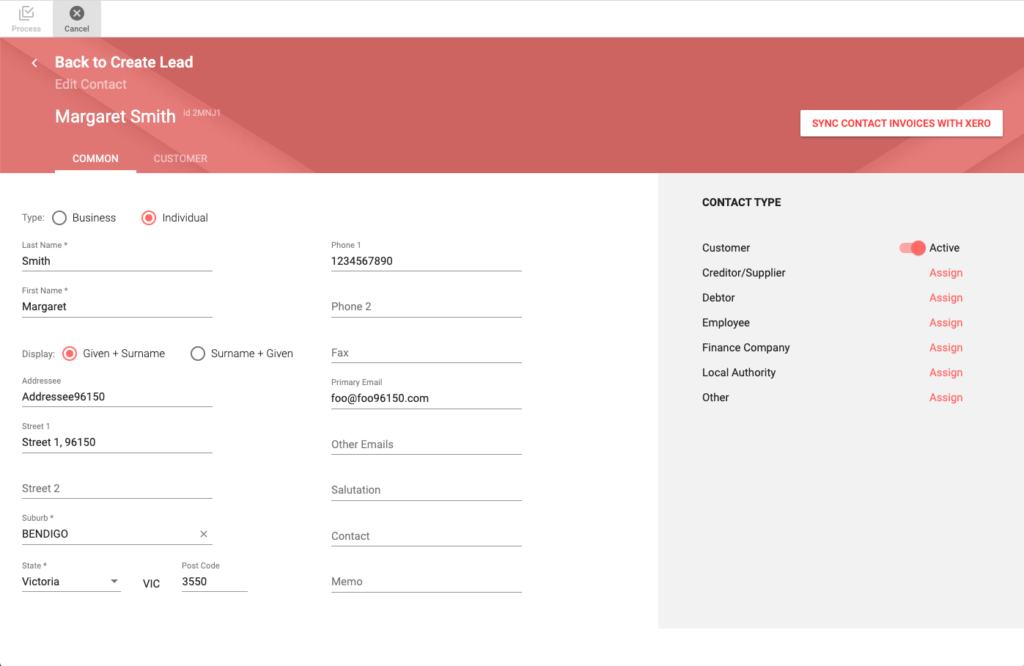
- Click Process.
– OR –
- If customer not available in the database;
- Click icon to the right of Customer name area,
- Click
 Create New Contact,
 - Create New Contact page will open, complete all details as necessary,
- Click Process.
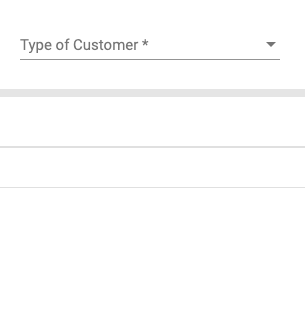
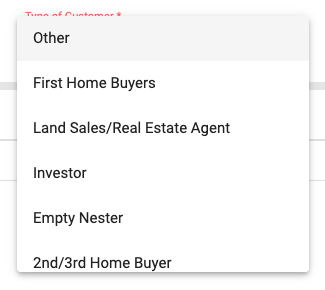
- Click
- Select Type of Customer from dropdown list.
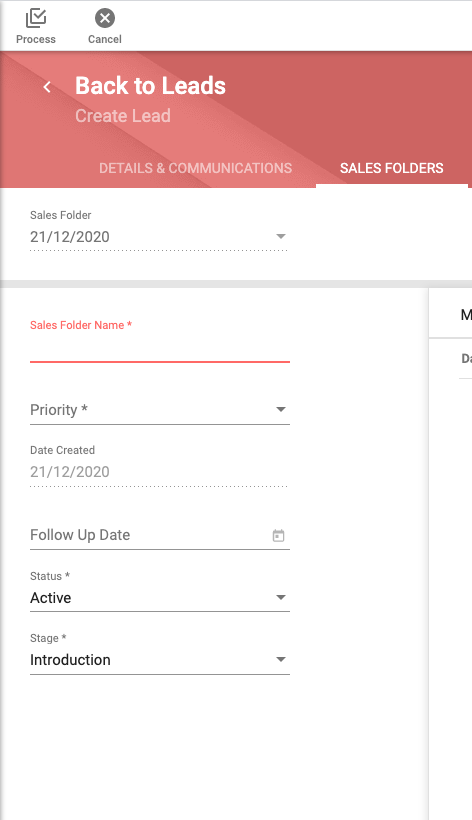
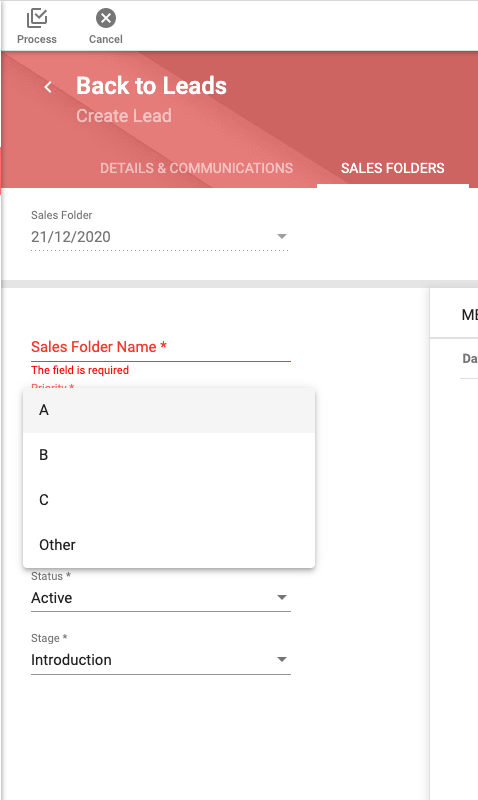
- Click Sales Folder.
- Type a Sales Folder Name, based on specific office format/policy.
- Select Priority from dropdown list.
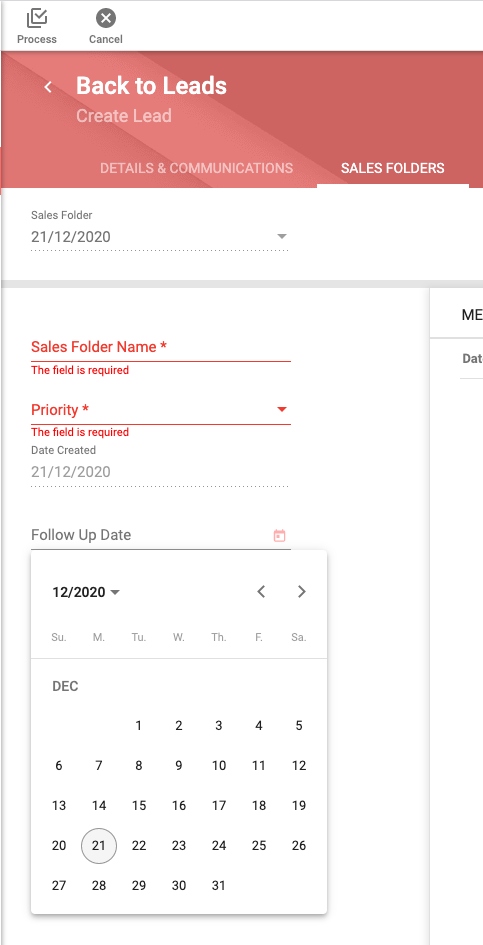
- Select Follow Up Date
icon, and select a follow up date for the customer.
- Click Process.
Request For Quotation (RFQ) Management
Sites
- Choose Sales > Leads.
- Search the required Lead.
- Click
icon or Press Return/Enter.
- Click;
- On the Row of the required Lead to open,
– OR –
- Hover over the row of the required Lead and click the Edit
 icon to the right on the row of the required Lead to open.
 - Click Sales Folder.
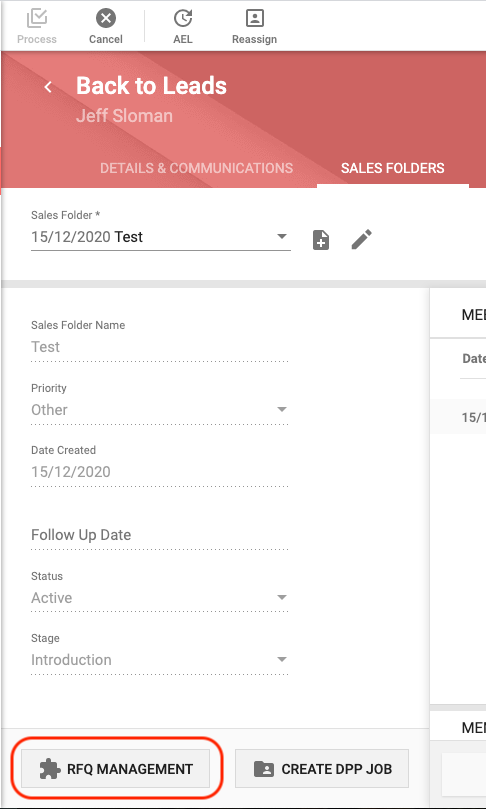
- Click RFQ Management.
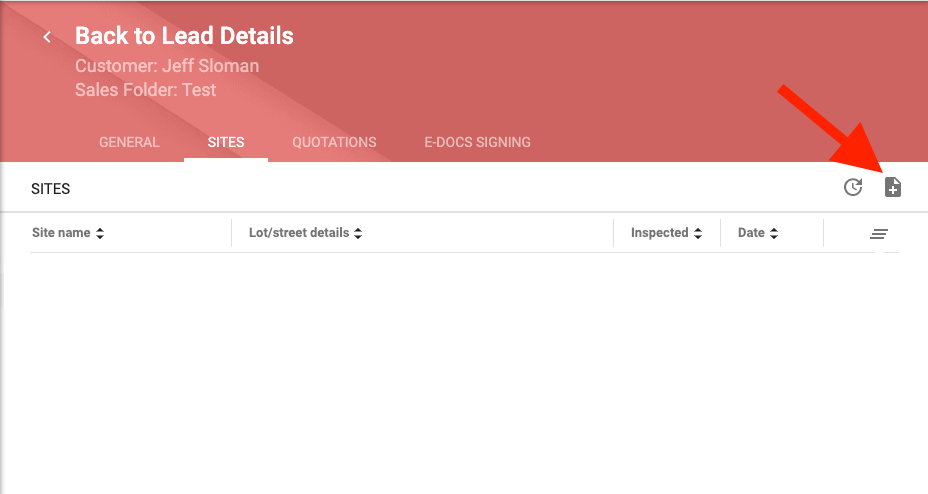
- Click Sites.
- Click Add
icon.
- Type a Site name, based on specific office format/policy.
- Complete the site address details.
- Select the Inspected on checkbox, and select the calendar
- Select from each category, using the dropdown lists, the status of the inspected site.
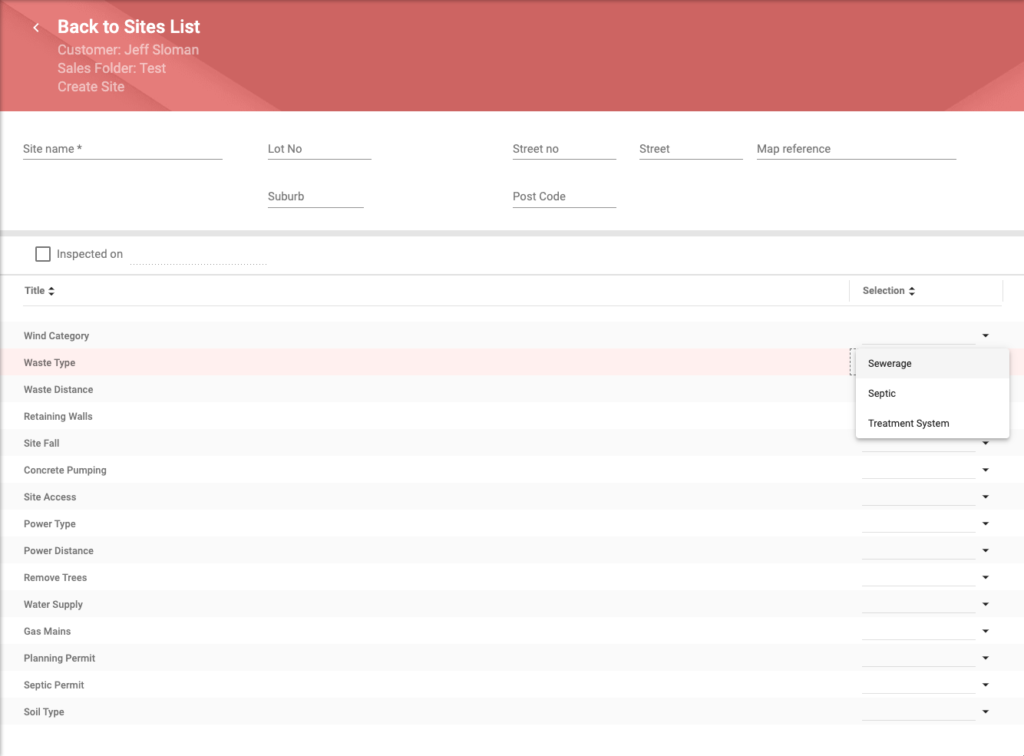
- Click Process.
- Click Back to Sites List.
Quotations
- Choose Sales > Leads.
- Search the required Lead.
- Click
- Click;
- On the Row of the required Lead to open,
– OR –
- Hover over the row of the required Lead and click the Edit icon to the right on the row of the required Lead to open.
- Click Sales Folder.
- Click RFQ Management.
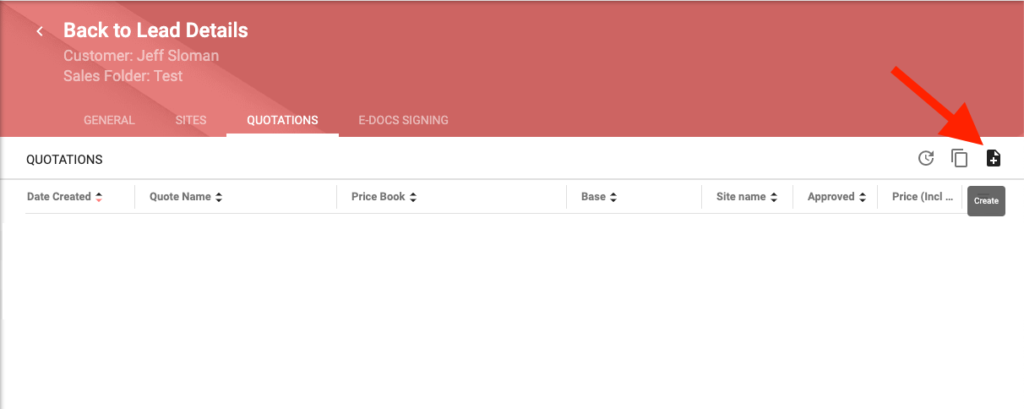
- Click Quotations.
- Click Create
icon.
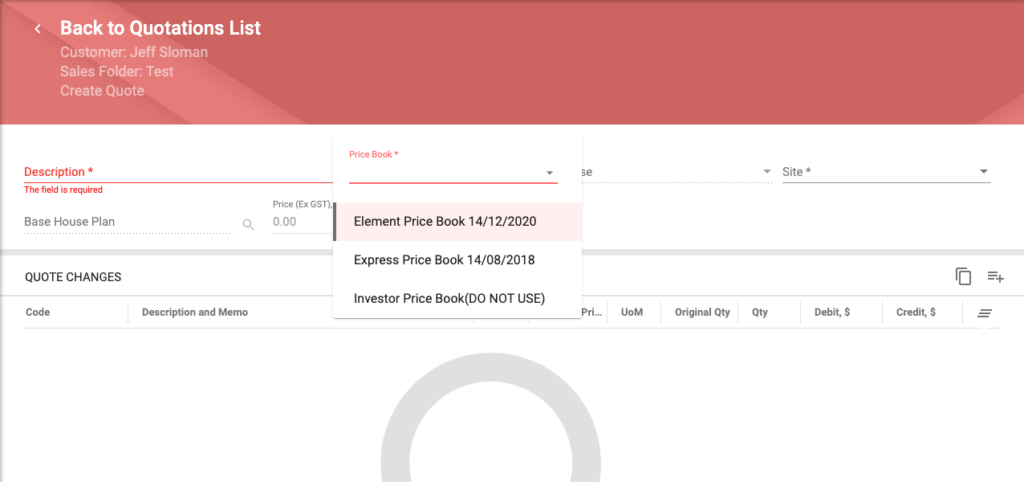
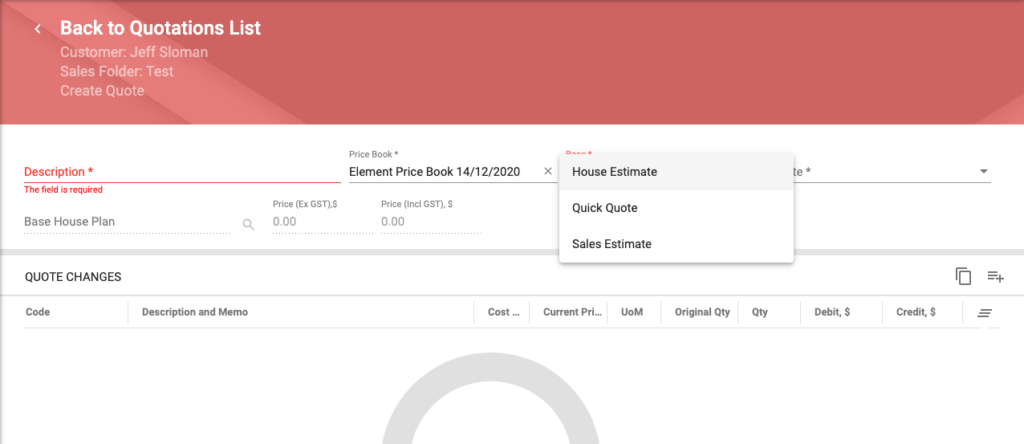
- Type a quotation Description, based on specific office format/policy.
- Select Price Book from dropdown list.
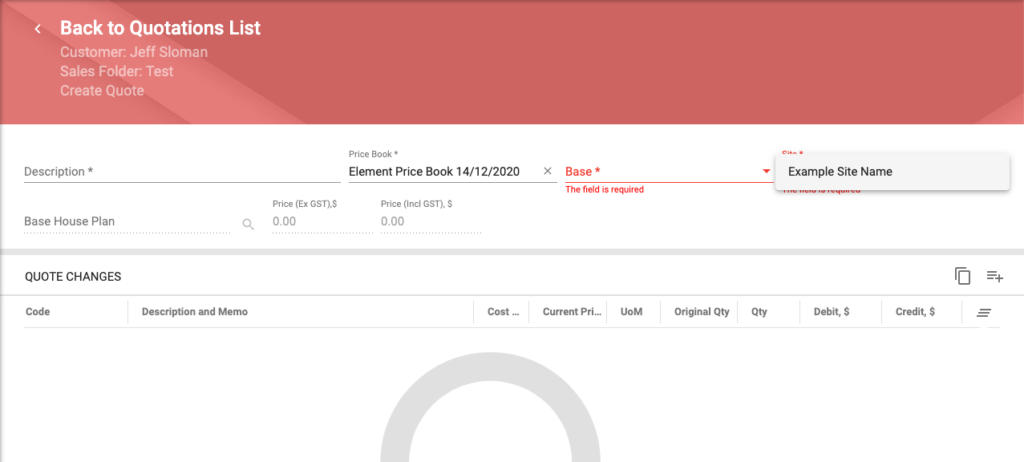
- Select Base from dropdown list, House Estimate, Quick Quote or Sales Estimate.
- Select Site from dropdown list.

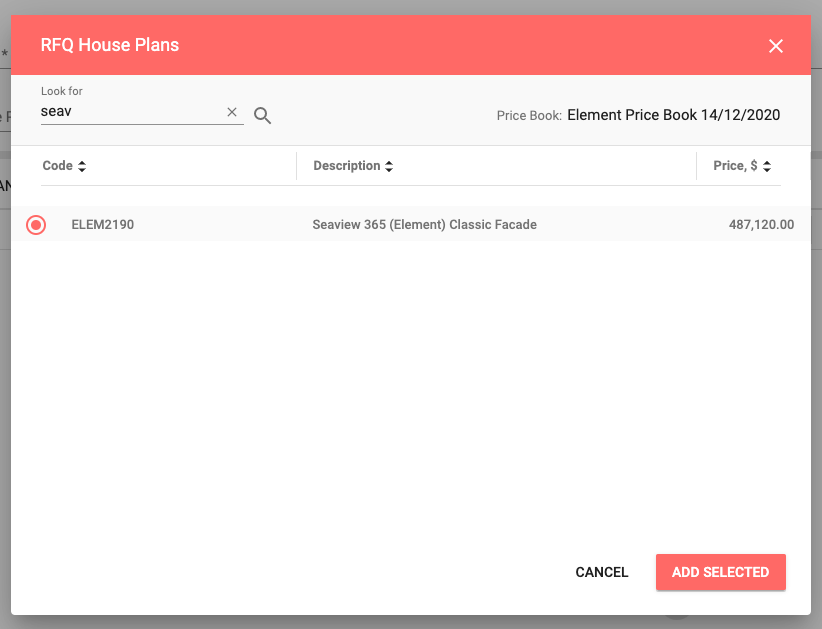
- Click
- Type in Look for the Code or Description, or part thereof, of the required House Plan.
- Click
- Click on the Row of the required House Plan.
- Click Add Selected.
- Click Process.
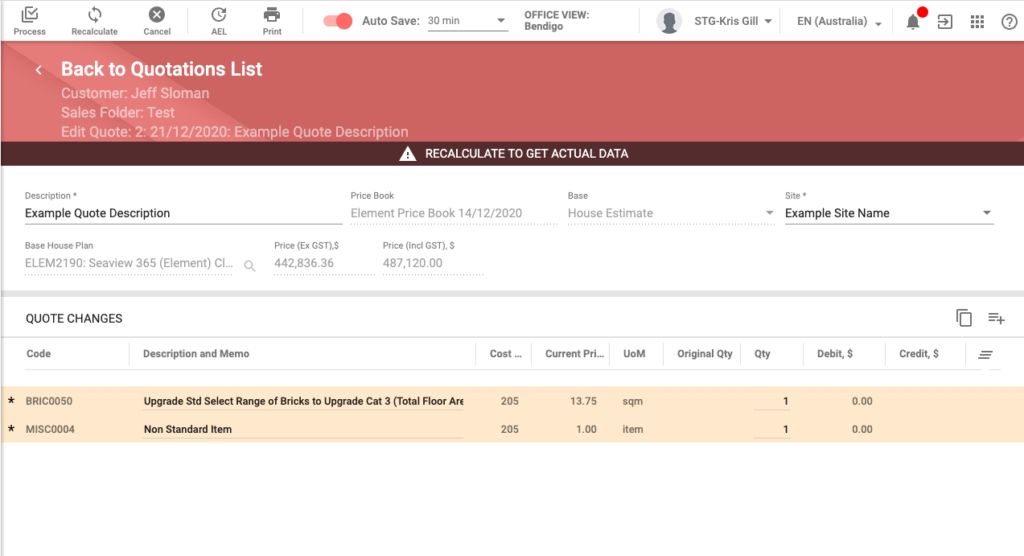
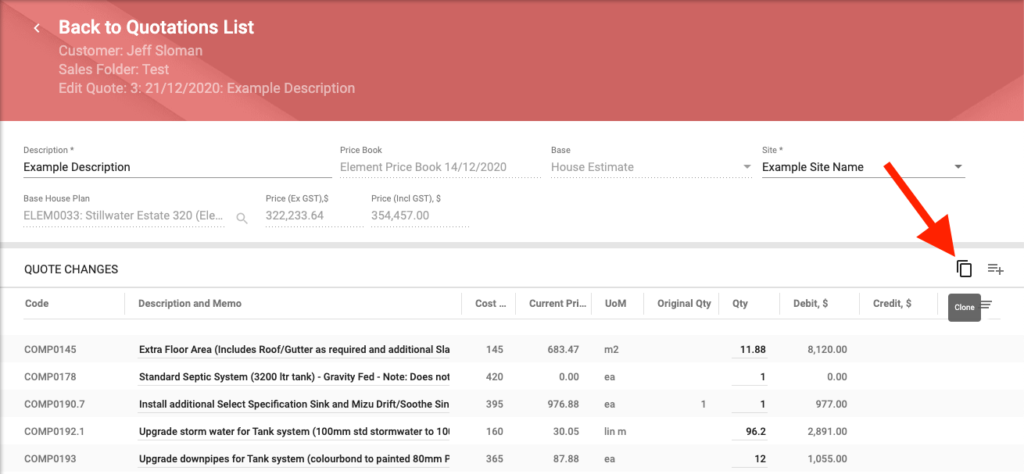
Quote Changes
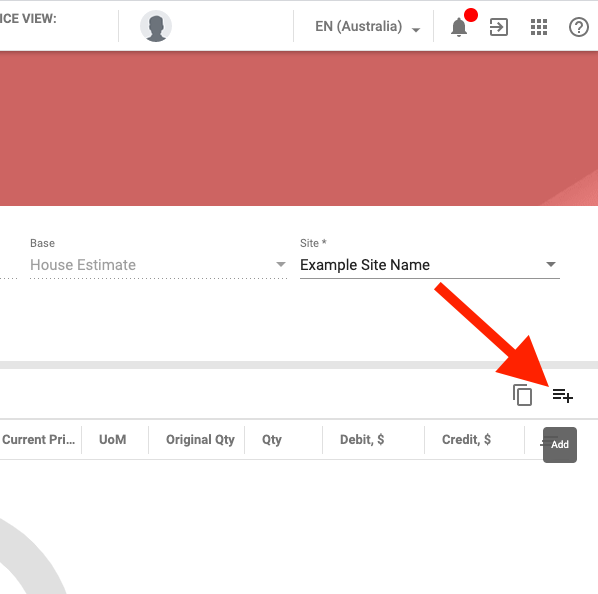
- Click Add
icon to access RFQ Items & Components in the Price Book selected in Quotations step 4.
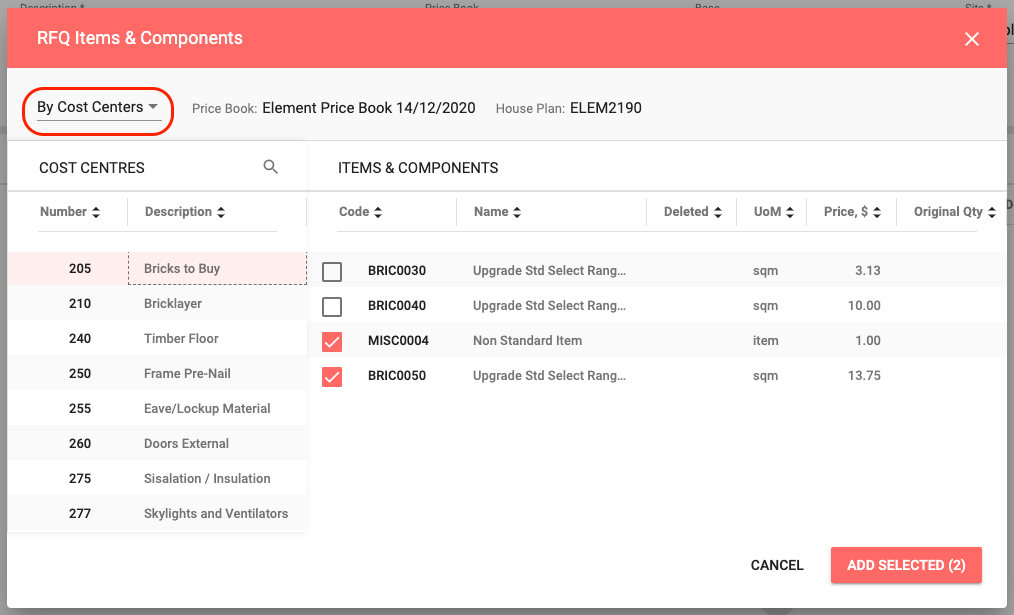
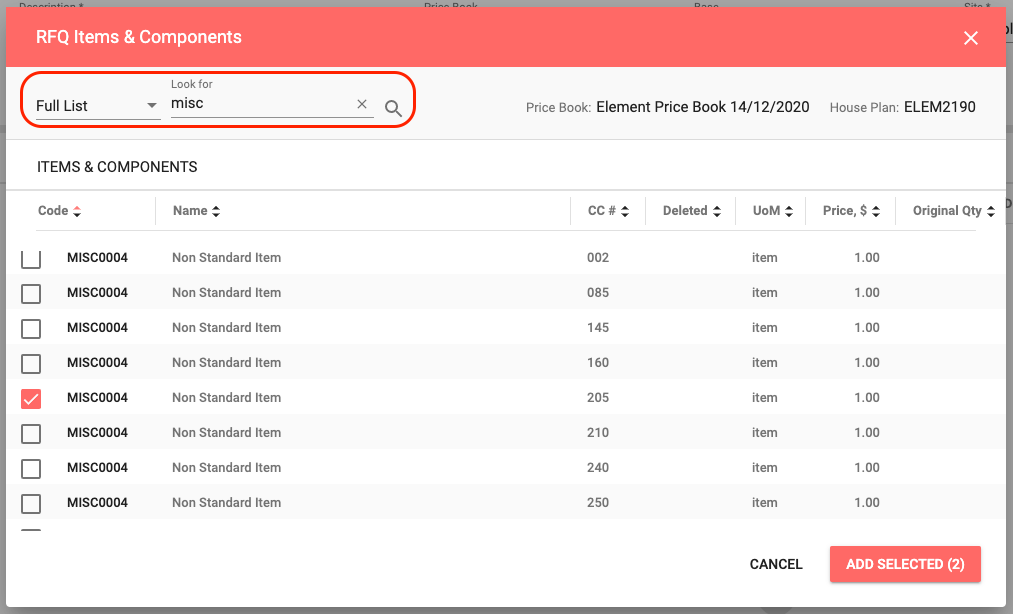
- Select view option from dropdown list, By Cost Centres or Full List;
- If By Cost Centres;
- Scroll down Cost Centre list to locate the required Cost Centre,
- Click Cost Centre,
- Scroll down Item and/or Component list in required Cost Centre to locate the required Item and/or Component,
- Select the Row of the required Item and/or Component,
- Repeat the above four steps as many times as required,
- The number of selections made will tally up in the Add Selected button in brackets,
- Click Add Selected will add all selections to the Quote Changes area.
- If By Cost Centres;
- If Full List;
- The full list of Items & Components will be displayed in Code alphanumeric order,
- Type in Look for the Code or Description, or part thereof, of the required Items and/or Components,
- Click
- Select the Row of the required Item and/or Component,
- Repeat the above three steps as many times as required,
- The number of selections made will tally up in the Add Selected button in brackets,
- Click Add Selected will add all selections to the Quote Changes area.
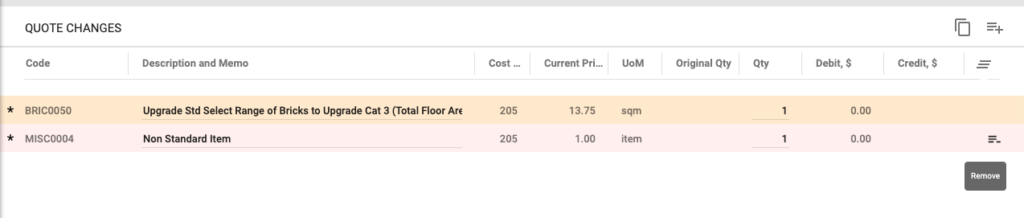
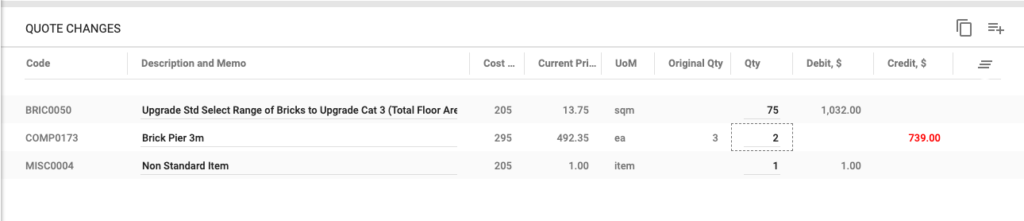
Items and/or Components newly added to Quote Changes will be highlighted and have an ‘*’ to their left, signifying that the actual data has not yet been saved. The Items and/or Components in this situation may be Removed, Quantities amended, Description and Memo amended, and the list can be further Added to.
To remove an Item or Component from the Quote Changes list, hover over the row of the required Item or Component and click the Remove
icon, located to the right on the row of the required Item or Component.
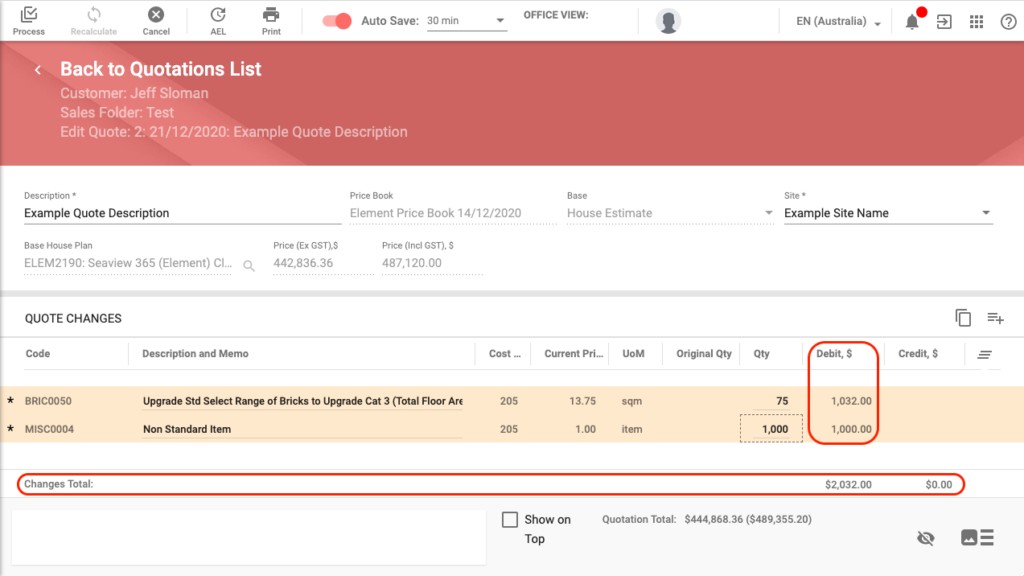
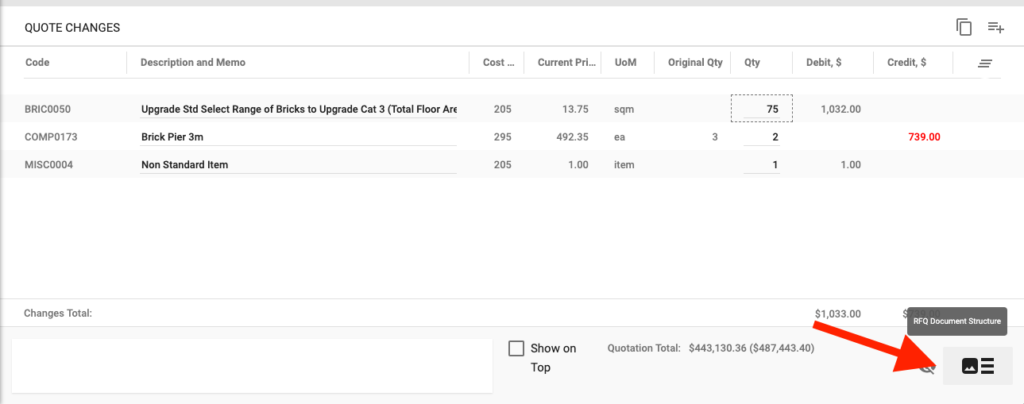
If the actual data view is required prior to processing, click Recalculate
, the Debit, $ column amounts and Changes Total: amount will be displayed accurately, while these Items and/or Components will remain highlighted and have an ‘*’ to their left until processed.
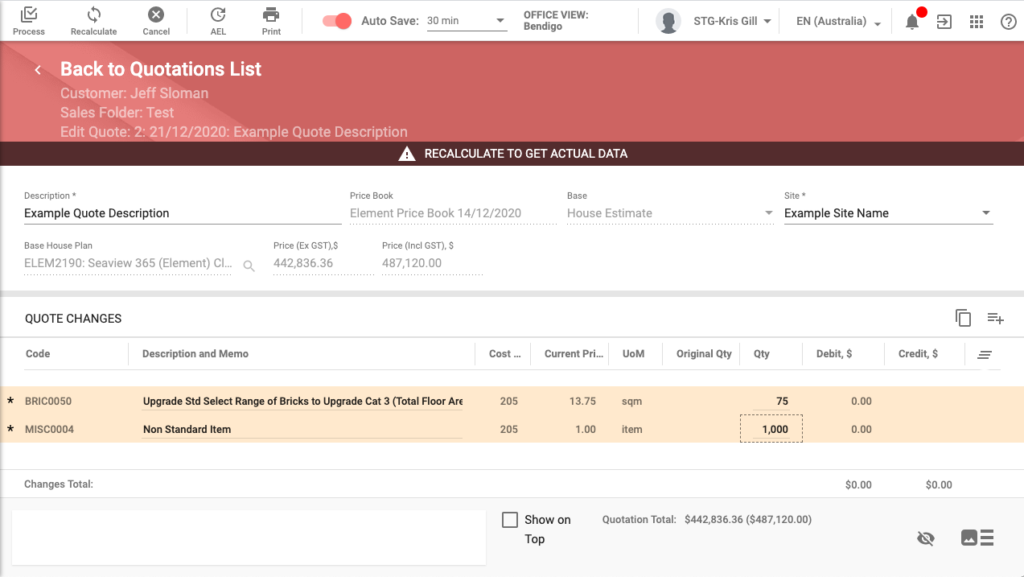
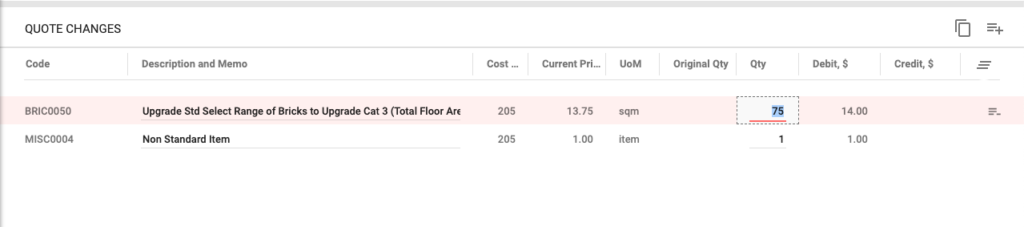
- Check and amend, if required, the Quantity of all Items and/or Components;
- Single click the Qty column for each row, this will display the dotted-line box around the selected data box, which can be amended by typing to over type (a double click of the Qty column for each row will highlight text, which can be amended by typing to over type or once text is highlighted, the cursor can be placed to amend text).

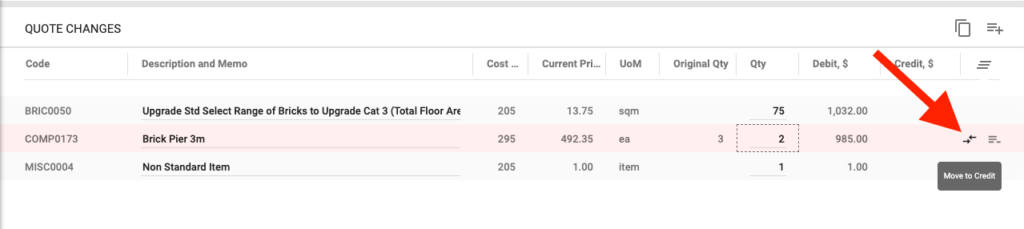
- Check and amend, if required, any Credit for an Item or Component;
- Locate the Item or Component with a positive value in the Original Qty column,
- Amend the Quantity of the Item or Component with a value ≤ the original quantity;
- Single click the Qty column for each row, this will display the dotted-line box around the selected data box, which can be amended by typing to over type (a double click of the Qty column for each row will highlight text, which can be amended by typing to over type or once text is highlighted, the cursor can be placed to amend text),
- Hover over the row of the required Item or Component and click the Move to Credit
icon, located to the right on the row of the required Item or Component,
- The price of the Item or Component will appear in the Credit, $ column and the text will be coloured red.
The credit price will be adjusted as per the Delete, % setting for the Item or Component in the Price Book selected for the Quotation.
To return the Item or Component back to the Debit, $ column, click the
icon, which is now displaying as the Move to Debit
icon.
- Check and amend, if required, the Description and Memo of all Items and/or Components;
- Single click the Description and Memo column for each row, this will display the dotted-line box around the selected data box, which can be amended by typing to over type (a double click of the Description and Memo column for each row will highlight text, which can be amended by typing to over type or once text is highlighted, the cursor can be placed to amend text).
- Click Process.


RFQ Document Structure
- Choose Sales > Leads.
- Search the required Lead.
- Click
- Click;
- On the Row of the required Lead to open,
– OR –
- Hover over the row of the required Lead and click the Edit icon to the right on the row of the required Lead to open.
- Click Sales Folder.
- Click RFQ Management.
- Click Quotations.
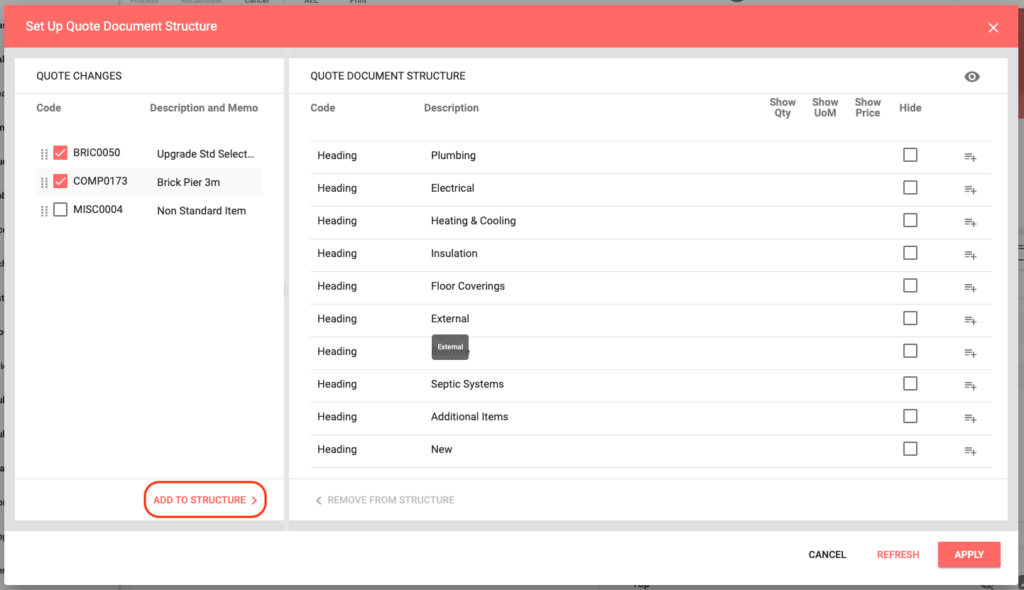
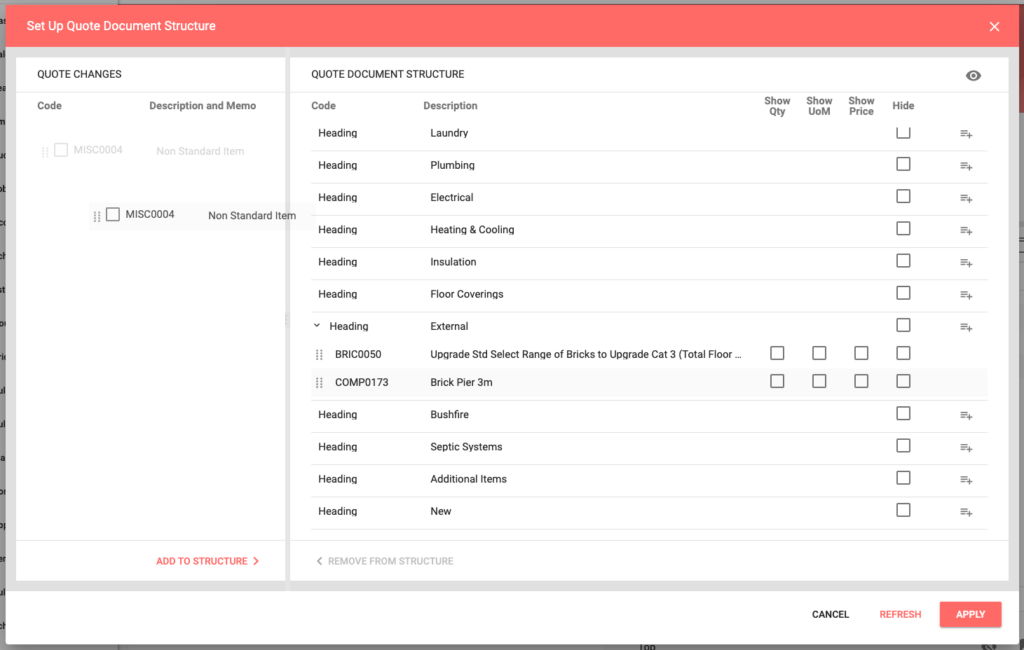
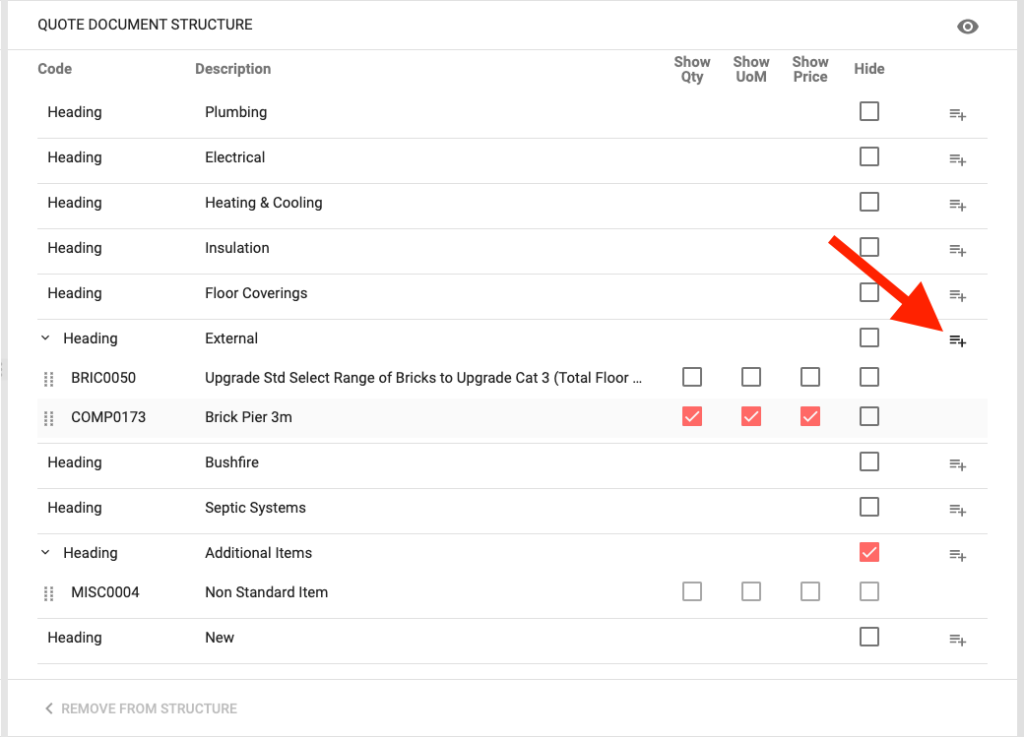
- Click RFQ Document Structure
icon to open the Set Up Quote Document Structure screen, located bottom right on the Quote Changes page.
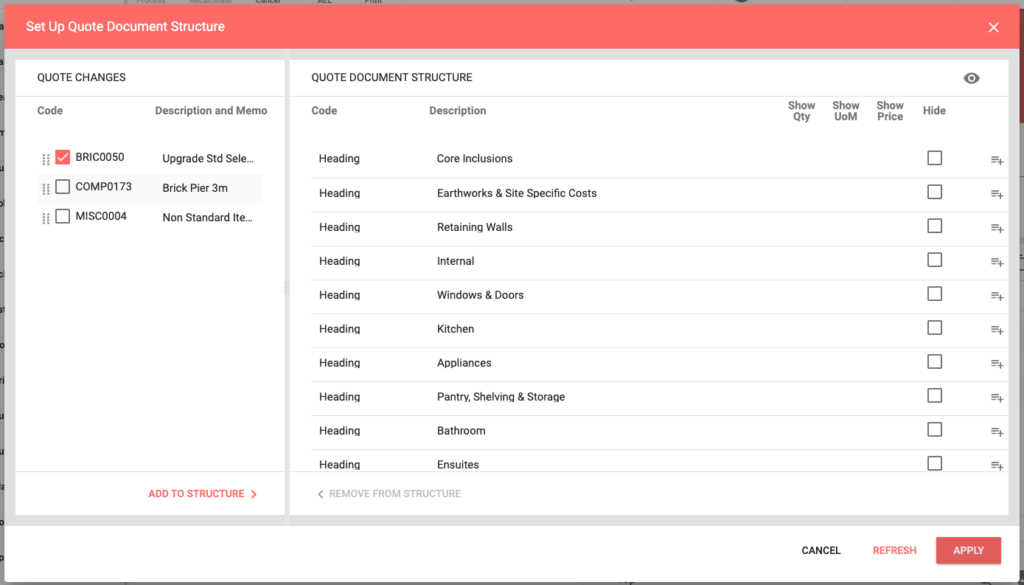
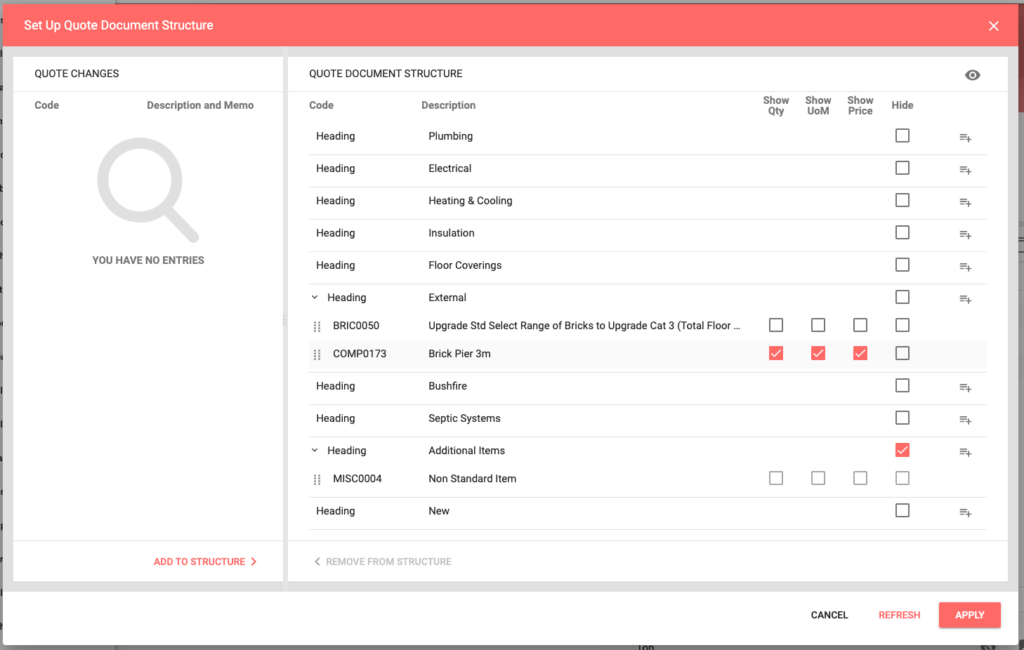
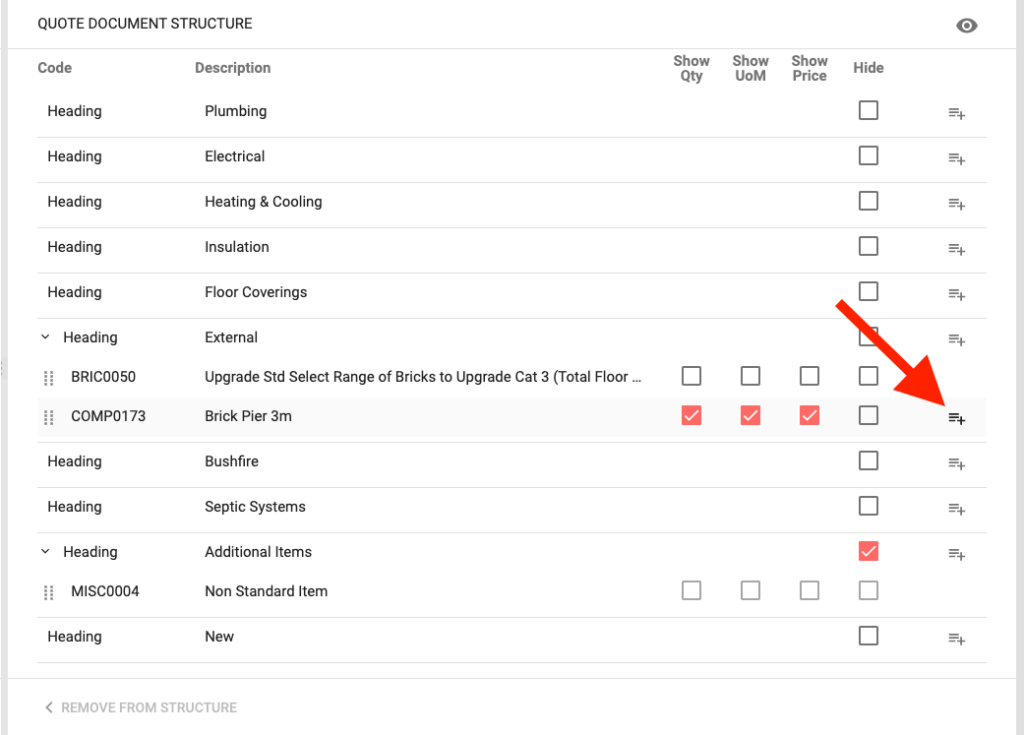
- The individual Quote Changes require adding to the appropriate Heading;
- Select the Checkboxes of the required Items and/or Components in the Quote Changes list,
- Select the appropriate Heading in the Quote Document Structure list,
- Select Add To Structure >,
– OR –
- Drag and Drop individual Items and/or Components, place the cursor over the eight vertical dots ⁞⁞ symbol to the left of the checkbox, the cursor will change to a four arrow cross
, click and hold the left mouse button and move the cursor to hover over the required Heading and release the left mouse button.
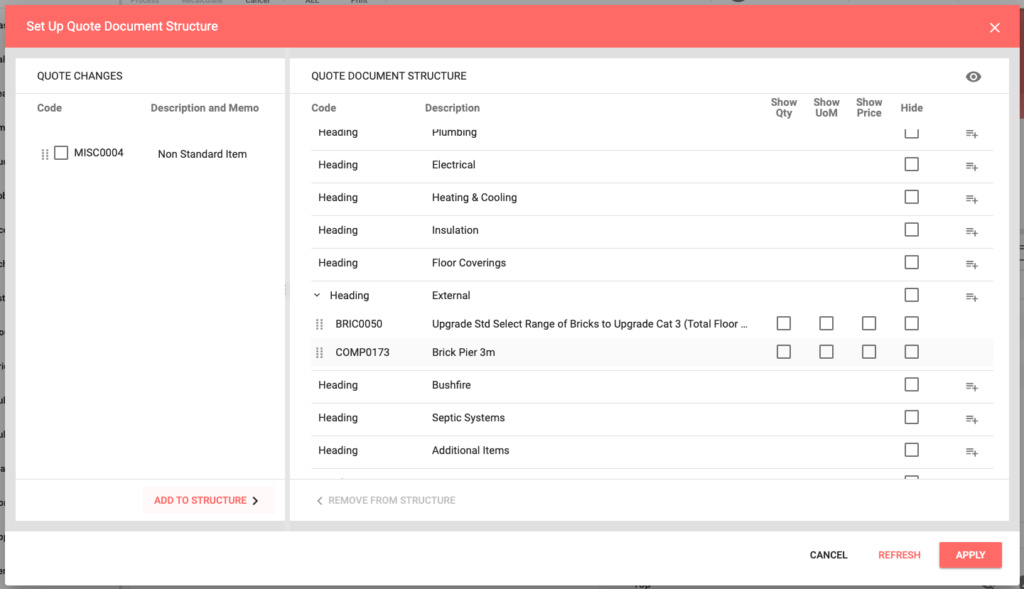
- Select the appropriate Show or Hide checkboxes for each Item and/or Component or the entire Heading;
- Show Qty – Displays the quantity value of the Item and/or Component from the Quote Changes list,
- Show UoM – Displays the Unit of Measure of the Item and/or Component from the Quote Changes list,
- Show Price – Displays the dollar value, including GST, of the Item and/or Component from the Quote Changes list,
- Hide – Hides all details of the Item and/or Component or the entire Heading from displaying on the Quotation document.
Unused Headings will not display on the Quotation document, therefore, it is unnecessary to select Hide for unused Headings.
The Show Qty, Show UoM and Show Price checkboxes will be disabled when the Hide checkbox is selected for the associated Heading or the individual Item or Component.
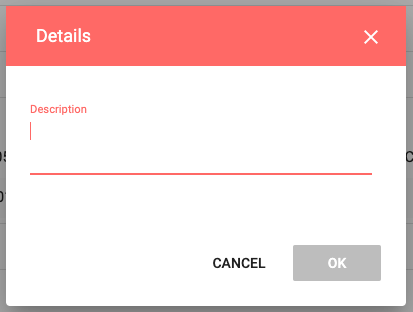
- Add detail text to Headings and/or Items and/or Components;
- Hover over the row of the required Heading or Item or Component and click the
- Type the appropriate text in the Description area,
- Click Ok.
- Hover over the row of the required Heading or Item or Component and click the
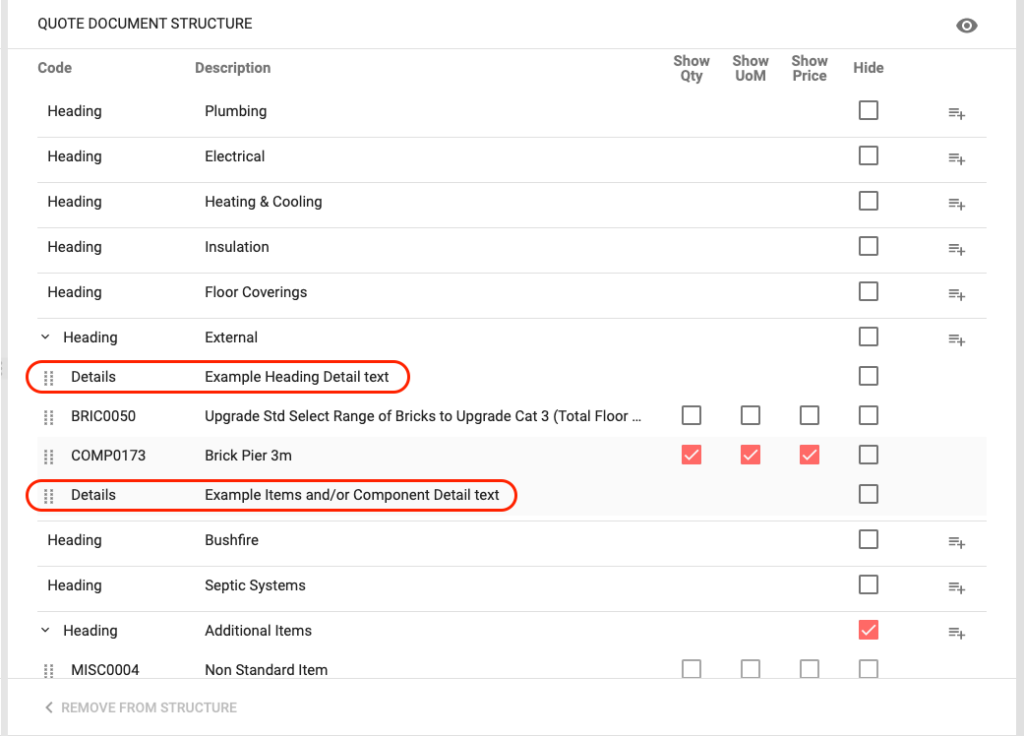
Detail Description text is displayed indented to the associated Heading or Item and/or Component on the Quotation document.
The Detail Description text can be edited, hover over the row of the required Detail Description and click
icon, located to the right on the row of the required Detail Description, edit text as required and click Ok.
The Detail Description text can be removed, hover over the row of the required Detail Description and click
icon, located to the right on the row of the required Detail Description.
- Click Preview
icon.
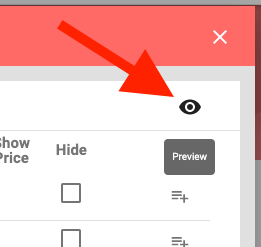
- Click the Preview Only link displayed on the Link to Preview Quote Document screen.
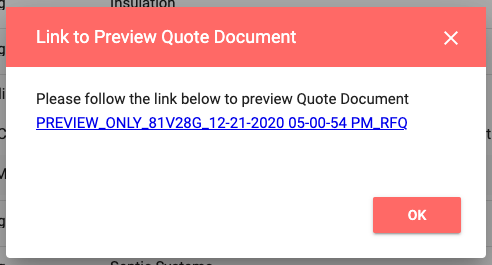
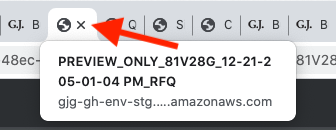
- The Quotation preview will appear on another Tab, where it can be scrutinised for accuracy and appropriateness, if required, it can be Downloaded or Printed.
- Close Preview Tab.
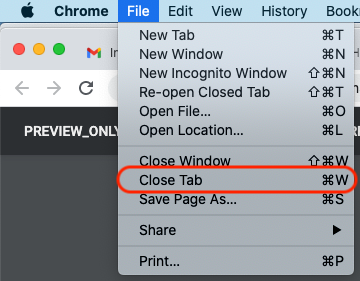
- Click on G.J. Software Tab,
- Click Ok.
- Amend if required;
- Move Items and/or Components,
- Select and/or deselect Show and/or Hide checkboxes,
- Edit and/or Add and/or Remove Details,
- Preview again.
- Click Apply.
Clicking Refresh will reset the Quote Document Structure page back to the last successful Apply or the initial Quote Document Structure screen, a warning screen will prompt ‘Would you like to save data before refreshing?’ Yes or No.
Print a Quotation
- Choose Sales > Leads.
- Search the required Lead.
- Click
- Click;
- On the Row of the required Lead to open,
– OR –
- Hover over the row of the required Lead and click the Edit icon to the right on the row of the required Lead to open.
- Click Sales Folder.
- Click RFQ Management.
- Click Quotations.
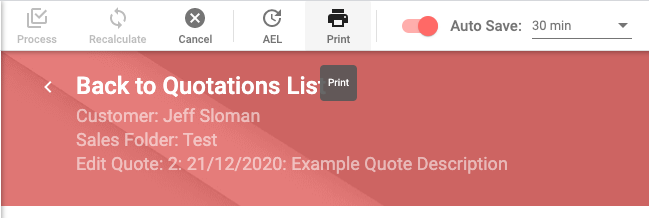
- Click Print
icon to open the RFQ Quote Filter screen, located top left on the Quote Changes page.
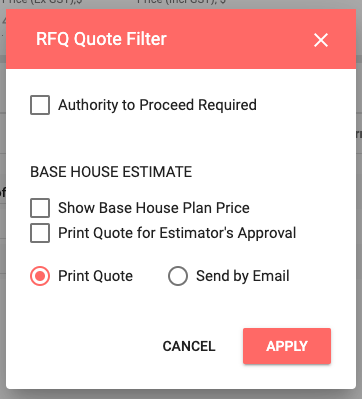
- Select the appropriate RFQ Quote Filter checkboxes;
- Authority to Proceed Required – Produce the Authority to Proceed letter to accompany the Quotation document.
- Show Base House Plan Price – Displays the price of the base house on the Quotation document.
- Print Quote for Estimator’s Approval – Produces the Quotation document;
- Displaying all RFQ Document Structure Headings and Items and/or Components, even if Hide checkbox selected,
- Displaying all RFQ Document Structure Items and/or Components;
- Show Qty, even if checkbox unselected,
- Show UoM, even if checkbox unselected,
- Show Price, even if checkbox unselected,
- Allocates a Quote number,
- Locks the Quotation from further editing.
- Select the appropriate production method;
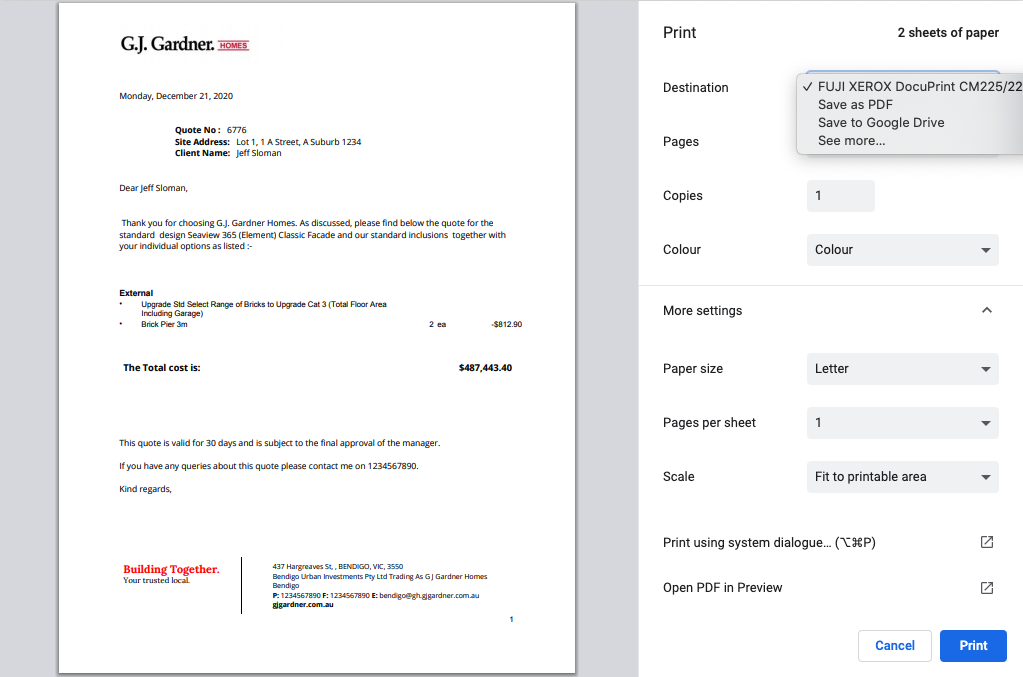
- Print Quote – Produces a Link to Print Quote Document screen;
- Click the Link to open Quote Document on another Tab (now stored in Google Drive),
- Click
icon to open another Tab,
- Click
- Select from the dropdown list, the required Destination,
- Select other appropriate options,
- Click Print.
- Print Quote – Produces a Link to Print Quote Document screen;
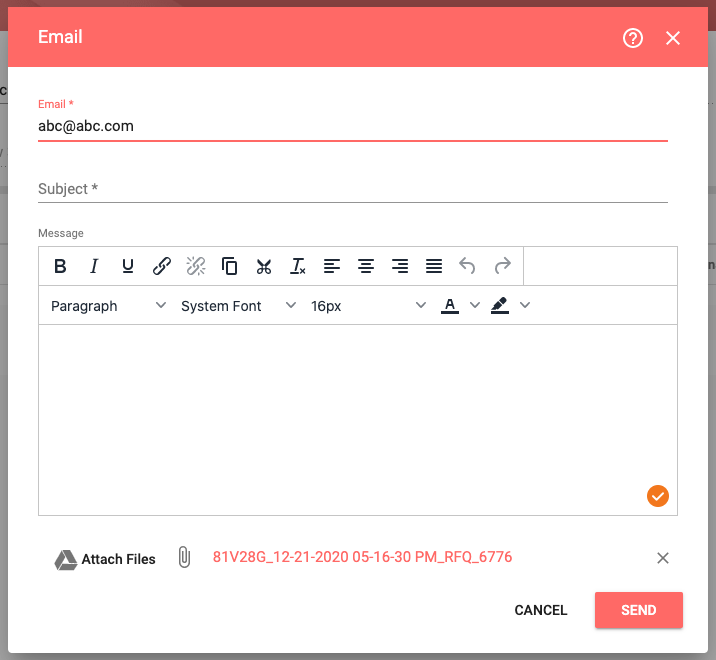
- Send by Email – Produces an Email screen;
- Check the email address and, if required, add other email addresses, separated by a semi-colon “;”,
- Type Subject text,
- Type Message text,
- Check the attached file and, if required, attach other files, click
Attach Files and select the required files from Google Drive,
- Click Send.
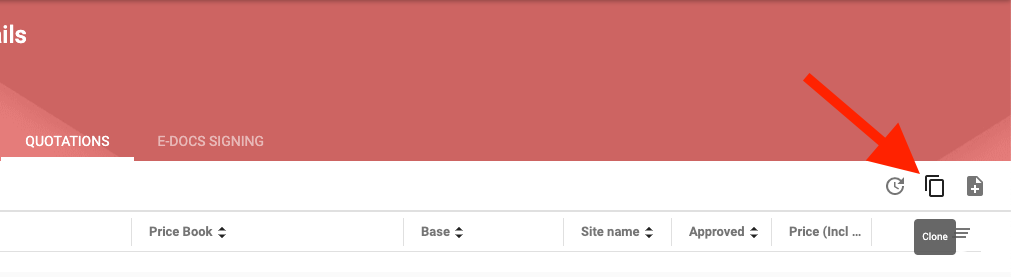
If editing a previously produced Quotation is required, where a Quote #: has been allocated, either Cloning the entire Quotation, or Cloning the Quote Changes will be necessary.
Clone a Quotation/Quote Changes
Clone a Quotation
- Choose Sales > Leads.
- Search the required Lead.
- Click
- Click;
- On the Row of the required Lead to open,
– OR –
- Hover over the row of the required Lead and click the Edit icon to the right on the row of the required Lead to open.
- Click Sales Folder.
- Click RFQ Management.
- Click Quotations.
- Click Clone
icon, located on the right-hand side above Quotations list, to open the Clone Quote screen.
- Select Customer, default is current Lead, though another Lead’s Quotation can be cloned into current Lead’s Quotation list.
- Select Sales Folder, most will only have one Sales Folder, though multiple Sales Folders can be created.
- Select the required Quotation to be cloned.
- Click Clone.
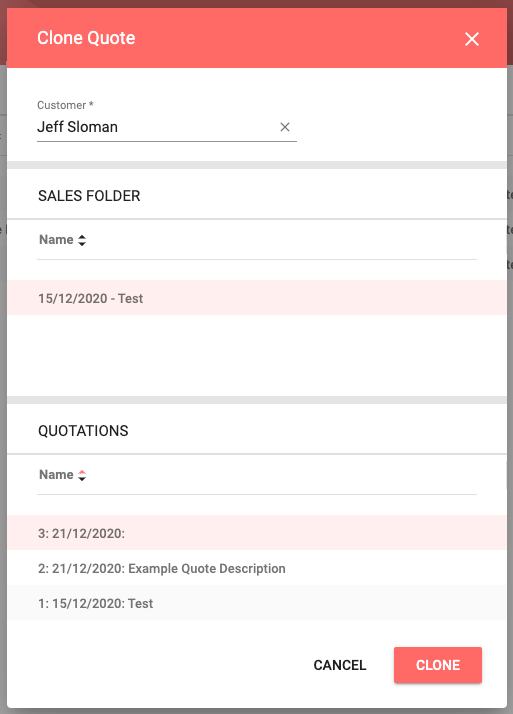
- Type a quotation Description, based on specific office format/policy.
- Select Site from dropdown list.
- Click Process.
- Amend Quote Changes as required.
Depending on the option selected in RFQ Clone Using Withdrawn Price Book Basis, located in Setup > System Variables > Sales, a warning message may be displayed, which can be managed by the User, or an error message may be displayed, preventing the User from cloning a quotation or quote changes.
Clone Quote Changes
- Choose Sales > Leads.
- Search the required Lead.
- Click
- Click;
- On the Row of the required Lead to open,
– OR –
- Hover over the row of the required Lead and click the Edit icon to the right on the row of the required Lead to open.
- Click Sales Folder.
- Click RFQ Management.
- Click Quotations.
- Select an active Quotation, one that has not been Printed or Emailed, in the instance of the Lead changing to a different level of Inclusions, where the User can clone the quote changes from another Lead’s quotation.
– OR –
- Click Create
- Click Clone
- Select Customer, default is current Lead, though another Lead’s Quote Changes can be cloned into the current Quotation.
- Select Sales Folder, most will only have one Sales Folder, though multiple Sales Folders can be created.
- Select the required Quotation that contains the required Quote Changes to be cloned.
- Click Clone.
- Amend Quote Changes as required.
- Click Process.
Any existing Quote Changes in the current Quotation, prior to cloning, will remain, so check carefully for any double-ups and/or unwanted Quote Changes.
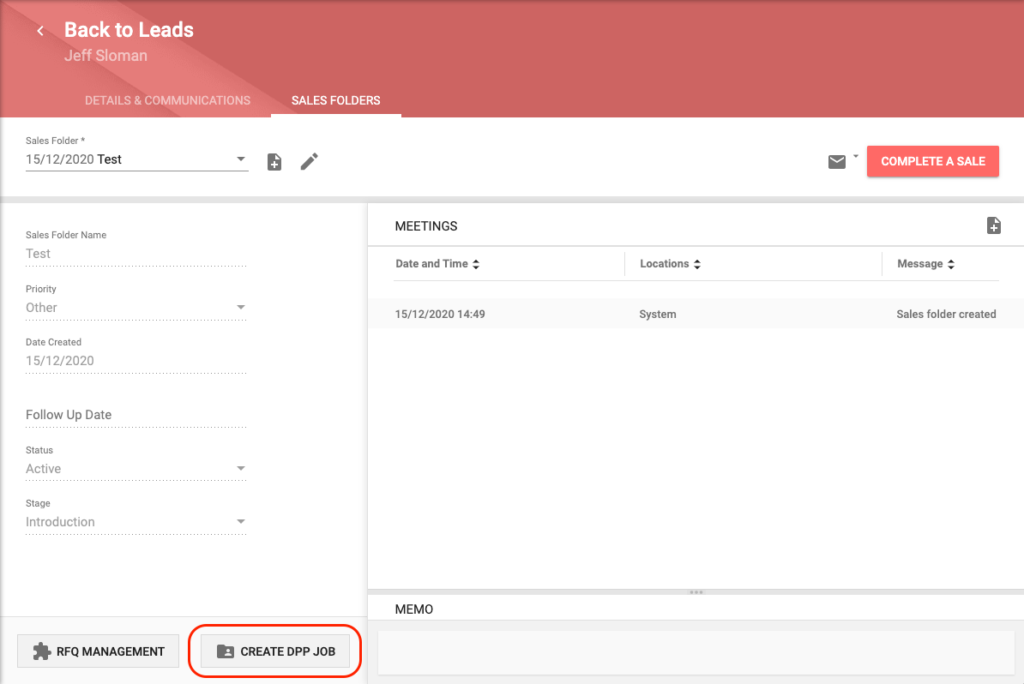
Create DPP Job
- Choose Sales > Leads.
- Search the required Lead.
- Click
- Click;
- On the Row of the required Lead to open,
– OR –
- Hover over the row of the required Lead and click the Edit icon to the right on the row of the required Lead to open.
- Click Sales Folder.
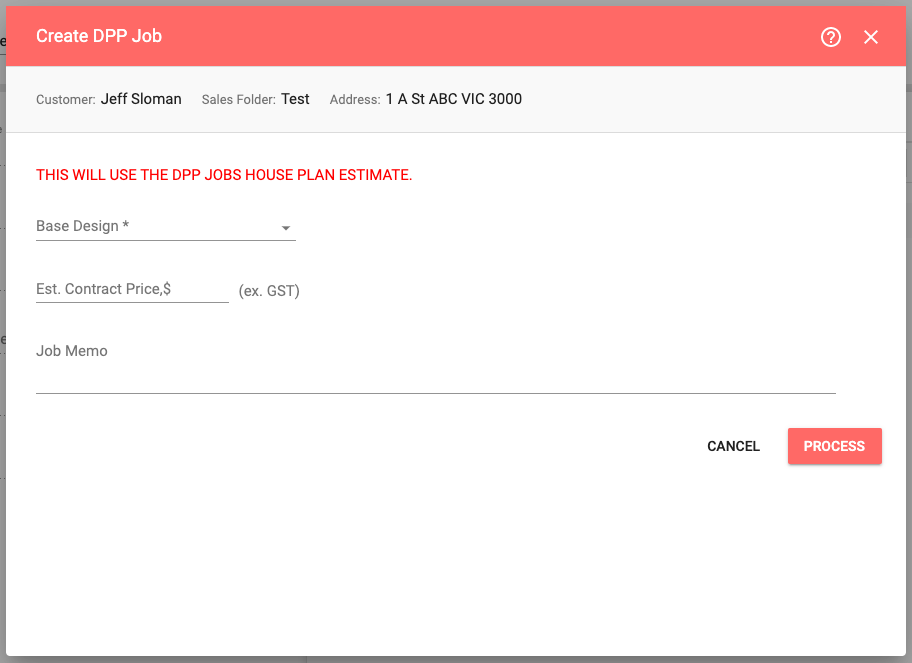
- Click Create DPP Job to open the Create DPP Job screen.
- Select Base Design from the dropdown list;
- The list of House Plans will be displayed in alphanumeric order,
- Type in Base Design the House Plan name, or part thereof, of the required House Plan to filter the list,
- Select the Row of the required House Plan.
- Type in Est. Contract Price,$ the estimated contract price amount excluding GST.
- Type in Job Memo, any details the User believes is relevant to the proposed sale, based on specific office format/policy.
- Click Process.
Approve/Unapprove a Quotation
Approve
- Choose Sales > Leads.
- Search the required Lead.
- Click
- Click;
- On the Row of the required Lead to open,
– OR –
- Hover over the row of the required Lead and click the Edit icon to the right on the row of the required Lead to open.
- Click Sales Folder.
- Click RFQ Management.
- Click Quotations.
- Select the required Quotation, one that has been allocated a Quote #:, meaning it has been Printed or Emailed.
- Scrutinise for accuracy and appropriateness.
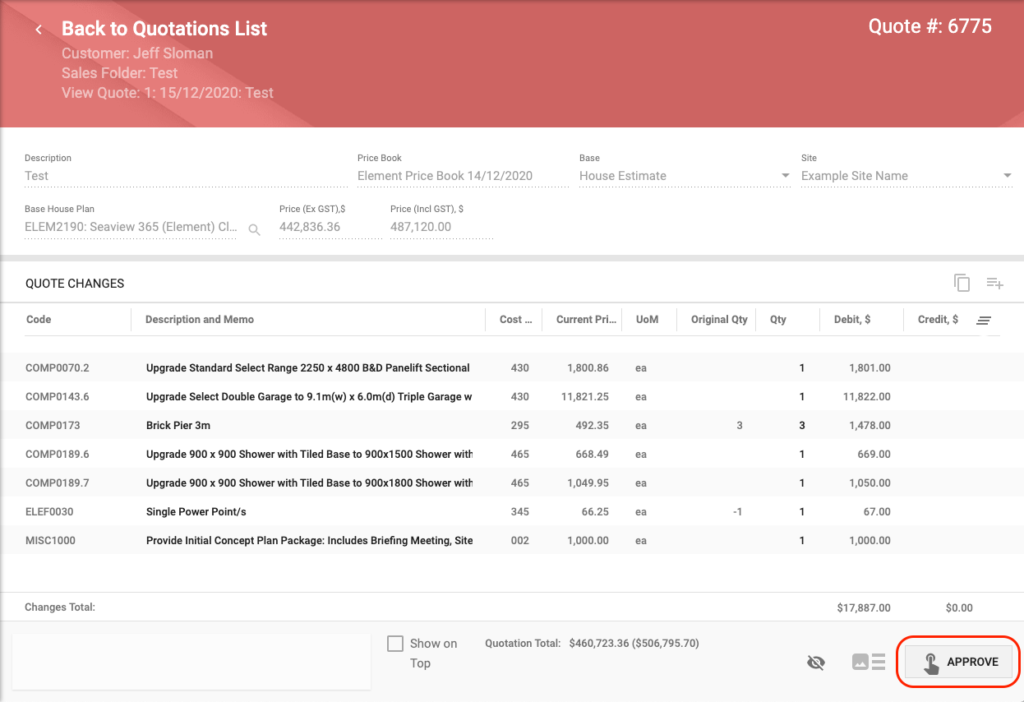
- Click Approve button, located on the lower right-hand side of the Quotation page.
Unapprove
- Choose Sales > Leads.
- Search the required Lead.
- Click
- Click;
- On the Row of the required Lead to open,
– OR –
- Hover over the row of the required Lead and click the Edit icon to the right on the row of the required Lead to open.
- Click Sales Folder.
- Click RFQ Management.
- Click Quotations.
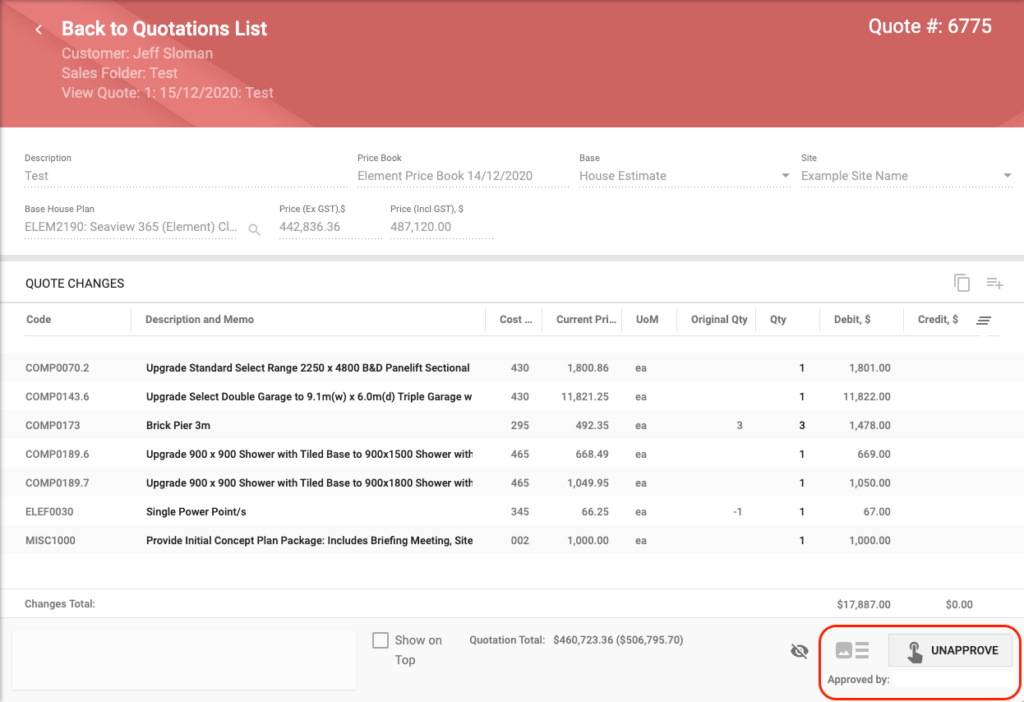
- Select the required Approved Quotation, one that has been marked with a tick ✓ in the Approved column.
- Click Unapprove button, located on the lower right-hand side of the Quotation page.
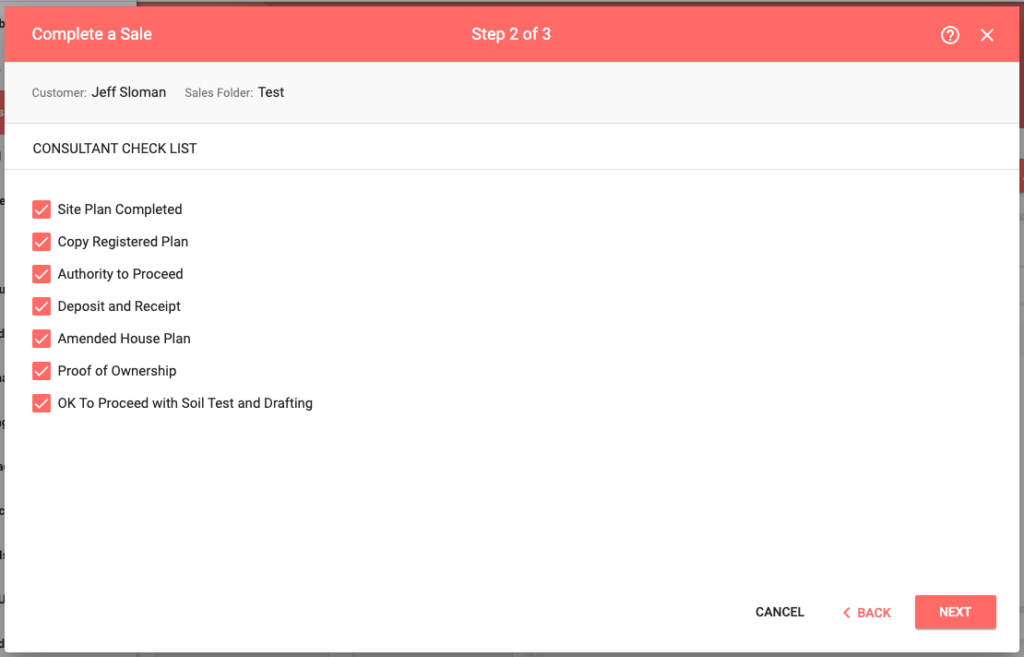
Complete a Sale
- Choose Sales > Leads.
- Search the required Lead.
- Click
- Click;
- On the Row of the required Lead to open,
– OR –
- Hover over the row of the required Lead and click the Edit icon to the right on the row of the required Lead to open.
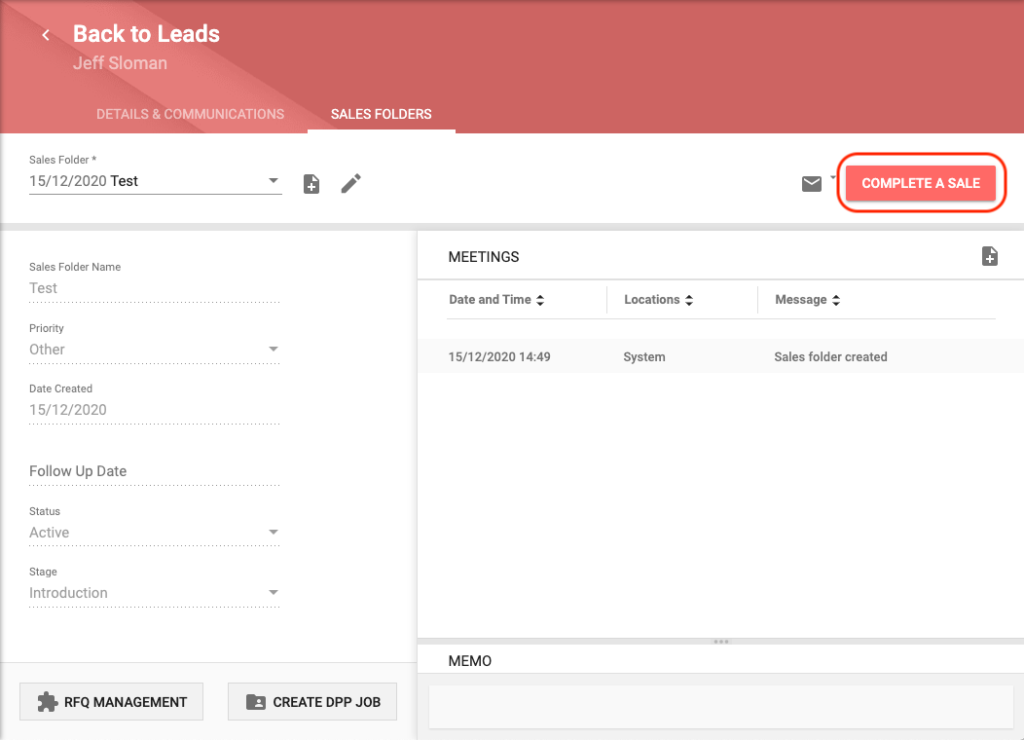
- Click Sales Folder.
- Check and amend, if required, the Site details;
- Site Address,
- Inspected on date,
- Status of all the inspected site parameters.
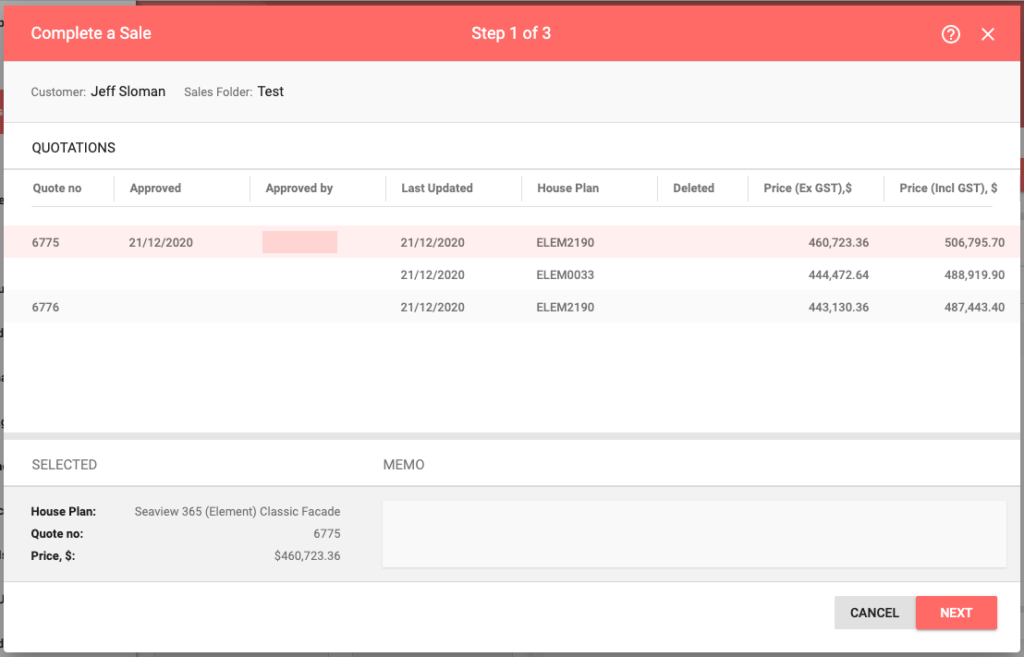
- Click Complete a Sale to open the Complete a Sale screen.
- Click to highlight the correct Approved Quotation.
- Click Next.
- Select all checkboxes in the Consultant Check List.
- Click Next.
- Check and amend, if required, the House Plan Description.
- Select Base Design from the dropdown list;
- The list of House Plans will be displayed in alphanumeric order,
- Type in Base Design the House Plan name, or part thereof, of the required House Plan to filter the list,
- Select the Row of the required House Plan.
- Type in Job Memo, any details the User believes is relevant to the Completed Sale, based on specific office format/policy.
- Click Process.

Typo error see below
Print Quote for Estimator’s Approval – Produces the Quotation document;
Displaying all RFQ DoTcument Structure Headings and Items and/or Components, even if Hide checkbox selected,
Thanks Greg! This has been updated.
not much to comment pretty self explanatory
Great to have this resource
this is a great resource to have available
Made it very clear on how the process is.
Good tool to refer if required
good resource