
Construction Schedule Templates contains a list of tasks that are grouped around Cost Centers. You can further add tasks into them, manage dependencies of tasks, and see the visual distribution of tasks on the timeline of the Gantt chart.
Managing Tasks on the Gantt Chart
You can manage Tasks of the Construction Schedule Template on the Gantt Chart.
Below the list with Tasks (Cost Centers), locate the Gantt Chart button and click it.
The page with the Gantt Chart opens, as follows:
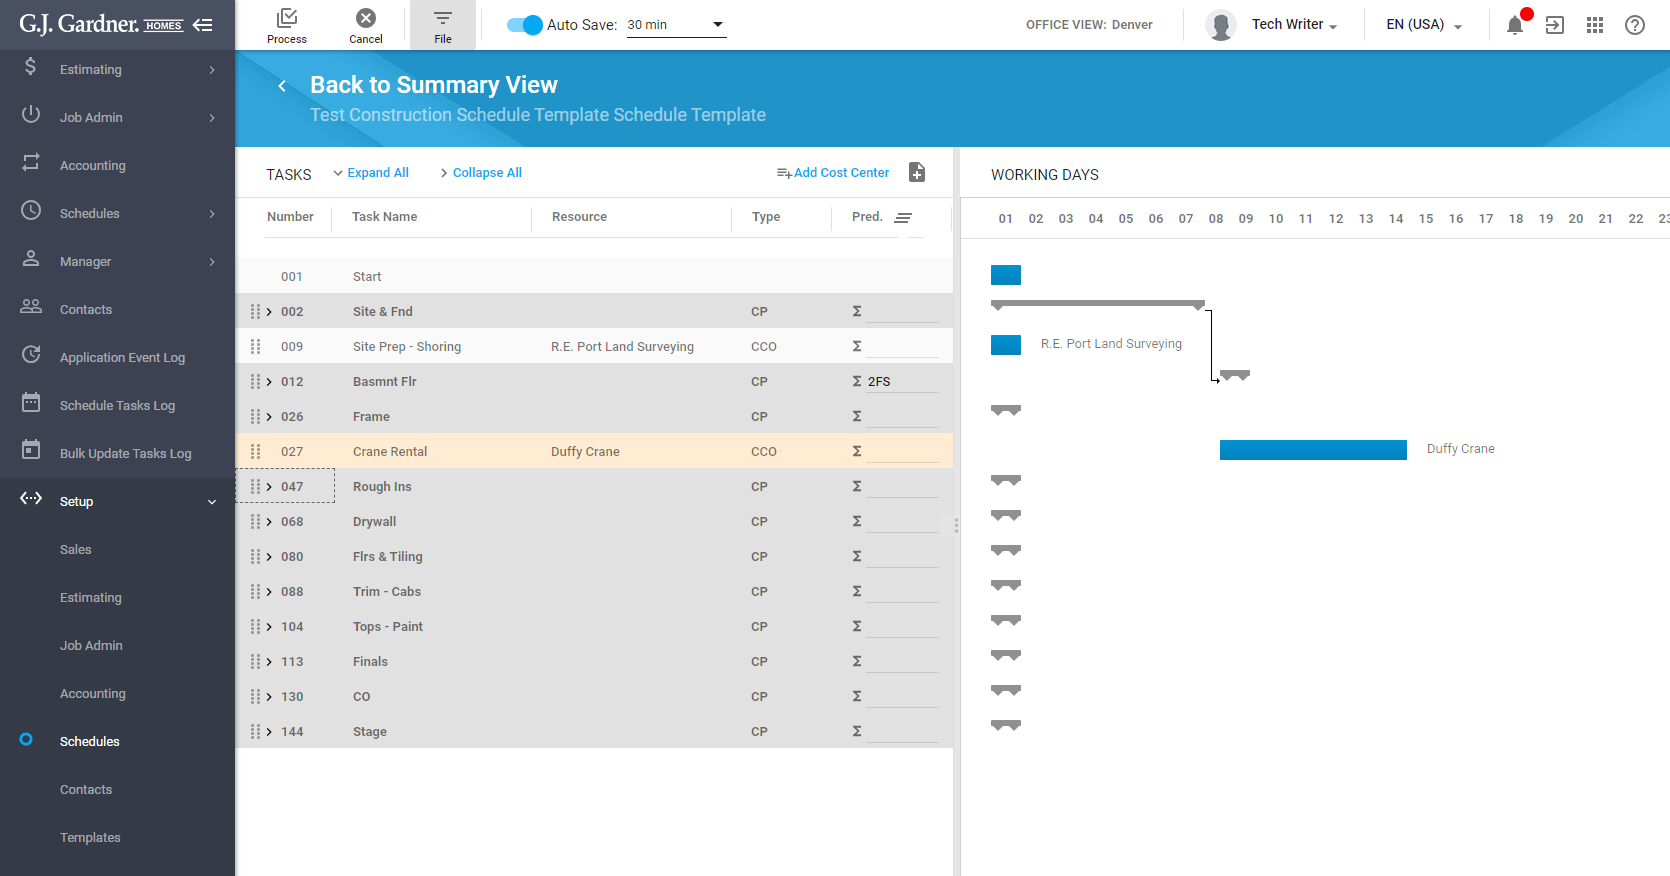
Here you can see that the page is divided into two parts. The left part accommodates the list of Tasks (Cost Centers), the right part accommodates the Gantt Chart for planning the construction activities and their distribution across the timeline.
The Tasks list shows the list of tasks grouped within the Critical Path stages. To view tasks within a specific stage, you can expand it by clicking the icon.
For each task on the list, the following information is displayed:
| Number | Ordinal number of the Task on the list. The system assigns it automatically. |
| Task Name | Name of the Task. |
| Resource | Supplier or Contractor who can provide a specific service for Task completion. |
| Type | Type of the task:
|
| Pred. | Number of the task which is a predecessor for the current task.
The parameter in the Pred. column can take one or a combination of the following values:
|
| Duration | Planned duration of the task in days. |
| Notes | Notes about the task. |
Managing Tasks in the Construction Schedule Template
The Tasks list shows the hierarchy of all tasks that should be completed for successful completion of the Job.
By default, the hierarchy of tasks is taken from the Construction Critical Path with all the Cost Centers mapped to each stage of this Critical Path.
You can modify this structure and add new tasks, as well as sub-tasks within it.
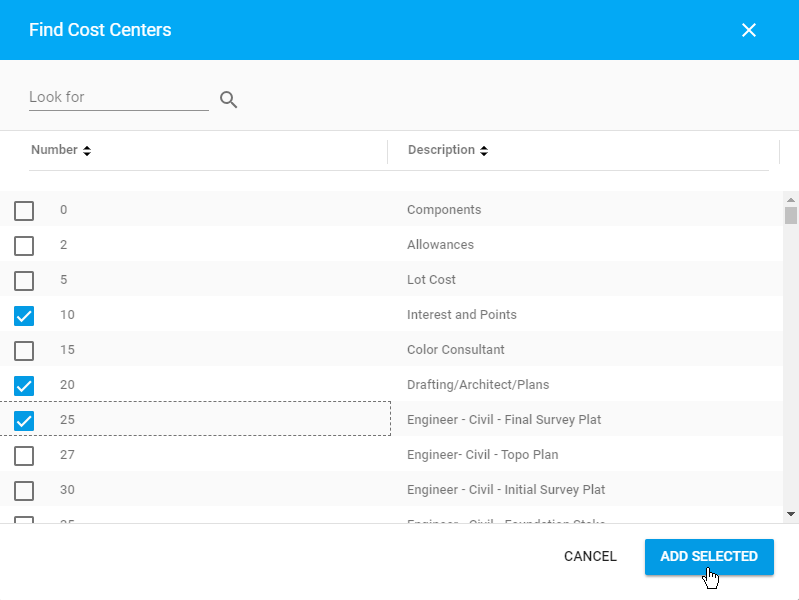
To add a Cost Center into the Tasks list:
- Above the Tasks list, locate the Add Cost Center button and click it.
- In the Find Cost Centers form, select one or multiple Cost Centers for adding them into the Tasks list.
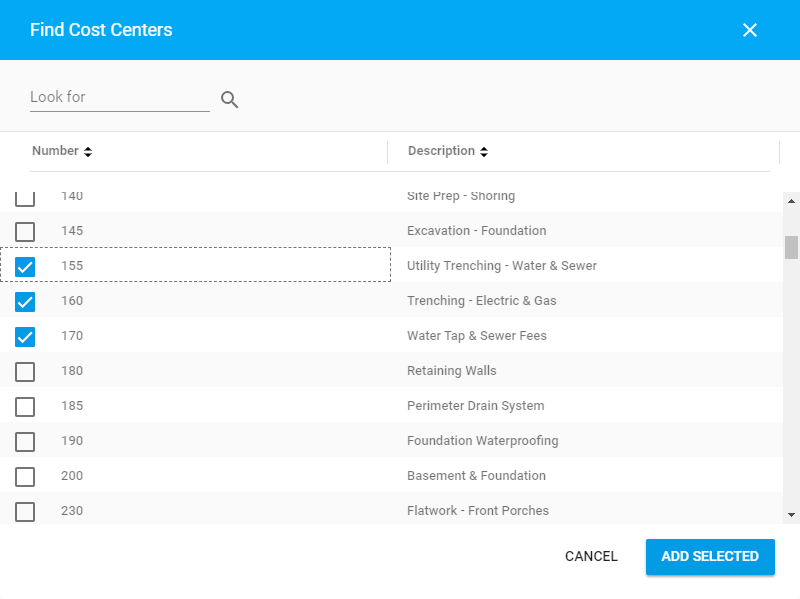
- Click Add Selected. The selected tasks will appear on the Tasks list.
- When complete, click Process.
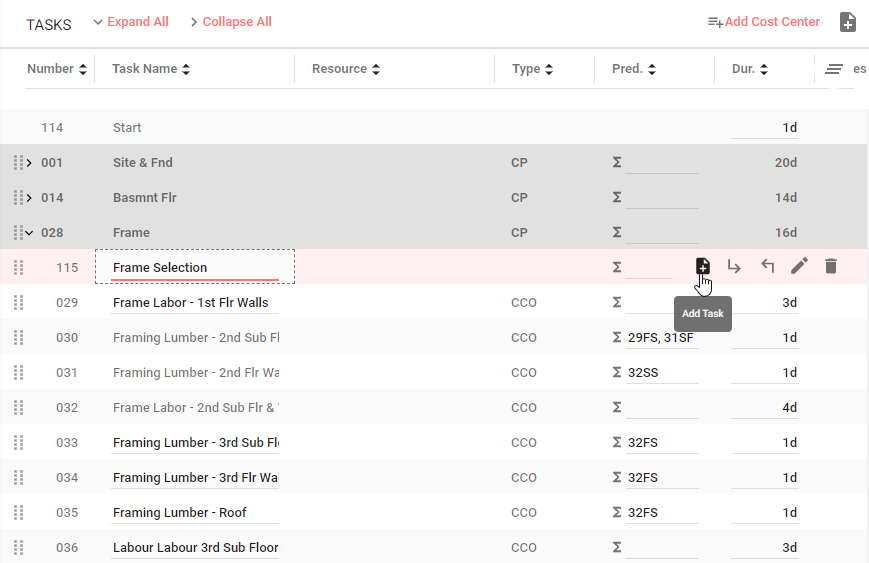
To add a new Task:
- Hover over the Critical Path Stage or Cost Center, until the action icons appear.
- Click the Add Task
 icon.
icon. - A new row with the generic task name appears on the list.
- Double-click the row and enter the task name.
- When complete, click Process.
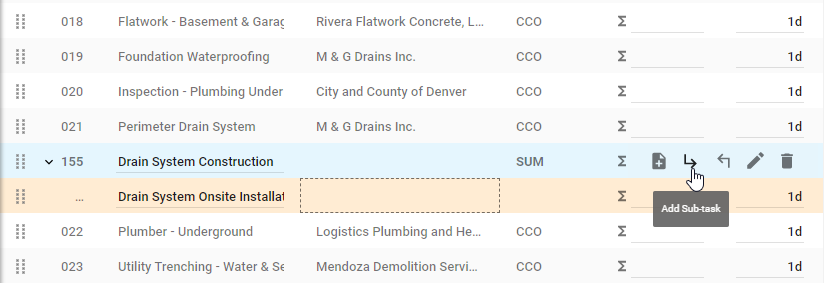
To add a new Sub-Task:
You can add sub-tasks for generic tasks and Critical Path Stages, but you cannot add sub-tasks for Cost Centers.
- On the list with tasks, locate the Critical Path Stage or generic task, which you want to add a sub-task for.
- Hover over it until the action icons appear.
- Hover over this task until the action icons appear.
- Click the Add Sub-task
 icon.
icon. - Enter the name for a new sub-task.
- When complete, click Process.
Note
You cannot create a sub-task for the Critical Path Stage labeled as ‘Start’.
To edit the task:
The editing of tasks allows you to update the name of generic tasks that appear in the Template and in Job Schedules created on its basis. Additionally, you can modify ancestors and predecessors of tasks, as well as their duration.
- On the list with tasks, locate the one you want to edit.
- Hover over it until the action icons appear.
- Click the Edit
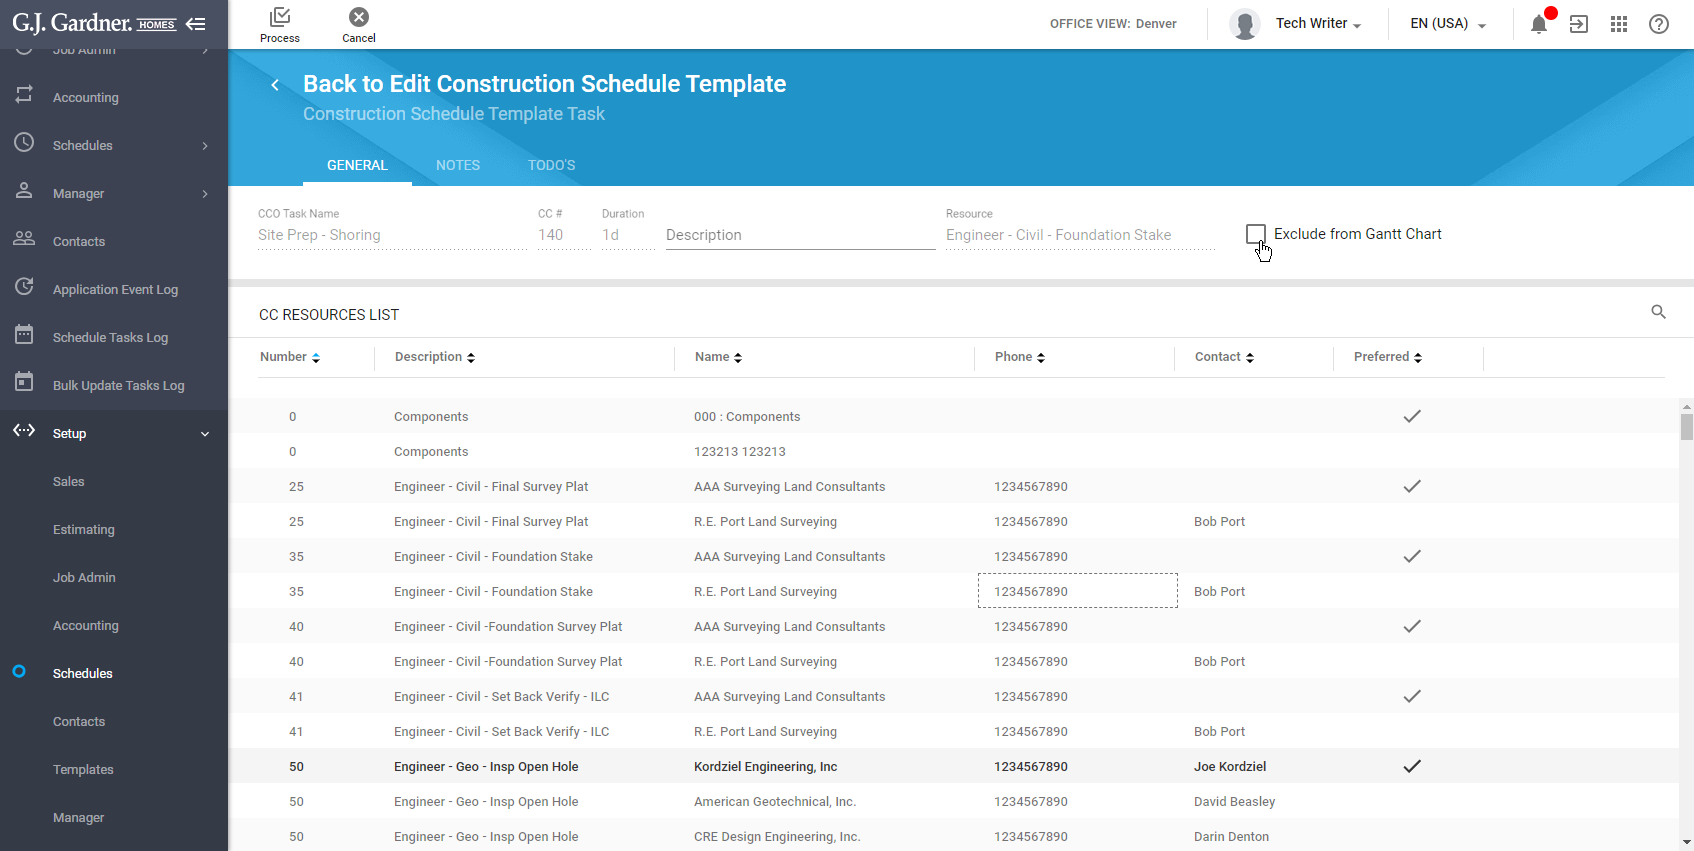
 icon. The Construction Schedule Template Task page opens, as follows:
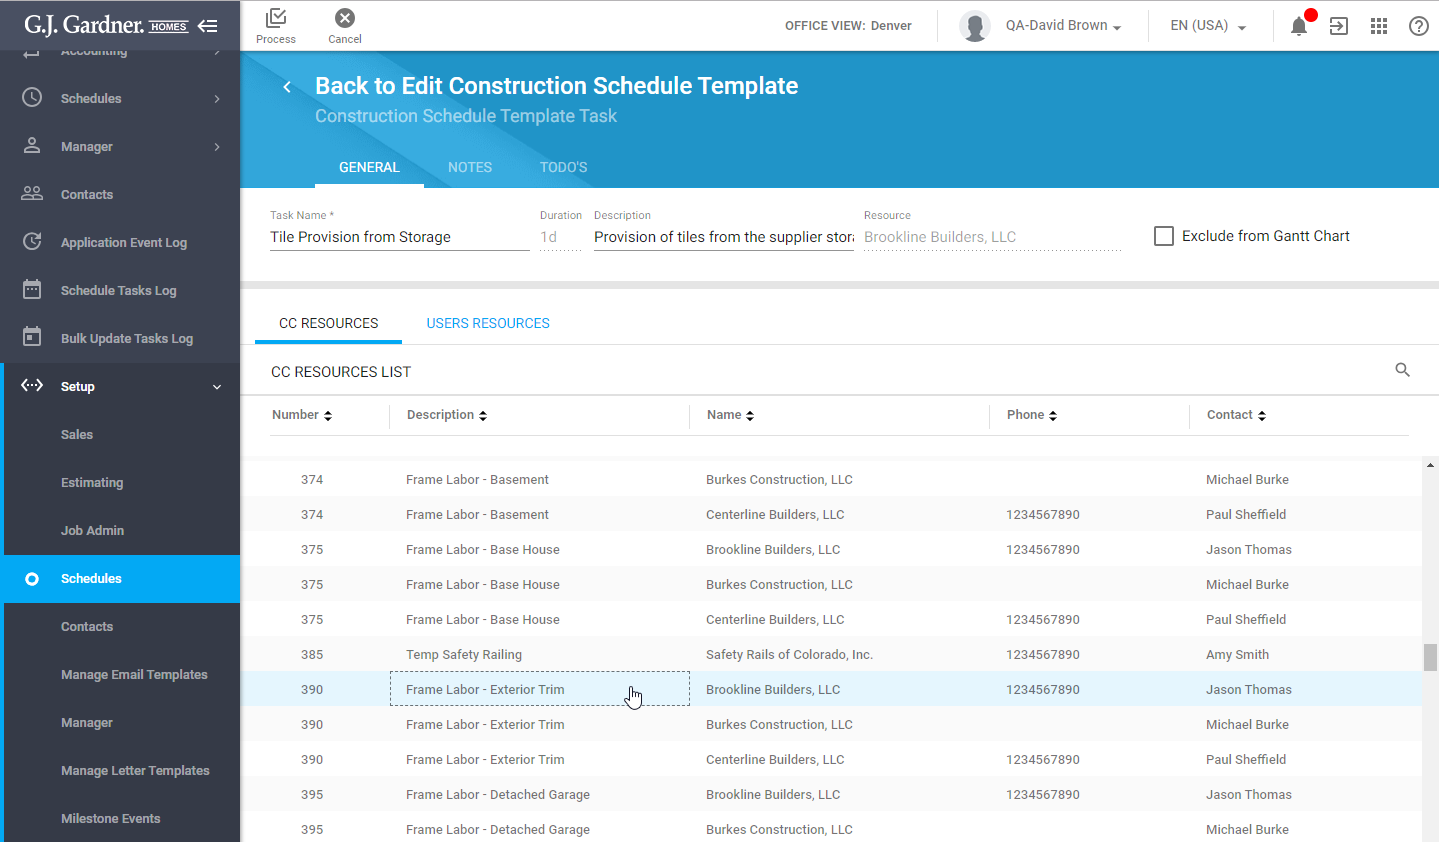
The page includes three tabs, as follows:
| General | Shows the generic information about the Task and allows you to select the Supplier (from existing Cost Centers) or User resources that can be used for executing this task. |
| Notes | Shows the list of notes about the task. |
| ToDo’s | Shows the list of ToDo tasks within the Task. |
To edit general information about the task:
| Task Name | Enter the task name to update the current name. |
| Description | Enter or update description of the existing Task. |
| Resource | On the CC Resources or Users Resources tabs, select the Supplier or User who can perform this task. The selected record appears in the field. |
| Exclude from Gantt Chart | Check the box to stop showing the task on the Gantt Chart. |
To add notes for the Task:
- Switch to the Notes tab.
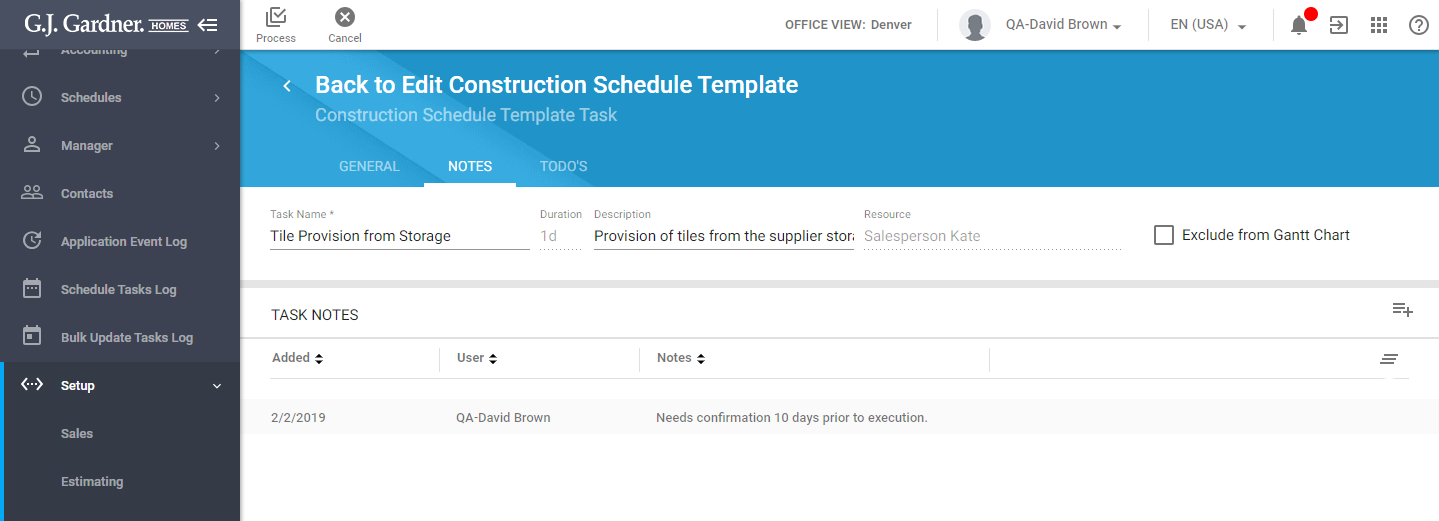
- Click the Add
 icon.
icon. - In the Add Note form, enter the note for the task.
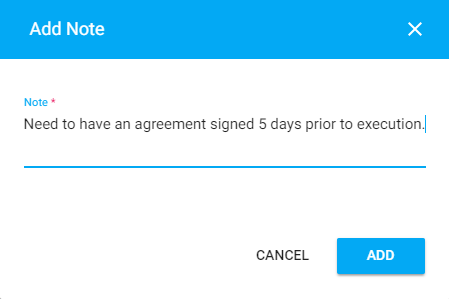
- Click Add.
To edit the note:
- Hover over the note you want to edit.
- Click the Edit icon.
- In the Edit Note form, update the note description.
- When complete, click Save.
To delete the note:
- Hover over the note you want to delete.
- Click the Delete
 icon.
icon. - Confirm the removal of the note.
- When complete, click Save.
To add ToDo task:
- Switch to the ToDo’s tab.
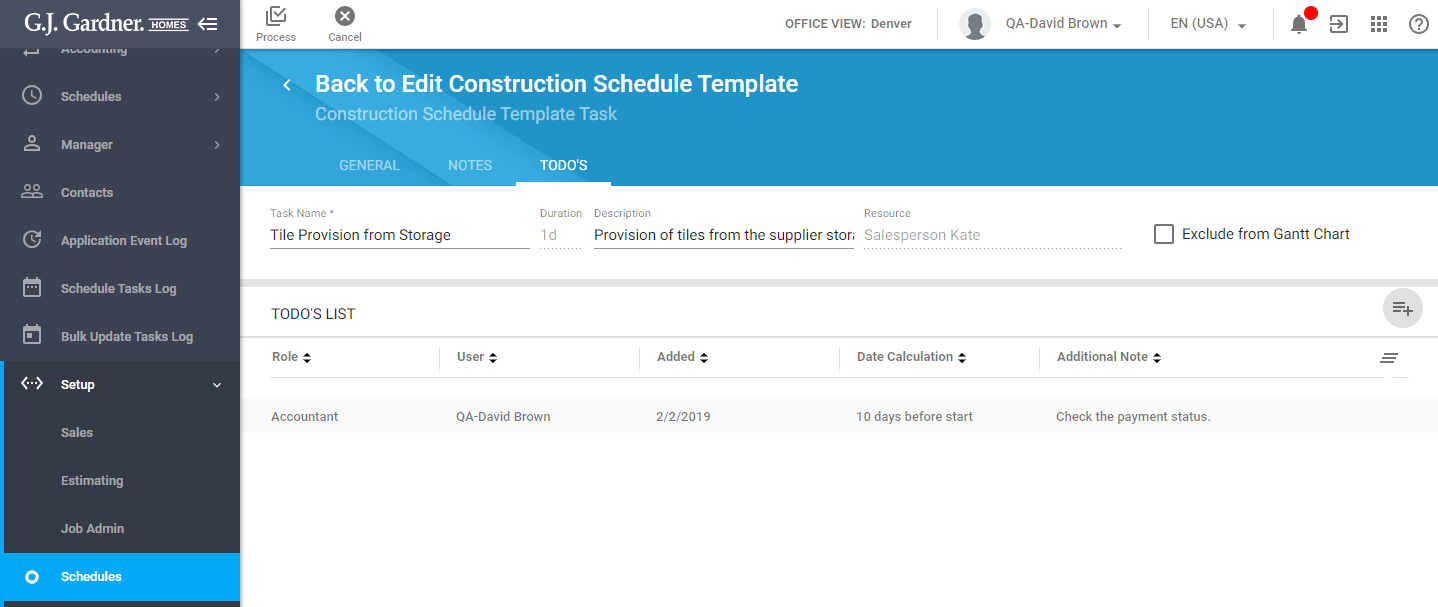
- Click the Add icon.
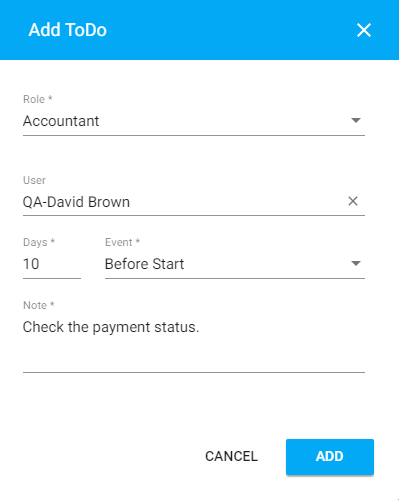
- In the Add ToDo form, enter specify information about the ToDo task, as follows:
Role Select the system role which the ToDo task is created for. User Select the user who the ToDo task is assigned to. Days … Event Enter the number of days and select the condition for the ToDo task execution. Note Enter the note for the ToDo task. - When complete, click Add.
To edit the ToDo task:
- Hover over the ToDo task you want to edit.
- Click the Edit icon.
- In the Edit ToDo form, update the ToDo task description.
- When complete, click Save.
To delete the ToDo task:
- Hover over the ToDo task you want to delete.
- Click the Delete icon.
- Confirm the removal of the ToDo task.
To save modifications for the Task, click Process.
To delete Tasks and Sub-tasks:
You can delete the Tasks and Sub-Tasks that you added for Critical Path Stages and Cost Centers.
- On the list with tasks, locate the task or sub-task you want to delete.
- Hover over it until the action icons appear.
- Click the Delete icon.
- Confirm the removal of the task or sub-task.
- When complete, click Process.
Note
You cannot delete the first task labeled as ‘Start’.
To convert the sub-task into the task:
You can convert the existing sub-task into a generic task.
- On the list with tasks, locate the sub-task you want to convert into a task.
- Hover over the sub-task until the action icons appear.
- Click the Not sub-task
 icon.
icon. - When complete, click Process.
The sub-task will be moved one level up. If you were using the multi-level hierarchy of tasks, you may need to repeat the same procedure once more.
To manage order of tasks on the Tasks list:
You can change order of elements on the Tasks list. You can change order of all task types that you have. Please consider the following while re-ordering tasks:
- You can only re-order Critical Path stages within the same level of hierarchy.
- You can re-order Cost Centers within the same Critical Path Stages and you can move them from one Critical Path Stage to another if both stages are expanded.
- You can re-order Tasks within the same Cost Center and you can move them to another Critical Path Stage.
- You can re-order Sub-Tasks within the same and move them to another Critical Path Stage as a Task.
- On the list with tasks, locate the task which position on the list you want to change.
- Drag the
 part of the row to the appropriate position on the list.
 - When complete, click Process.
Note
You cannot change position of the first task labeled as ‘Start’. It should be always at the top of the list of tasks.
To expand all Tasks on the Tasks list:
Above the Tasks list, locate the Expand all button and click it. All the Tasks within the Critical Path stages will be expanded.
To collapse all Tasks on the Tasks list:
Above the Tasks list, locate the Collapse all button and click it. All the Tasks within the Critical Path stages will be collapsed.
Managing Tasks on the Gantt Chart
You can manage tasks within the Schedule Template on the Gantt Chart. This is a quick and efficient way to estimate the overall duration of all tasks in the Schedule Template and trace dependencies between tasks. So that you can see how the increase in duration of one task impacts other tasks and the overall duration in general.
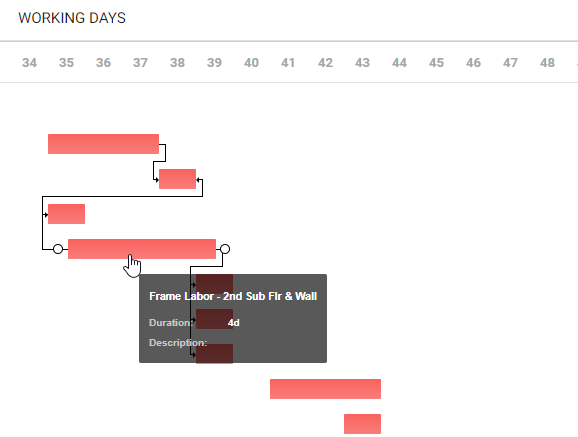
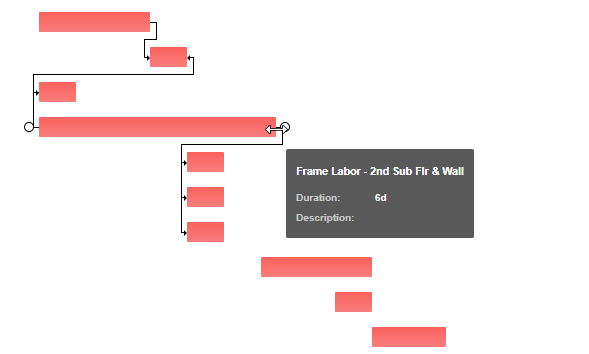
Each Cost Center, task and sub-task represents an activity which is shown on the Gantt Chart as an activity bar. By default, duration of each activity equals one day and all activities start from the same day. The Critical Path Stage is shown as progress activity bar on the Gantt Chart. Its length is determined automatically from the scope of all tasks within this stage.
All the activities are distributed through the timescale. You can regulate positions of activity bars on the timescale and adjust duration of tasks.
To adjust the position of the activity bar on the timescale:
- Hover over the activity bar which position on the timescale you want to adjust.
- Drag the activity bar across the timescale.
- When complete, click Process.
You can also adjust the position of the Critical Path stage on the timescale. When you change the position of the Critical Path stage, all the Tasks within are also moved with the stage.
To adjust the duration of the Task:
- Hover over the activity bar which duration you want to increase or decrease. Once you hover, close to the left and right edges of the activity bar the circles appear.
- Drag the left-side or right-side circle to adjust the duration of the Tab. When you drag the circle, you can see how duration of the activity is changing in the tooltip.
- When complete, click Process.
Duration of the Critical Path stage is calculated automatically by the system on the basis of all Tasks within this stage. You cannot adjust duration of the Critical Path stage.
To manage dependencies between Tasks or Stages:
You can manage dependencies between Tasks and in this way indicate that some task can be started only when a specific task is completed or starts.
- Hover over the activity bar which you want to set the dependency for. Once you hover, close to the left and right edges of the activity bar the circles appear.
- Drag the line from the one activity bar to the circle of the other activity bar. The dependency line appears between the two activity bars.
- When complete, click Process.
You can also set dependencies between Critical Path stages in the way similar to setting dependencies between Tasks. You can set dependencies between Tasks from difference Critical Path stages too.

Consider the following relationship types between the two activities (Tasks):
| FS (Finish to Start) | A predecessor task must finish before a successor task can start.
To define this relationship type: Drag the arrow from the right edge of a predecessor task to the left edge of a successor task. When FS type is set, a successor task starts from the finish point of a predecessor task. |
| SS (Start to Start) | A predecessor task must start before a successor task can start.
To define this relationship type: Drag the arrow from the left edge of a predecessor task to the left edge of a successor task. When SS type is set, a successor task starts from the start point of a predecessor task. |
| FF (Finish to Finish) | A predecessor task must finish before a successor task can finish.
To define this relationship type: Drag the arrow from the right edge of a predecessor task to the right edge of a successor task. When FF type is set, a successor task finishes at the finish point of a predecessor task. |
| SF (Start to Finish) | A predecessor task must start before a successor task can finish.
To define this relationship type: Drag the arrow from the left edge of a predecessor task to the right edge of a successor task. When SF type is set, a successor task finishes at the start point of a predecessor task. |
Instead of dragging lines from one activity bar to the other, you can just enter the appropriate number of the task and relationship type into the field.
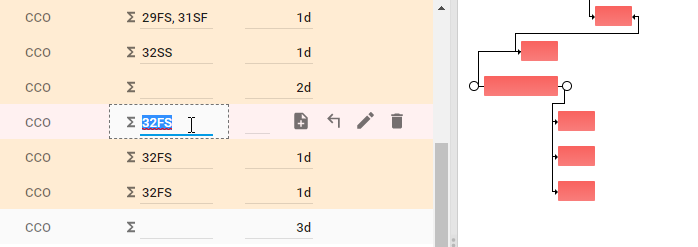
You can add multiple relationships between activity bars, in this case several values will be displayed in the field labeled as ∑.
To delete the no longer needed relationship between activity bars, clear the value in the field labeled as ∑ for a specific task.
To manually enter a predecessor task and its connection type:
- Double-click the text field (with the ∑ label) and enter the number of a predecessor task and a connection type (for example, 16SS where 16 is a number of a predecessor task and SS is a Start to Start connection type).
- When complete, press Enter.
You can add multiple predecessor tasks and define delays between a specific task and other tasks on the timeline.
- On the list with Tasks, locate the one which you want to add predecessor tasks for.
- Click the Add predecessors
 icon.
icon. - In the Predecessor Kit for a Task Name form, define the following information about a predecessor task:
Predecessor Select a predecessor task from the ones registered in the current schedule template. Relationship Select the relationship type from the following ones: - Finish to Start
- Start to Start
- Finish to Finish
- Start to Finish
Delay Select the delay or overlap in the relationship between tasks, as follows: ‘+’ = Delay
A successor task starts some days after the end of a predecessor task.
‘-‘ = Overlap
A successor task starts some days prior to the end of a predecessor task. In this case, a successor task overlaps a predecessor task.
Days The number of days a successor task starts before/after the end/start of a predecessor task. 
- When complete, click Apply.
- Click Process.
The specified delay and overlap values will be shown as lags when you hover over a relationship arrow on the Gantt Chart.
Manage Tasks in Construction Schedule Templates
Adding Cost Centers into the Construction Schedule Template
- Above the top right part of the Tasks list, click Add Cost Center.
- In the Find Cost Centers form, locate Cost Centers you want to add and select them.
- Click Add Selected.
Editing Cost Centers in the Construction Schedule Template
While Editing Cost Centers in the Schedule Template, you can perform the following actions:
- exclude specific Tasks (Cost Centers) from Gantt Chart
- manage notes for Tasks
- manage quick To Do tasks
Excluding Tasks (Cost Centers) from Gantt Chart
- On the General tab, locate the Cost Center you want to exclude from Gantt Chart.
- Check the Exclude from Gantt Chart box.
- When complete, click Process.
Managing Task Notes
You can add task notes for a specific Cost Center Task.
- Switch to the Notes tab.
- Click the Add
 icon.
icon. - In the Add Note form, enter a note.

- Click Add.
- When complete, click Process.
To edit the existing note:
- On the list with task notes, locate the one you want to edit.
- Hover over the note until the action icons appear.
- Click the Edit icon.
- In the Edit Note form, update the note.
- Click Save.
- When complete, click Process.
To delete the existing note:
- On the list with task notes, locate the one you want to delete.
- Hover over the note until the action icons appear.
- Click the Delete icon.
- Confirm the removal of the note.
- When complete, click Process.
Managing To Do Tasks
You can add To Do tasks for a specific Cost Center.
- Switch to the ToDo’s tab.
- Click the Add icon.
- In the Add ToDo form, enter information for a ToDo task:
Role Select the Role which this ToDo task relates to. User Select the User who this ToDo task is assigned to.(Not Required, so if you want this to go to the assigned User in Selected Role, leave this Blank). Days Enter the number of days. Event Select the option for event: - Before Start
- After Start
- Before End
- After End
- After Complete
Note Enter a note for a task. 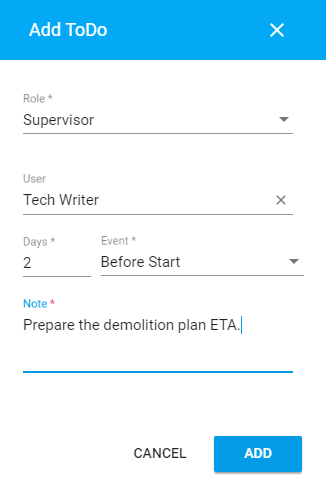
- Click Add.
- When complete, click Process.
To edit the existing ToDo task:
- On the list with ToDo tasks, locate the one you want to edit.
- Hover over the ToDo task until the action icons appear.
- Click the Edit icon.
- In the Edit ToDo form, update the ToDo task.
- Click Edit.
- When complete, click Process.
To delete the existing ToDo task:
- On the list with ToDo tasks, locate the one you want to delete.
- Hover over the ToDo task until the action icons appear.
- Click the Delete icon.
- Confirm the removal of the ToDo task.
- When complete, click Process.
Excluding Tasks (Cost Centers) on the Gantt Chart
- On the list with Tasks (Cost Centers), locate the task you want to exclude from showing on the Gantt chart.
- In the Excl column, check the box for the Task.
- When complete, click Process.
Marking Task (Cost Center) to Show on Supervisor Schedule Report
You can mark specific tasks to be shown in the Supervisor Schedule Report once a Schedule is created from the Schedule Template.
- On the list with Tasks (Cost Centers), locate the one you want to add to the Supervisor Schedule Report..
- In the Supvsr column, check the box for the Task.
- When complete, click Process.